
Highlight
配件的设置体验一直是痛点。之前的流程需要用户授权蓝牙权限、可能还要加入配件的 Wi-Fi 热点、再进行蓝牙配对——每一步都是一道摩擦。iOS 18 的 AccessorySetupKit 把这些全部压缩到一个系统级 picker 界面中。
核心内容
配对一个蓝牙配件需要几步?在 iOS 17 及之前,答案是:请求蓝牙权限、等待系统弹窗、用户授权、扫描设备、可能还要单独加入 Wi-Fi 热点、再发起蓝牙配对——每一步都可能流失用户。Apple 自己的调研也表明,配件首次设置时的摩擦是用户放弃的头号原因。
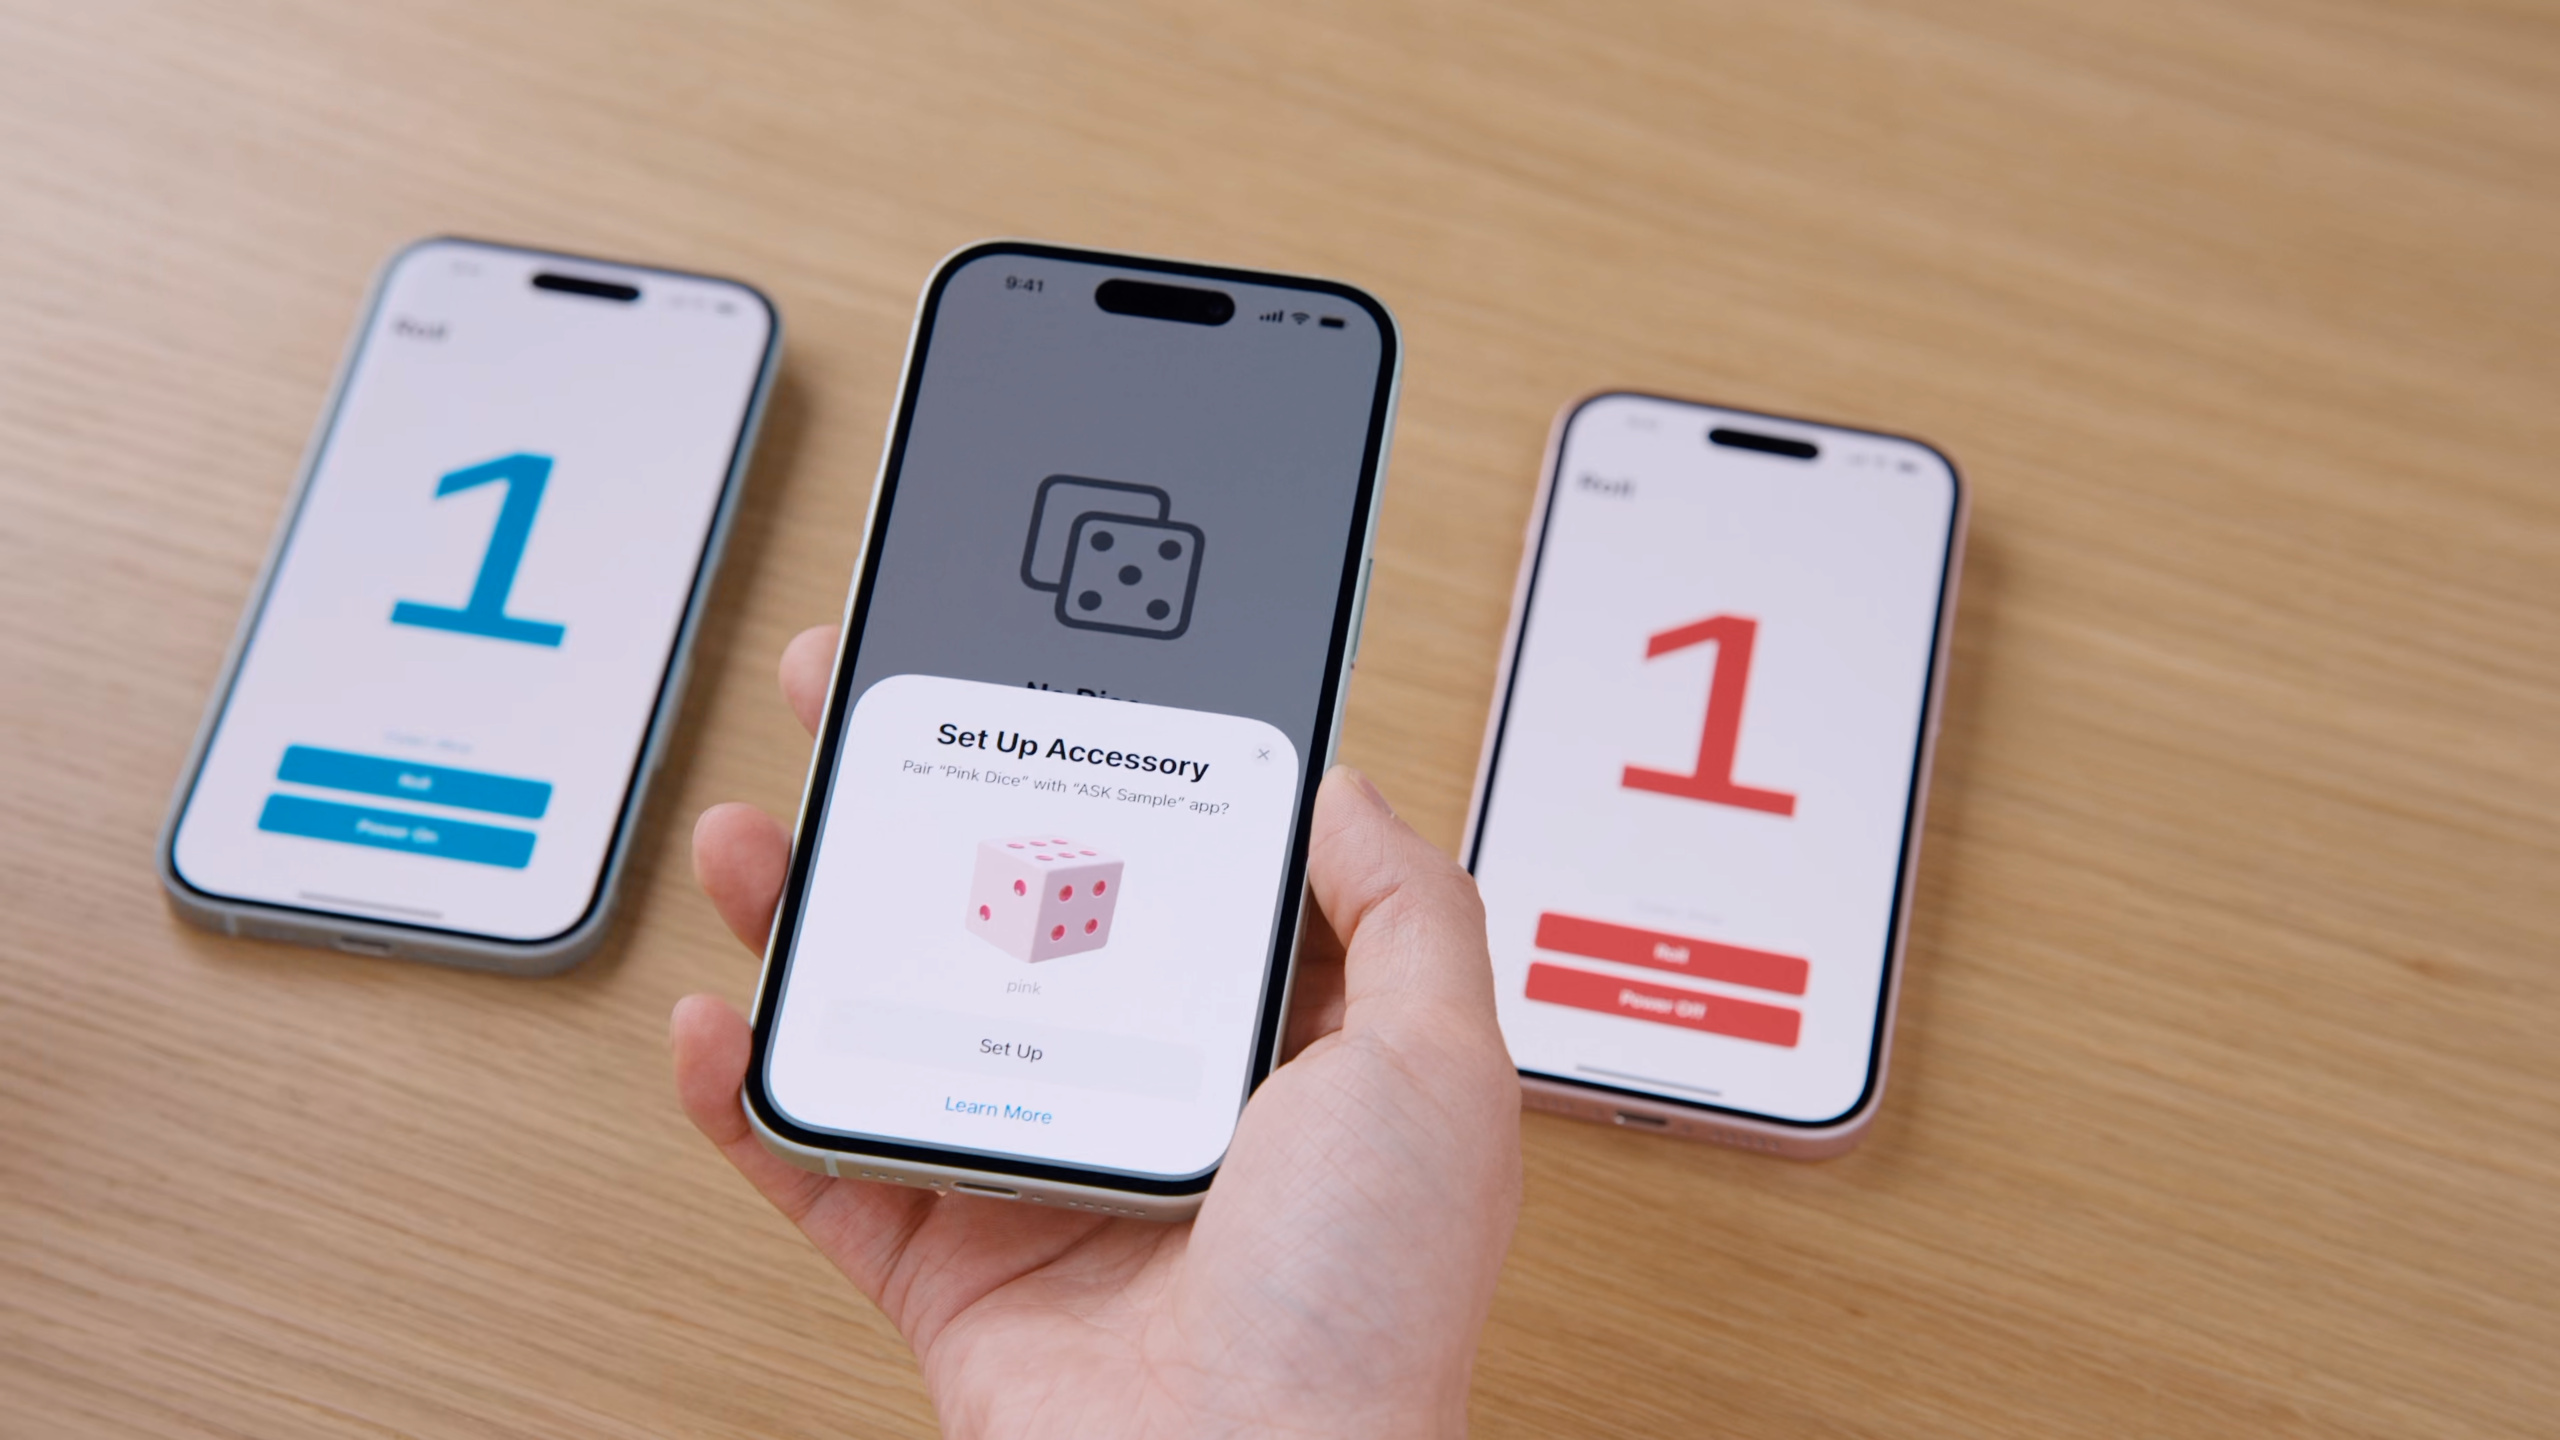
iOS 18 引入的 AccessorySetupKit 把整个流程压缩成一次点击。App 调用 showPicker(),系统在独立进程中扫描附近配件,用你提供的产品图片和名称在 picker 中展示,用户点击即完成配对。蓝牙和 Wi-Fi 的访问权限在这一次点击中同时获得,不需要单独的权限弹窗。
隐私设计是这个框架的关键考量。picker 运行在独立进程中,你的 App 只发送发现规则和展示素材,不直接接触蓝牙扫描。用户在 picker 中同时看到你定义的产品名称/图片以及配件广播的硬件名称,可以验证配件的真实性。配对完成后,通信仍然使用 CoreBluetooth 和 NetworkExtension 的标准 API,不需要学习新的通信方式。
详细内容
使用 AccessorySetupKit 的第一步是在 Info.plist 中声明支持的技术和发现规则。在 AccessorySetupKit - Supports 数组中添加 Bluetooth(或 Wi-Fi),然后在 Bluetooth Services 中填入配件广播的 GATT service UUID(04:12)。
核心 API 是 ASAccessorySession。创建并激活 session,注册事件回调(06:02):
import AccessorySetupKit

// Create a session
var session = ASAccessorySession()

// Activate session with event handler
session.activate(on: DispatchQueue.main, eventHandler: handleSessionEvent(event:))

// Handle event
func handleSessionEvent(event: ASAccessoryEvent) {
    switch event.eventType {
    case .activated:
        print("Session is activated and ready to use")
        print(session.accessories)
    default:
        print("Received event type \(event.eventType)")
    }
}
关键点:
ASAccessorySession是整个框架的中心对象,负责展示 picker、接收事件和管理配件activate(on:eventHandler:)需要指定 DispatchQueue 和事件回调.activated事件表示 session 已就绪,此时可以读取已有的session.accessories或发起新的配对流程
接下来创建 ASPickerDisplayItem,为每个配件变体指定名称、图片和发现规则(07:23):
// Create descriptor for pink dice
let pinkDescriptor = ASDiscoveryDescriptor()
pinkDescriptor.bluetoothServiceUUID = pinkUUID
// Create descriptor for blue dice
let blueDescriptor = ASDiscoveryDescriptor()
blueDescriptor.bluetoothServiceUUID = blueUUID

// Create picker display items
let pinkDisplayItem = ASPickerDisplayItem(
    name: "Pink Dice",
    productImage: UIImage(named: "pink")!,
    descriptor: pinkDescriptor
)
let blueDisplayItem = ASPickerDisplayItem(
    name: "Blue Dice",
    productImage: UIImage(named: "blue")!,
    descriptor: blueDescriptor
)
关键点:
ASDiscoveryDescriptor将发现规则组合成一个对象,系统会匹配描述符中的所有规则来筛选目标配件- 如果配件同时支持蓝牙和 Wi-Fi,可以在同一个 descriptor 中配置两种规则,用户一次点击获得两种访问权限
- 不同变体的配件(如不同颜色)需要各自独立的 descriptor 和 display item
调用 showPicker() 展示配件选择器(08:10):
// Invoke accessory picker
Button {
    session.showPicker(for: [pinkDisplayItem, blueDisplayItem]) { error in
        if let error {
            // Handle error
        }
    }
} label: {
    Text("Add Dice")
}
关键点:
showPicker(for:)接受 display item 数组,picker 会同时扫描所有描述符对应的配件- picker 运行在独立进程中,你的 App 不会直接接触蓝牙扫描
- 回调中的 error 用于处理 picker 无法展示的情况(如系统限制)
用户在 picker 中选择配件后,App 收到 accessoryAdded 事件(09:26):
// Handle event
func handleSessionEvent(event: ASAccessoryEvent) {
    switch event.eventType {

    case .accessoryAdded:
        let newDice: ASAccessory = event.accessory!

    case .accessoryChanged:
        print("Accessory properties changed")

    case .accessoryRemoved:
        print("Accessory removed from system")

    default:
        print("Received event with type: \(event.eventType)")
    }
}
关键点:
.accessoryAdded携带ASAccessory对象,包含配对配件的所有信息.accessoryChanged在配件属性变更时触发,比如用户在设置中改了显示名称.accessoryRemoved在用户或 App 移除配件时触发
配对完成后,用 CoreBluetooth 与配件通信(10:22):
// Connect to accessory using CoreBluetooth
let central = CBCentralManager(delegate: self, queue: nil)

func centralManagerDidUpdateState(_ central: CBCentralManager) {
    switch central.state {
    case .poweredOn:
        let peripheral = central.retrievePeripherals(withIdentifiers: [newDice.bluetoothIdentifier]).first
        central.connect(peripheral)
    default:
        print("Received event type \(event.eventType)")
    }
}

func centralManager(_ central: CBCentralManager, didConnect peripheral: CBPeripheral) {
    peripheral.delegate = self
    peripheral.discoverServices(pinkUUID)
}
关键点:
- 因为在 Info.plist 中声明了 AccessorySetupKit 支持,用户不再被请求蓝牙权限
CBCentralManager的状态只在 App 有已配对配件时变为.poweredOn- 用
bluetoothIdentifier从ASAccessory中获取 CBPeripheral 标识符,再用retrievePeripherals(withIdentifiers:)获取 peripheral 对象 - 扫描 API 仍然可用,但只返回与你的 App 配对的配件
对于已有配件的迁移,使用 ASMigrationDisplayItem(11:58):
// Create migration items
let pinkMigration = ASMigrationDisplayItem(name: "Pink Dice", productImage: UIImage(named: "pink")!, descriptor: pinkDescriptor)
pinkMigration.peripheralIdentifier = pinkPeripheral.identifier

// Present picker with migration items
session.showPicker(for: [pinkMigration]) { error in
    if let error {
        // Handle error
    }
}
关键点:
ASMigrationDisplayItem是ASPickerDisplayItem的子类,用于将已有配件迁移到 AccessorySetupKit 管理- 需要设置
peripheralIdentifier为已有 CBPeripheral 的 identifier - 如果
showPicker只包含迁移项,系统展示一个信息页面通知用户迁移;如果同时包含非迁移项,迁移只在用户选择并设置新配件时发生
配件图片的展示也有设计规范。picker 为产品图片提供 180x120 pt 的容器,图片背景应为透明以适配深色/浅色模式。透明边框的宽度会影响图片在容器中的缩放——边框越宽,配件看起来越小(12:54)。
核心启发
-
做什么:为蓝牙/Wi-Fi 配件 App 接入 AccessorySetupKit,替换原有的蓝牙权限请求流程。为什么值得做:减少配对步骤从多步到一步,降低用户流失率,同时提升隐私保护——App 不再需要全局蓝牙权限。怎么开始:在 Info.plist 中添加
AccessorySetupKit - Supports和发现规则,创建ASAccessorySession,用ASPickerDisplayItem配置展示项,调用showPicker()。 -
做什么:为已上架的配件 App 实现迁移流程,将已有配件从旧权限模型迁移到 AccessorySetupKit 管理。为什么值得做:已授权蓝牙权限的老用户不会自动迁移到新模型,不迁移就无法享受新权限管理的精细控制。怎么开始:用
ASMigrationDisplayItem传入已有 peripheral 的 identifier,在showPicker中展示迁移提示。 -
做什么:优化配件在 picker 中的展示素材,确保产品图片在深色和浅色模式下都清晰可辨。为什么值得做:picker 中产品图片是用户识别和验证配件的主要依据,图片模糊或显示异常会直接影响配对完成率。怎么开始:准备 180x120 pt 容器尺寸的高分辨率图片,背景设为透明,调整透明边框宽度以控制缩放比例,在两种模式下都做视觉测试。
-
做什么:对于同时支持蓝牙和 Wi-Fi 的配件,在一个 discovery descriptor 中配置两种接口规则。为什么值得做:用户一次点击即可获得蓝牙和 Wi-Fi 两种访问权限,避免两次配对流程。怎么开始:在同一个
ASDiscoveryDescriptor中同时设置bluetoothServiceUUID和 Wi-Fi SSID,picker 会自动处理两种技术的配对。
关联 Session
- What’s new in privacy — iOS 18 新的权限流程与隐私改进,与 AccessorySetupKit 的权限模型变更紧密相关
- What’s new in location authorization — 位置授权的改进与最佳实践,同样是 iOS 18 中权限流程优化的组成部分
- Meet the next generation of CarPlay architecture — CarPlay 新架构中的配件通信机制,与 AccessorySetupKit 同属系统服务领域
- Say hello to the next generation of CarPlay design system — CarPlay 设计系统,涉及车载配件的交互设计参考
评论
GitHub Issues · utterances