
Highlight
visionOS 2 为 Volume 新增自动底板、角落调整大小手柄、工具栏和自定义装饰件,同时增强了沉浸式空间的沉浸度控制和空间跟踪能力。
核心内容
visionOS 有三种场景类型:Window、Volume 和 Immersive Space。这场 Session 聚焦在 Volume 和 Immersive Space 上,尤其是 visionOS 2 对这两者的增强。
Volume 在 visionOS 2 中有了明显改进。当你注视它时,底部会自动显示底板(Baseplate),帮助用户感知 Volume 的边界范围。如果内容已经填满了整个 Volume 或自己绘制了底部表面,可以用 .volumeBaseplateVisibility(.hidden) 关闭底板。
另一个重要变化是 Volume 现在有了角落的调整大小手柄。默认情况下,Volume 的最小/最大尺寸继承自内容视图的 frame。如果你给视图设置了固定尺寸,Volume 就无法调整大小。改为设置最小/最大值后,拖动手柄就能平滑缩放。你也可以通过代码动态改变状态变量来驱动 Volume 尺寸变化。
工具栏(Toolbar)可以浮动在 Volume 底部的装饰件中。visionOS 2 的工具栏会自动跟随用户站立的方位移动到最近的侧面,窗口控件也一样。除了工具栏,visionOS 2 还允许 Volume 添加自定义装饰件,可以放在 Volume 周围的任意位置,并且会根据距离自动缩放保持可读性。
当用户在 Volume 周围移动时,机器人和内容需要做出响应。每个 Volume 的侧面都是一个视点(Viewpoint),系统会自动将窗口控件和装饰件移动到离用户最近的侧面。你可以用 onVolumeViewpointChange 监听视点变化,让内容也跟随调整。如果只想支持特定侧面,可以用 supportedVolumeViewpoints 限制。
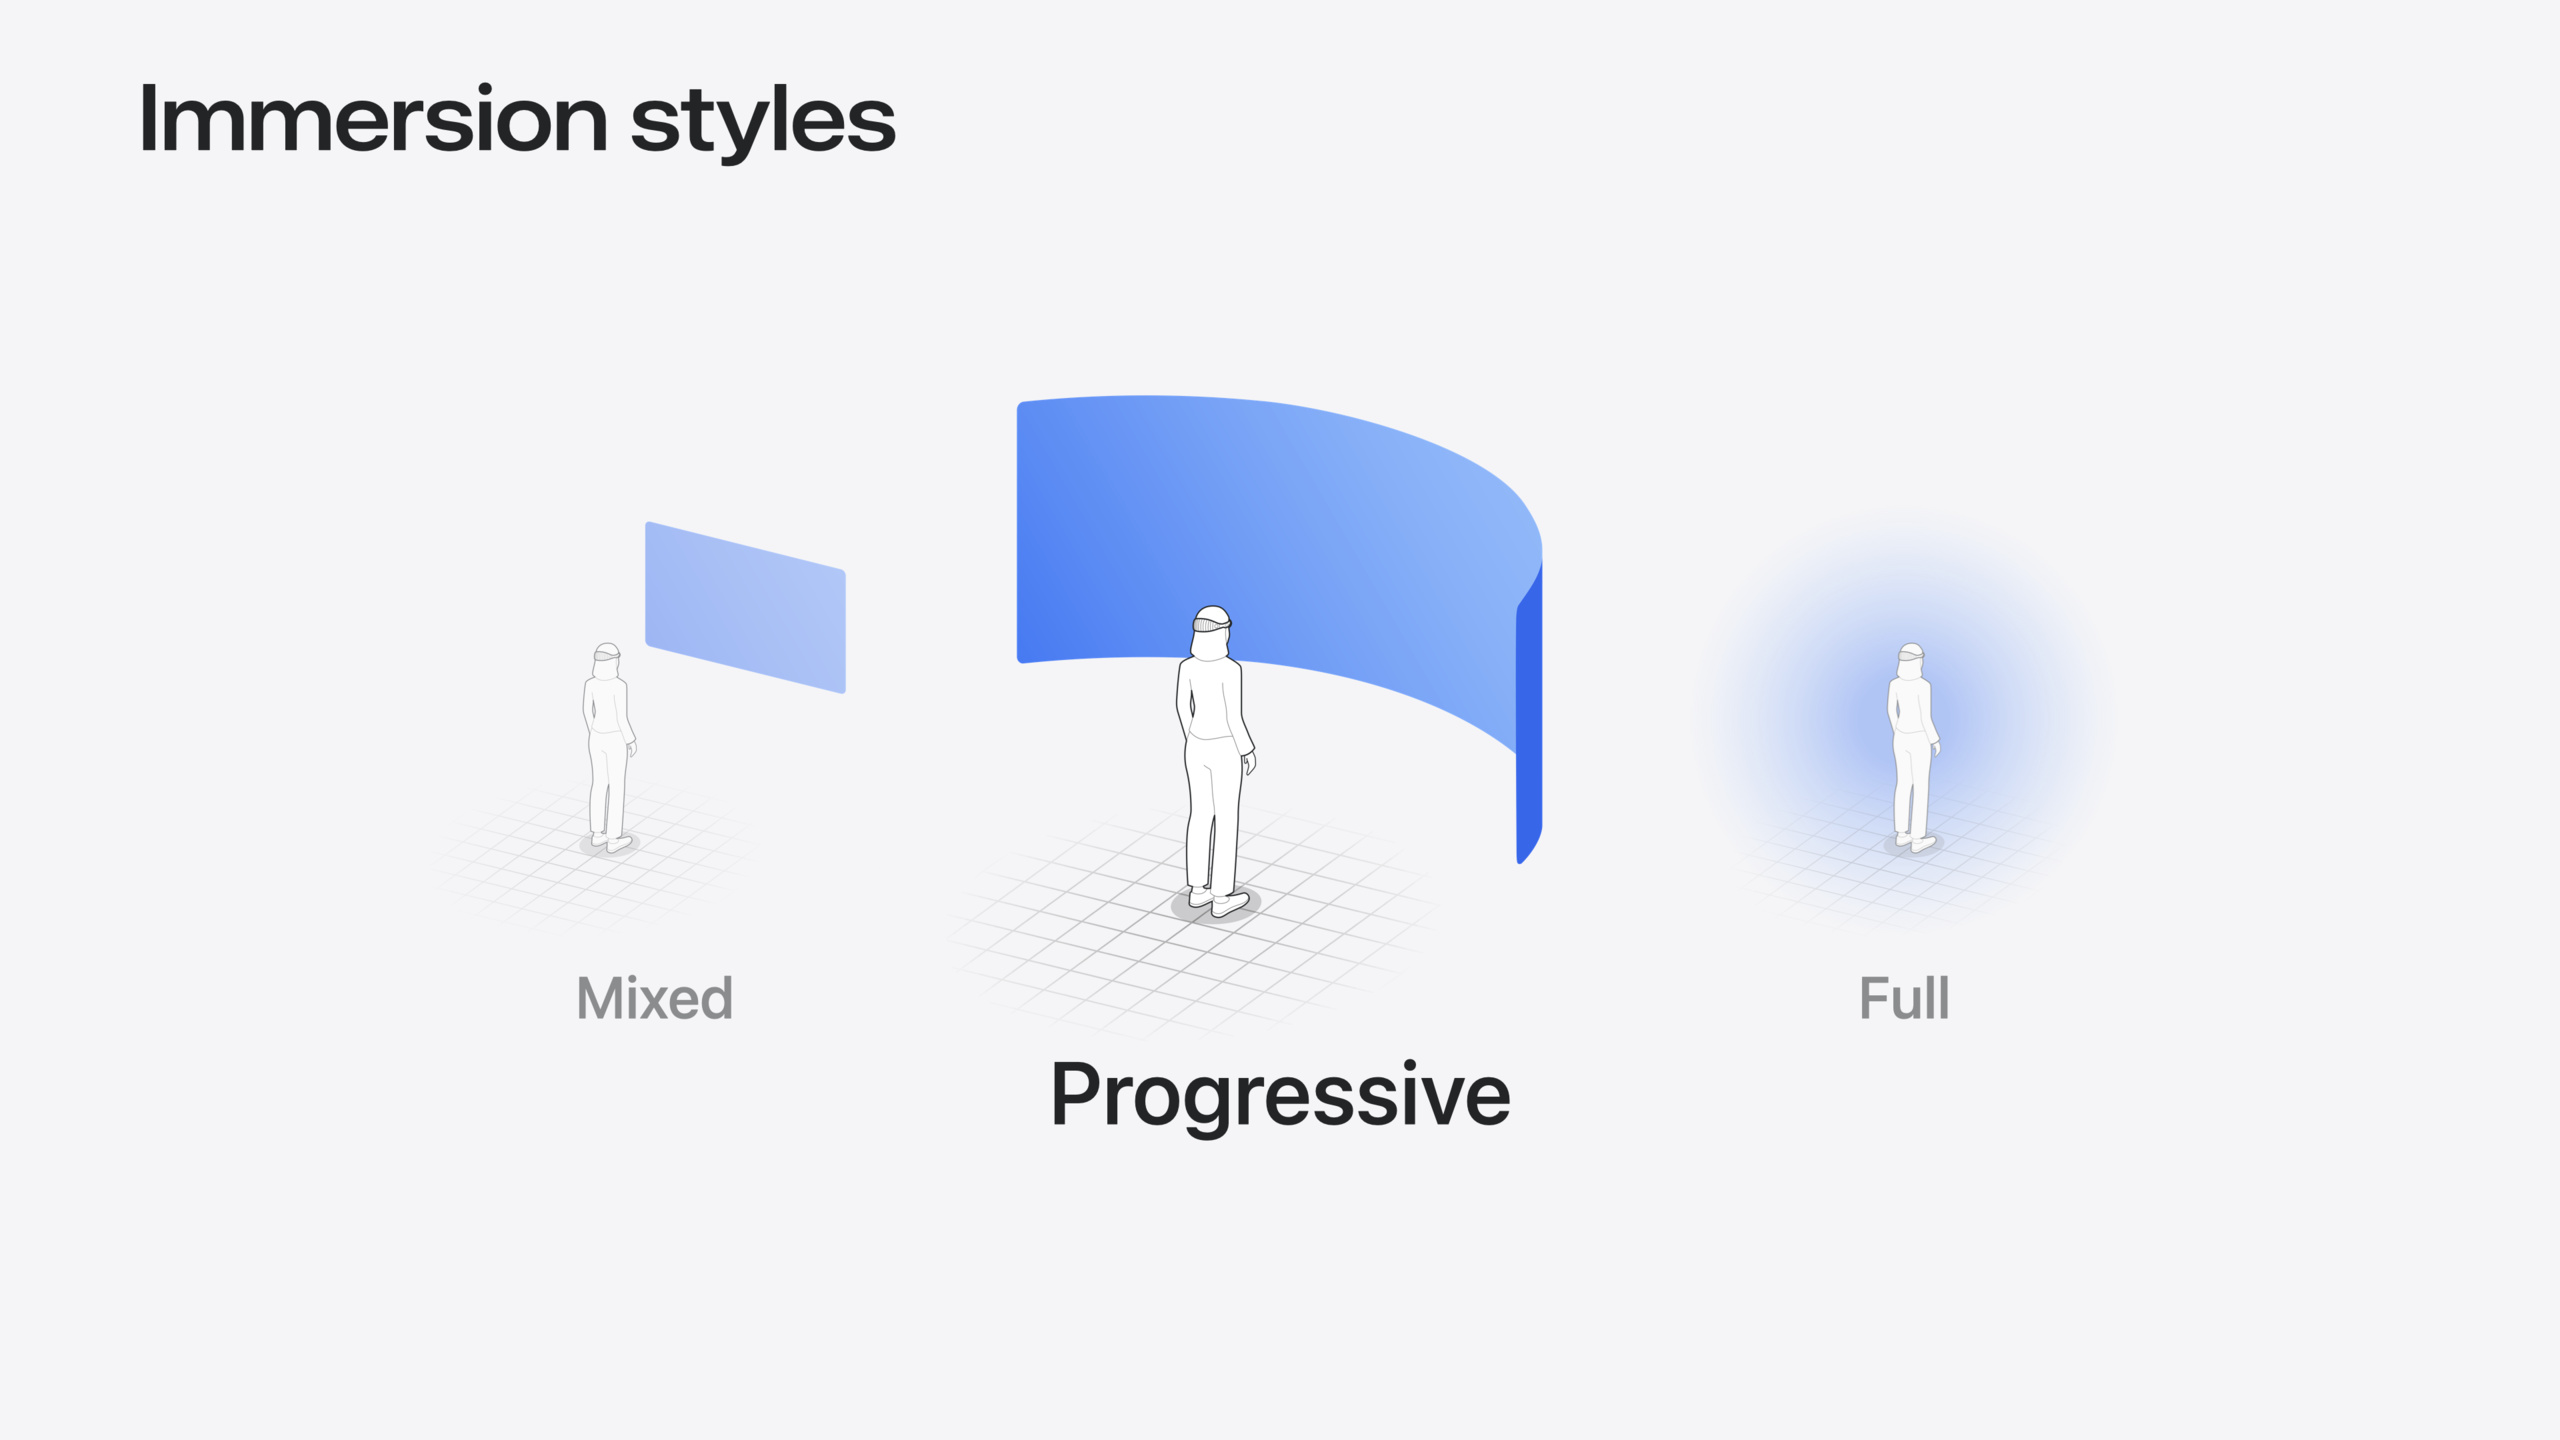
Immersive Space 部分增加了更多控制能力。visionOS 2 支持自定义沉浸度范围,可以指定渐进式沉浸的初始值和最小/最大值。用户旋转数码表冠调整沉浸度时,你可以用 onImmersionChange 监听并做出反应。
新的 SpatialTrackingSession API 让你能够跟踪平面锚点。创建 floor anchor 后,可以用 SpatialTapGesture 检测用户在沉浸空间中的点击,然后将植物放置在用户点击的位置。最后,你可以用 SurroundingsEffect 动态改变现实透视的颜色,比如当机器人碰撞到植物时,用对应的花盆颜色来改变环境色调。
详细内容
Volume 底板
visionOS 2 默认为 Volume 启用底板。它会在用户注视时淡入显示,帮助感知 Volume 的边界。
// Baseplate

WindowGroup(id: "RobotExploration") {
    ExplorationView()
        .volumeBaseplateVisibility(.visible) // Default!
}
.windowStyle(.volumetric)volumeBaseplateVisibility(.visible)是默认行为,底板会在注视时自动淡入- 如果内容已填满 Volume 边界或自定义了底部表面,设置为
.hidden避免视觉冲突 - 底板帮助用户找到角落的调整大小手柄
Volume 调整大小
Volume 现在有角落的调整大小手柄,需要正确设置 frame 的最小/最大值。
// Enabling resizability

WindowGroup(id: "RobotExploration") {
    let initialSize = Size3D(width: 900, height: 500, depth: 900)

    ExplorationView()
        .frame(minWidth: initialSize.width, maxWidth: initialSize.width * 2,
               minHeight: initialSize.height, maxHeight: initialSize.height * 2)
        .frame(minDepth: initialSize.depth, maxDepth: initialSize.depth * 2)
}
.windowStyle(.volumetric)
.windowResizability(.contentSize) // Default!- 设置
minWidth/maxWidth、minHeight/maxHeight、minDepth/maxDepth允许 Volume 调整大小 - 固定 frame 值会禁用调整大小
windowResizability(.contentSize)是默认行为,Volume 尺寸继承自内容
代码驱动 Volume 尺寸
你可以通过状态变量动态改变 Volume 尺寸(06:10)。
// Programmatic resize

struct ExplorationView: View {
    @State private var levelScale: Double = 1.0

    var body: some View {
        RealityView { content in
            // Level code here
        } update: { content in
            appState.explorationLevel?.setScale(
                [levelScale, levelScale, levelScale], relativeTo: nil)
        }
        .frame(width: levelSize.value.width * levelScale,
               height: levelSize.value.height * levelScale)
        .frame(depth: levelSize.value.depth * levelScale)
        .overlay { Button("Change Size") { levelScale = levelScale == 1.0 ? 2.0 : 1.0 } }
    }
}- 状态变量
levelScale控制缩放比例 - frame 值随 scale 变化,Volume 自动调整大小以适应新尺寸
- RealityKit entity 也需要同步缩放
工具栏装饰件
工具栏可以浮动在 Volume 底部(07:39)。
// Toolbar ornament

ExplorationView()
.toolbar {
		ToolbarItem {
      	Button("Next Size") {
          	levelScale = levelScale == 1.0 ? 2.0 : 1.0
        }
    }
  	ToolbarItemGroup {
      	Button("Replay") {
          	resetExploration()
        }
      	Button("Exit Game") {
          	exitExploration()
          	openWindow(id: "RobotCreation")
        }
    }
}ToolbarItem和ToolbarItemGroup用于组织按钮- 工具栏会自动跟随用户移动到最近的侧面
- 工具栏会根据 Volume 距离自动缩放保持可读性
自定义装饰件
除了工具栏,你可以在 Volume 周围添加自定义装饰件(10:41)。
// Ornaments

WindowGroup(id: "RobotExploration") {
    ExplorationView()
    .ornament(attachmentAnchor: .scene(.topBack)) {
        ProgressView()
    }
}
.windowStyle(.volumetric)
attachmentAnchor: .scene(.topBack)将装饰件放置在 Volume 后上方- 装饰件会自动跟随视点移动
- 装饰件会根据距离自动缩放
监听视点变化
让内容响应用户在 Volume 周围的移动(12:08)。
// Volume viewpoint

struct ExplorationView: View {
    var body: some View {
        RealityView { content in
            // Some RealityKit code
        }
        .onVolumeViewpointChange { oldValue, newValue in
            appState.robot?.currentViewpoint = newValue.squareAzimuth
        }
    }
}onVolumeViewpointChange在活动视点改变时触发newValue.squareAzimuth返回四个标准化值之一:front、left、right、back- 可以用这个值让角色转向用户
限制支持的视点
如果你的内容只适合从某些侧面观看,可以限制支持的视点(13:43)。
// Supported viewpoints
struct ExplorationView: View {
  	let supportedViewpoints: Viewpoint3D.SquareAzimuth.Set = [.front, .left, .right]

  	var body: some View {
      	RealityView { content in
        		// Some RealityKit code
        }
      	.supportedVolumeViewpoints(supportedViewpoints)
      	.onVolumeViewpointChange { _, newValue in
        		appState.robot?.currentViewpoint = newValue.squareAzimuth
        }
    }
}supportedVolumeViewpoints接受一个选项集,指定支持的侧面- 未支持的侧面不会触发装饰件和窗口控件移动
- 默认支持所有四个侧面
视点更新策略
用 updateStrategy 控制是否收到不支持视点的更新(14:30)。
// Viewpoint update strategy

struct ExplorationView: View {
    let supportedViewpoints: Viewpoint3D.SquareAzimuth.Set = [.front, .left, .right]

    var body: some View {
        RealityView { content in
            // Some RealityKit code
        }
        .supportedVolumeViewpoints(supportedViewpoints)
        .onVolumeViewpointChange(updateStrategy: .all) { _, newValue in
            appState.robot?.currentViewpoint = newValue.squareAzimuth
            if !supportedViewpoints.contains(newValue) {
                appState.robot?.animationState.transition(to: .annoyed)
            }
        }
    }
}
updateStrategy: .all确保所有视点变化都会触发回调- 可以检测用户是否在不支持的侧面,并触发提示动画
- 默认只在支持的视点之间切换时触发
自定义沉浸度范围
visionOS 2 支持自定义渐进式沉浸的初始值和范围(23:54)。
// Customizing immersion
struct BotanistApp: App {
    // Custom immersion amounts
    @State private var immersionStyle: ImmersionStyle = .progressive(0.2...1.0, initialAmount: 0.8)

    var body: some Scene {
        // Immersive Space
        ImmersiveSpace(id: "ImmersiveSpace") {
            ImmersiveSpaceExplorationView()
        }
        .immersionStyle(selection: $immersionStyle, in: .mixed, .progressive, .full)
    }
}
.progressive(range, initialAmount:)创建自定义渐进式沉浸0.2...1.0是最小到最大沉浸度范围initialAmount: 0.8设置初始沉浸度为 80%
响应沉浸度变化
监听数码表冠调整沉浸度的事件(25:17)。
// Reacting to immersion
struct ImmersiveView: View {
    @State var immersionAmount: Double?

    var body: some View {
        ImmersiveSpaceExplorationView()
            .onImmersionChange { context in
                immersionAmount = context.amount
            }
            .onChange(of: immersionAmount) { oldValue, newValue in
                handleImmersionAmountChanged(newValue: newValue, oldValue: oldValue)
            }
    }
}onImmersionChange提供新的沉浸度值onChange检测沉浸度变化并触发响应- 可以比较新旧值判断沉浸度是增加还是减少
处理沉浸度变化
根据沉浸度变化让机器人做出反应(25:39)。
// Reacting to immersion
func handleImmersionAmountChanged(newValue: Double?, oldValue: Double?) {
    guard let newValue, let oldValue else {
        return
    }

    if newValue > oldValue {
        // Move the robot outward to react to increasing immersion
        moveRobotOutward()
    } else if newValue < oldValue {
        // Move the robot inward to react to decreasing immersion
        moveRobotInward()
    }
}- 沉浸度增加时,机器人向外移动
- 沉浸度减少时,机器人向内移动
- 这种响应增强用户对沉浸度变化的感知
空间跟踪会话
使用 SpatialTrackingSession 跟踪平面锚点(26:57)。
// Create and run spatial tracking session
struct ImmersiveExplorationView {
    @State var spatialTrackingSession: SpatialTrackingSession
        = SpatialTrackingSession()

    var body: some View {
        RealityView { content in
            // ...
        }
        .task {
            await runSpatialTrackingSession()
        }
    }
}SpatialTrackingSession管理空间跟踪.task在沉浸空间打开时启动会话- 需要用户授权才能访问平面锚点
配置并运行跟踪
设置平面跟踪配置并运行会话(27:11)。
// Create and run the spatial tracking session
func runSpatialTrackingSession() async {
    // Configure the session for plane anchor tracking
    let configuration =
        SpatialTrackingSession.Configuration(tracking: [.plane])

    // Run the session to request plane anchor transforms
    let _ = await spatialTrackingSession.run(configuration)
}
Configuration(tracking: [.plane])配置平面跟踪run(configuration)请求授权并开始跟踪- 返回值表示授权是否成功
创建地面锚点
创建一个水平地面的锚点实体(27:32)。
// Create a floor anchor to track
struct ImmersiveExplorationView {
    @State var spatialTrackingSession: SpatialTrackingSession
        = SpatialTrackingSession()

    let floorAnchor = AnchorEntity(
        .plane(.horizontal, classification: .floor, minimumBounds: .init(x: 0.01, y: 0.01))
    )

    var body: some View {
        RealityView { content in
            content.add(floorAnchor)
        }
        .task {
            await runSpatialTrackingSession()
        }
    }
}
.plane(.horizontal, classification: .floor, ...)创建地面锚点minimumBounds设置最小检测尺寸- 将锚点添加到 RealityView 以启用跟踪
检测空间点击
用 SpatialTapGesture 检测用户在沉浸空间中的点击(27:54)。
// Detect taps on entities in immersive space
RealityView { content in
    // ...
}
.gesture(
    SpatialTapGesture(
        coordinateSpace: .immersiveSpace
    )
    .targetedToAnyEntity()
    .onEnded { value in
        handleTapOnFloor(value: value)
    }
)
SpatialTapGesture(coordinateSpace: .immersiveSpace)检测 3D 空间中的点击.targetedToAnyEntity()让手势作用于任何实体onEnded处理点击事件
处理点击放置植物
将点击位置转换为地面锚点坐标并放置植物(28:09)。
// Handle tap event
func handleTapOnFloor(value: EntityTargetValue<SpatialTapGesture.Value>) {
    let location =
        value.convert(value.location3D, from: .immersiveSpace, to: floorAnchor)

    plantEntity.position = location
    floorAnchor.addChild(plantEntity)
}
convert(location3D, from: .immersiveSpace, to: floorAnchor)转换坐标系- 将转换后的位置设置为植物的位置
- 将植物添加为地面锚点的子实体
环境透视着色
用 SurroundingsEffect 改变现实透视的颜色(30:48)。
// Apply effect to tint passthrough
struct ImmersiveExplorationView: View {
    var body: some View {
        RealityView { content in
            // ...
        }
        .preferredSurroundingsEffect(surroundingsEffect)
    }

    // The resolved surroundings effect based on tint color
    var surroundingsEffect: SurroundingsEffect? {
        if let color = appModel.tintColor {
            return SurroundingsEffect.colorMultiply(color)
        } else {
            return nil
        }
    }
}SurroundingsEffect.colorMultiply(color)创建颜色乘法效果preferredSurroundingsEffect应用环境效果- 当机器人碰撞到植物时,用对应颜色改变环境色调
核心启发
-
为 Volume 启用调整大小:如果 Volume 内容不是固定尺寸,使用
frame(minWidth:maxWidth:minDepth:maxDepth:)而不是固定 frame,让用户可以通过拖动角落手柄调整大小。对于需要动态调整的场景,可以用状态变量驱动 frame 变化,Volume 会自动适应。 -
用装饰件减少主视图混乱:将辅助 UI(如进度显示、状态信息)从主视图中提取到自定义装饰件中。装饰件会自动跟随用户移动到最近的侧面,并根据距离自动缩放,保持可读性。主视图只保留核心 3D 内容。
-
让内容响应用户视角:使用
onVolumeViewpointChange监听用户在 Volume 周围的移动,让角色或内容转向用户。如果只支持特定侧面,用supportedVolumeViewpoints限制,并用updateStrategy: .all在用户走到不支持侧面时给出提示。 -
自定义沉浸度体验:visionOS 2 允许指定渐进式沉浸的初始值和范围。如果你的体验需要更强的沉浸感,可以设置更高的初始值(如 80%)。用
onImmersionChange监听用户调整沉浸度,让内容做出相应反应。 -
用空间跟踪实现交互:使用 SpatialTrackingSession 跟踪平面锚点,配合 SpatialTapGesture 检测 3D 空间中的点击。这能实现”点击地面放置物体”之类的交互,让用户在真实环境中布置内容。
关联 Session
- Create custom environments for your immersive apps in visionOS — 学习如何创建视觉丰富且高性能的自定义应用环境
- Create enhanced spatial computing experiences with ARKit — 学习如何用 ARKit 创建迷人的沉浸式体验
- Design interactive experiences for visionOS — 学习如何为 Apple Vision Pro 设计引人入胜的交互式叙事体验
- Meet RealityKit 4 — 了解 RealityKit 4 的最新能力及其如何为空间计算应用提供支持
评论
GitHub Issues · utterances