
Highlight
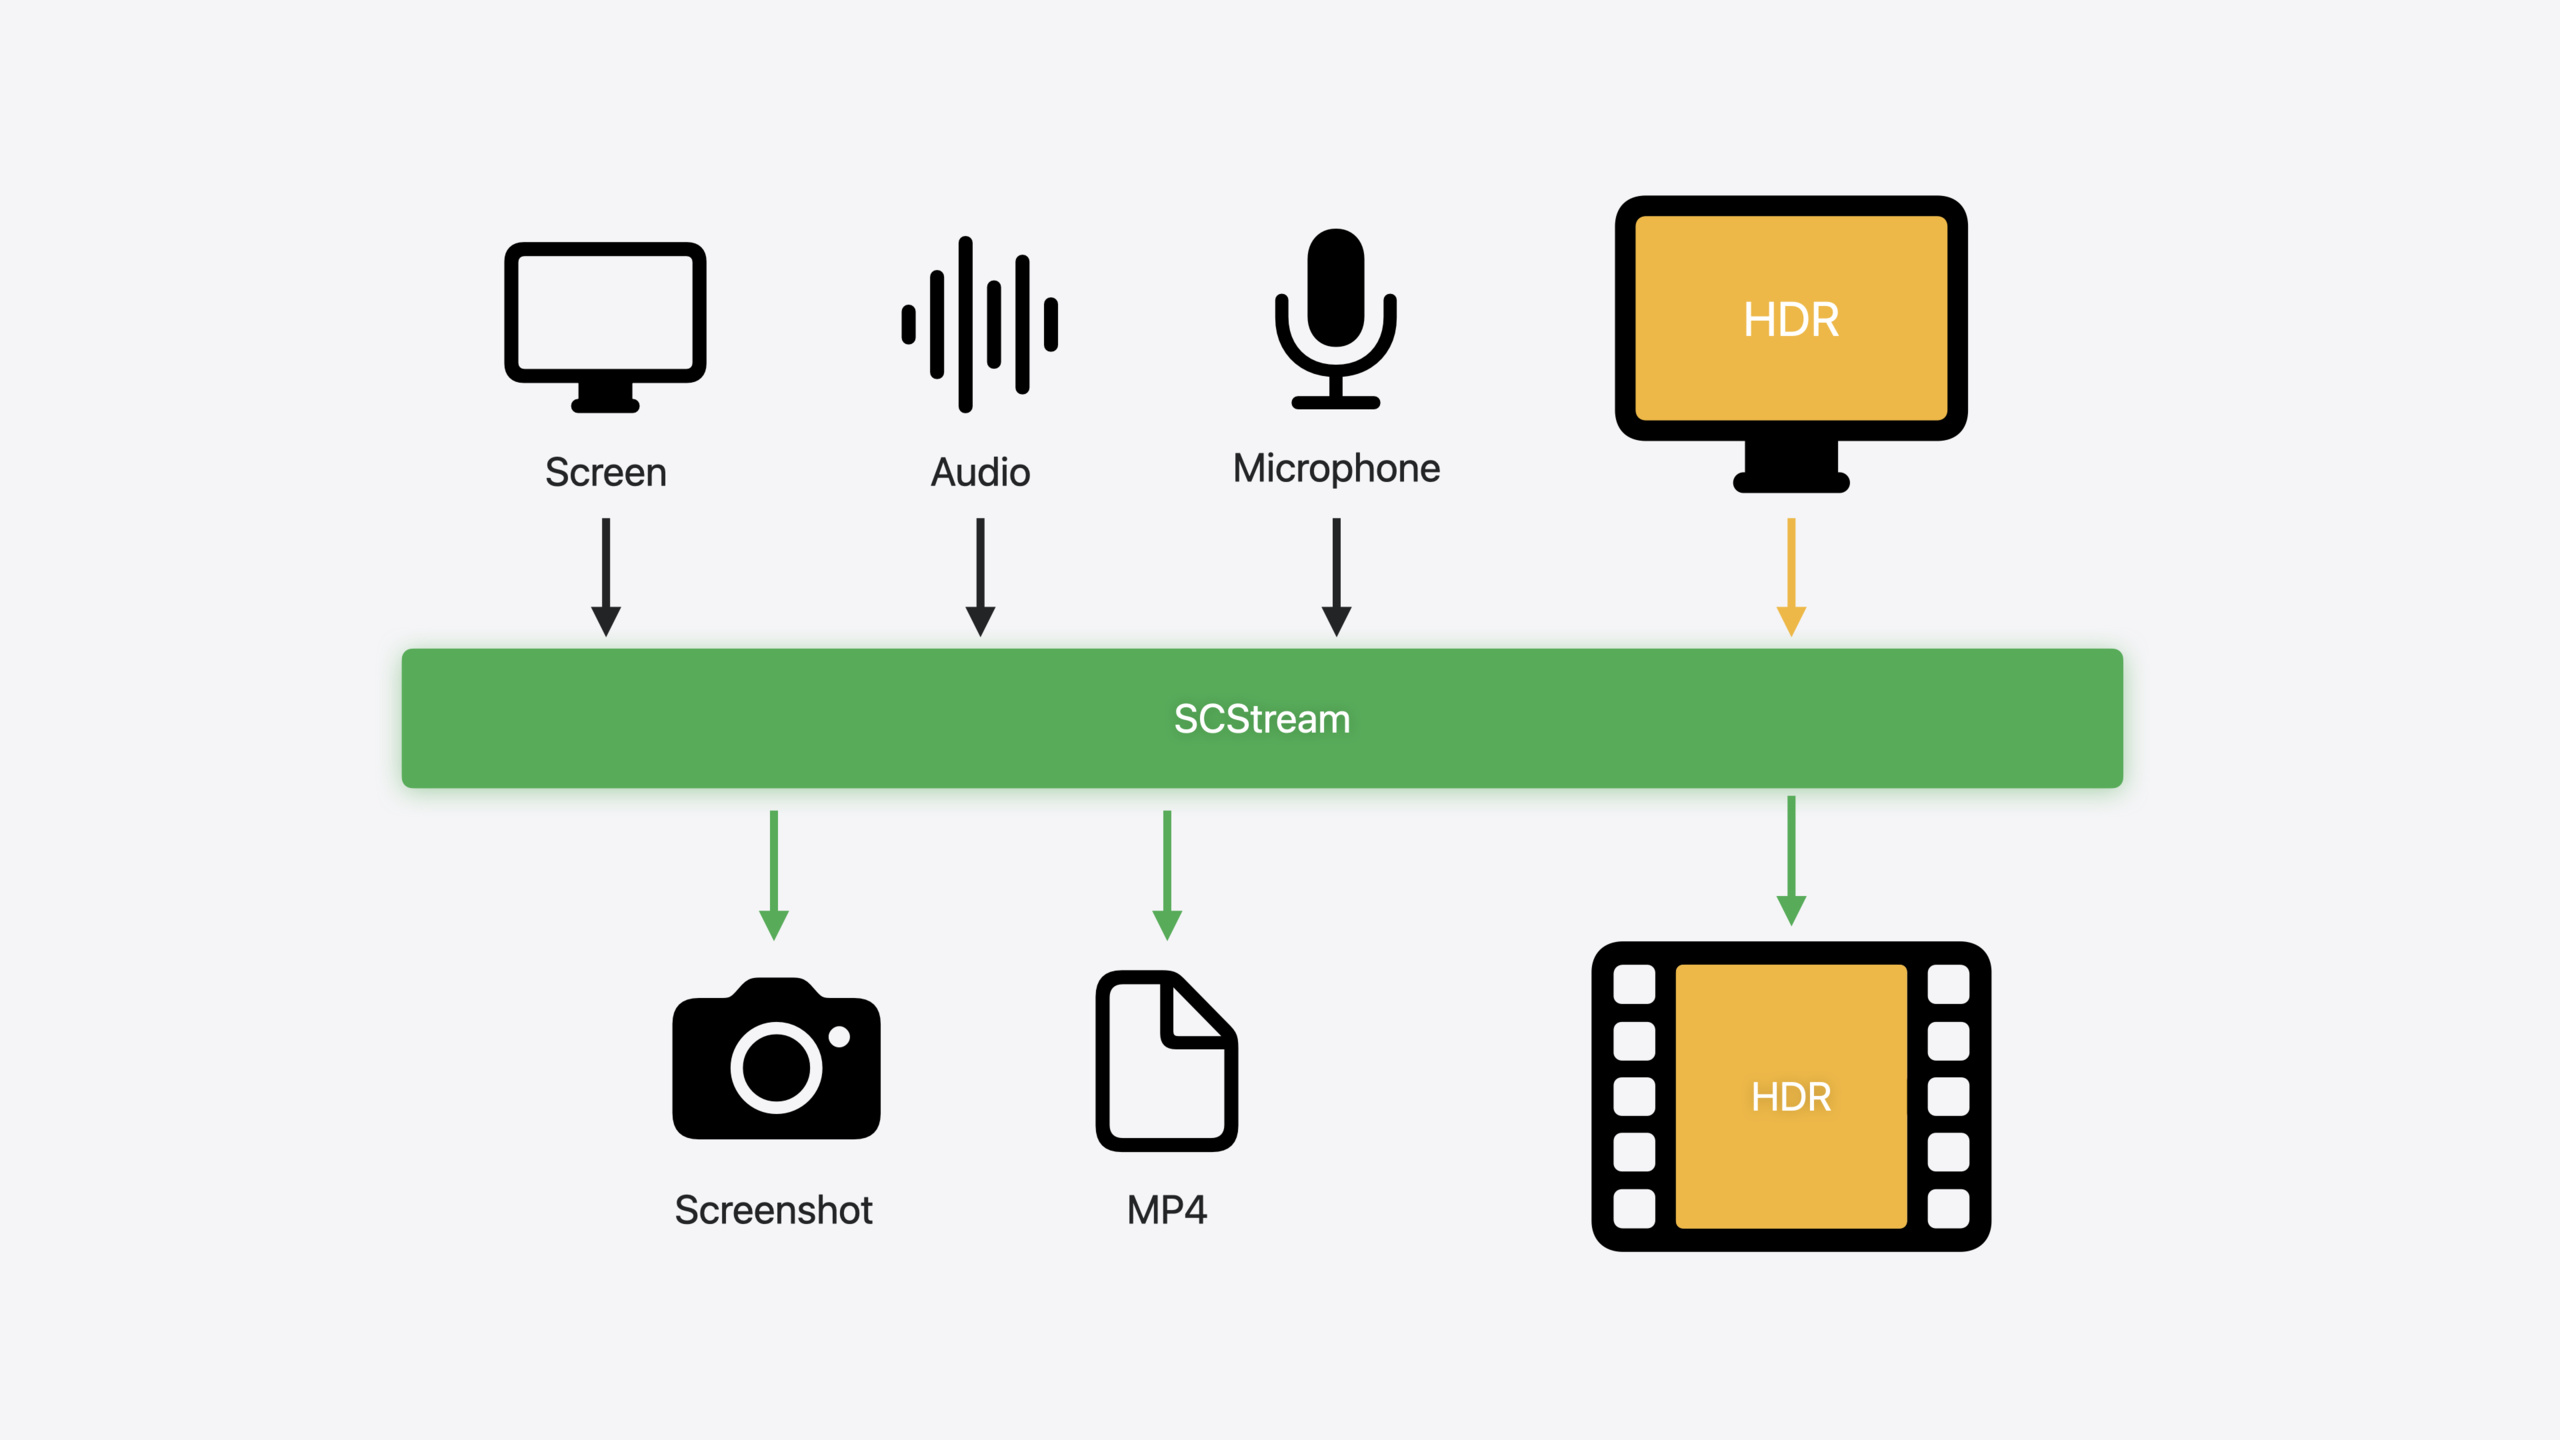
ScreenCaptureKit 是 macOS 上做屏幕共享、截图、远程桌面的核心框架。今年的更新覆盖了三个场景:HDR 内容捕获、麦克风采集、以及录制输出。
核心内容
做屏幕共享或远程桌面应用时,一个常见问题是:用户屏幕上的 HDR 内容(比如 4K HDR 视频、游戏画面)共享给对方后变成灰蒙蒙的 SDR。原因很简单——SCStream 默认只输出 SDR,colorSpace、pixelFormat、colorMatrix 这些参数要自己配,稍有不慎颜色就偏了。
今年 ScreenCaptureKit 直接提供了两个 HDR 预置:captureHDRStreamLocalDisplay 用于本机同时采集和渲染的场景,captureHDRStreamCanonicalDisplay 用于采集后分享给其他 HDR 设备。预置把 colorSpace(Display P3 PQ / HLG)、pixelFormat(10-bit YCbCr)、colorMatrix 全部填好,一行代码就能拿到正确的 HDR 画面。
第二个痛点是采集旁白。以前的 SCStream 只能拿屏幕画面和系统音频,要录旁白必须单独用 AVAudioEngine 开一路麦克风,两边的时间戳对齐全靠自己。现在 SCStream 原生支持 .microphone 输出类型,屏幕、系统音频、麦克风三种媒体从同一个流里出,时间戳天然对齐。
第三个痛点是录制。拿到 CMSampleBuffer 后要自己写 AVAssetWriter 逻辑,处理文件格式、编码器选择、错误恢复,代码量大且容易出 bug。新增的 SCRecordingOutput 把这些全部封装了:指定 URL、文件类型和编码器,添加到 stream 上就自动录制,录完文件直接可用。
详细内容
HDR 捕获的两种预置
HDR 和 SDR 的核心差异在于亮度范围和色域。HDR 提供 10-bit 以上的色深和 PQ/HLG 传输函数,能保留阴影和高光中的细节。SCStreamConfiguration 今年新增了 captureDynamicRange 属性,设为 .hdrLocalDisplay 或 .hdrCanonicalDisplay 即可启用 HDR。
两种预置的区别:Local Display 假设你在同一台机器上采集并渲染,颜色映射走本地显示器路径;Canonical Display 假设内容会被发送到其他设备,走标准 HDR 传输路径。
下面是使用 Canonical Display 预置捕获 HDR 流的完整代码(5:22):
// Get content that is currently available for capture.
let availableContent = try await SCShareableContent.current

// Create instance of SCContentFilter to record entire display.
guard let display = availableContent.displays.first else { return }
let filter = SCContentFilter(display: display, excludingWindows: [])

// Create a configuration using preset for HDR stream canonical display.
let config = SCStreamConfiguration(preset: .captureHDRStreamCanonicalDisplay)

// Create a stream with the filter and stream configuration.
let stream = SCStream(filter: filter, configuration: config, delegate: self)

// Add a stream output to capture screen content.
try stream.addStreamOutput(self, type: .screen, sampleHandlerQueue: nil)

// Start the capture session.
try await stream.startCapture()
关键点:
SCShareableContent.current获取当前可采集的显示器和窗口列表SCContentFilter指定采集范围,这里排除所有窗口等于采集整个显示器.captureHDRStreamCanonicalDisplay预置自动填充 colorSpace、pixelFormat、colorMatrix- 如果需要自定义,可以在预置基础上逐项覆盖属性
截图场景也有对应的 HDR 预置。SCScreenshotManager 新增了 captureHDRScreenshotLocalDisplay 和 captureHDRScreenshotCanonicalDisplay(6:40):
// Create an SCStreamConfiguration with preset for HDR.
let config = SCStreamConfiguration(preset: .captureHDRScreenshotLocalDisplay)

// Call the screenshot API to get CMSampleBuffer representation.
let screenshotBuffer = try await SCScreenshotManager.captureSampleBuffer(contentFilter: filter, configuration: config)

// Call the screenshot API to get CGImage representation.
let screenshotImage = try await SCScreenshotManager.captureImage(contentFilter: filter, configuration: config)
关键点:
captureSampleBuffer返回 CMSampleBuffer,适合后续视频处理管线captureImage返回 CGImage,适合直接显示或保存- 两个 API 使用同一套 configuration,只是输出格式不同
麦克风采集
SCStreamConfiguration 新增两个属性:captureMicrophone(开关)和 microphoneCaptureDeviceID(指定设备 ID)。采集到的麦克风数据通过新的 .microphone 输出类型分发(8:05):
// Create instance of SCStreamConfiguration.
let config = SCStreamConfiguration()

// Enable microphone capture and set id of microphone to capture.
config.captureMicrophone = true
config.microphoneCaptureDeviceID = AVCaptureDevice.default(for: .audio)?.uniqueID

// Create an SCStream instance.
let stream = SCStream(filter: filter, configuration: config, delegate: self)

// Add stream outputs for capturing screen and microphone.
try stream.addStreamOutput(self, type: .screen, sampleHandlerQueue: nil)
try stream.addStreamOutput(self, type: .microphone, sampleHandlerQueue: nil)

// Start the capture session.
try await stream.startCapture()

// Implement SCStreamOutput function to receive samples.
func stream(_ stream: SCStream, didOutputSampleBuffer sampleBuffer: CMSampleBuffer, of type: SCStreamOutputType) {
    switch type {
    case .screen:
        handleLatestScreenSample(sampleBuffer)
    case .audio:
        handleLatestAudioSample(sampleBuffer)
    case .microphone:
        handleLatestMicrophoneSample(sampleBuffer)
    }
}
关键点:
captureMicrophone = true是开启麦克风采集的前提microphoneCaptureDeviceID通过 AVCaptureDevice 获取,可以指定特定麦克风.microphone是新增的 SCStreamOutputType,和.screen、.audio并列- 三种媒体类型的时间戳由系统保证对齐
录制到文件
SCRecordingOutput 是新增的录制 API,替代了手动使用 AVAssetWriter 的方式(9:38):
// Create a recording output configuration.
let recordingConfiguration = SCRecordingOutputConfiguration()

// Configure the outputURL (optionally set file type and video codec).
recordingConfiguration.outputURL = url
recordingConfiguration.outputFileType = .mov
recordingConfiguration.videoCodecType = .hevc

// Create the recording output with the configuration.
let recordingOutput = SCRecordingOutput(configuration: recordingConfiguration, delegate: self)

// Add an SCRecordingOutput to the stream.
try stream.addRecordingOutput(recordingOutput)

// Start capturing (which will also start recording).
try await stream.startCapture()

// Stop recording.
try await stream.stopCapture()

// OR
// Stop recording, but keep stream running.
try stream.removeRecordingOutput(recordingOutput)
关键点:
outputURL指定保存路径,outputFileType和videoCodecType可选.hevc编码器配合 HDR 使用效果最佳addRecordingOutput后调用startCapture会同时开始录制stopCapture同时停止流和录制;removeRecordingOutput只停止录制,流继续运行
录制状态通过 SCRecordingOutputDelegate 回调通知(10:27):
func recordingOutputDidStartRecording(_ recordingOutput: SCRecordingOutput) {
    // Recording started asynchronously after addRecordOutput.
}

func recordingOutput(_ recordingOutput: SCRecordingOutput, didFailWithError error: Error) {
    // Recording failed with error.
}

func recordingOutputDidFinishRecording(_ recordingOutput: SCRecordingOutput) {
    // Recording finished after calling either removeRecordOutput or stopCapture.
}
关键点:
recordingOutputDidStartRecording在录制异步启动后触发didFailWithError处理录制中途的错误recordingOutputDidFinishRecording触发时,文件已经写入完成,可以直接使用
核心启发
-
给屏幕共享工具加 HDR 支持:如果你的应用做视频会议或远程桌面,用户在分享 HDR 视频或游戏画面时体验很差。切换到
captureHDRStreamCanonicalDisplay预置就能解决问题,改动量极小——只需替换 SCStreamConfiguration 的初始化方式。怎么开始:把现有的SCStreamConfiguration()改为SCStreamConfiguration(preset: .captureHDRStreamCanonicalDisplay),其余代码不动。 -
给录制工具加旁白功能:教程录制、产品演示等场景需要同时录屏幕和语音。以前要自己开 AVAudioEngine 采集麦克风再和屏幕流合并。现在只需设
captureMicrophone = true,添加.microphone输出类型,三种媒体从同一个流获取。怎么开始:在现有 SCStreamConfiguration 上加两行配置,在 addStreamOutput 时多加一个.microphone类型。 -
用 SCRecordingOutput 替换手写的 AVAssetWriter 逻辑:如果你在用 CMSampleBuffer 手动写文件,代码量大且容易出 bug(编码器选错、文件头损坏、时间戳不对齐)。SCRecordingOutput 三行配置就能完成同样的工作,还能和 HDR、麦克风无缝配合。怎么开始:创建 SCRecordingOutputConfiguration,设好 URL 和编码器,用
stream.addRecordingOutput替换原来的 AVAssetWriter 写入逻辑。
关联 Session
- Use HDR for dynamic image experiences in your app — 深入讲解 HDR 图像的读写与显示,和本 session 的 HDR 捕获配合使用
- Discover media performance metrics in AVFoundation — AVFoundation 新增媒体性能监控 API,适合分析录制产物的播放质量
- Keep colors consistent across captures — Constant Color API 保证拍摄颜色一致性,和 HDR 捕获的色域管理互补
- Build compelling spatial photo and video experiences — 空间照片和视频的采集与播放,涉及类似的 HDR 和多流媒体处理
评论
GitHub Issues · utterances