
Highlight
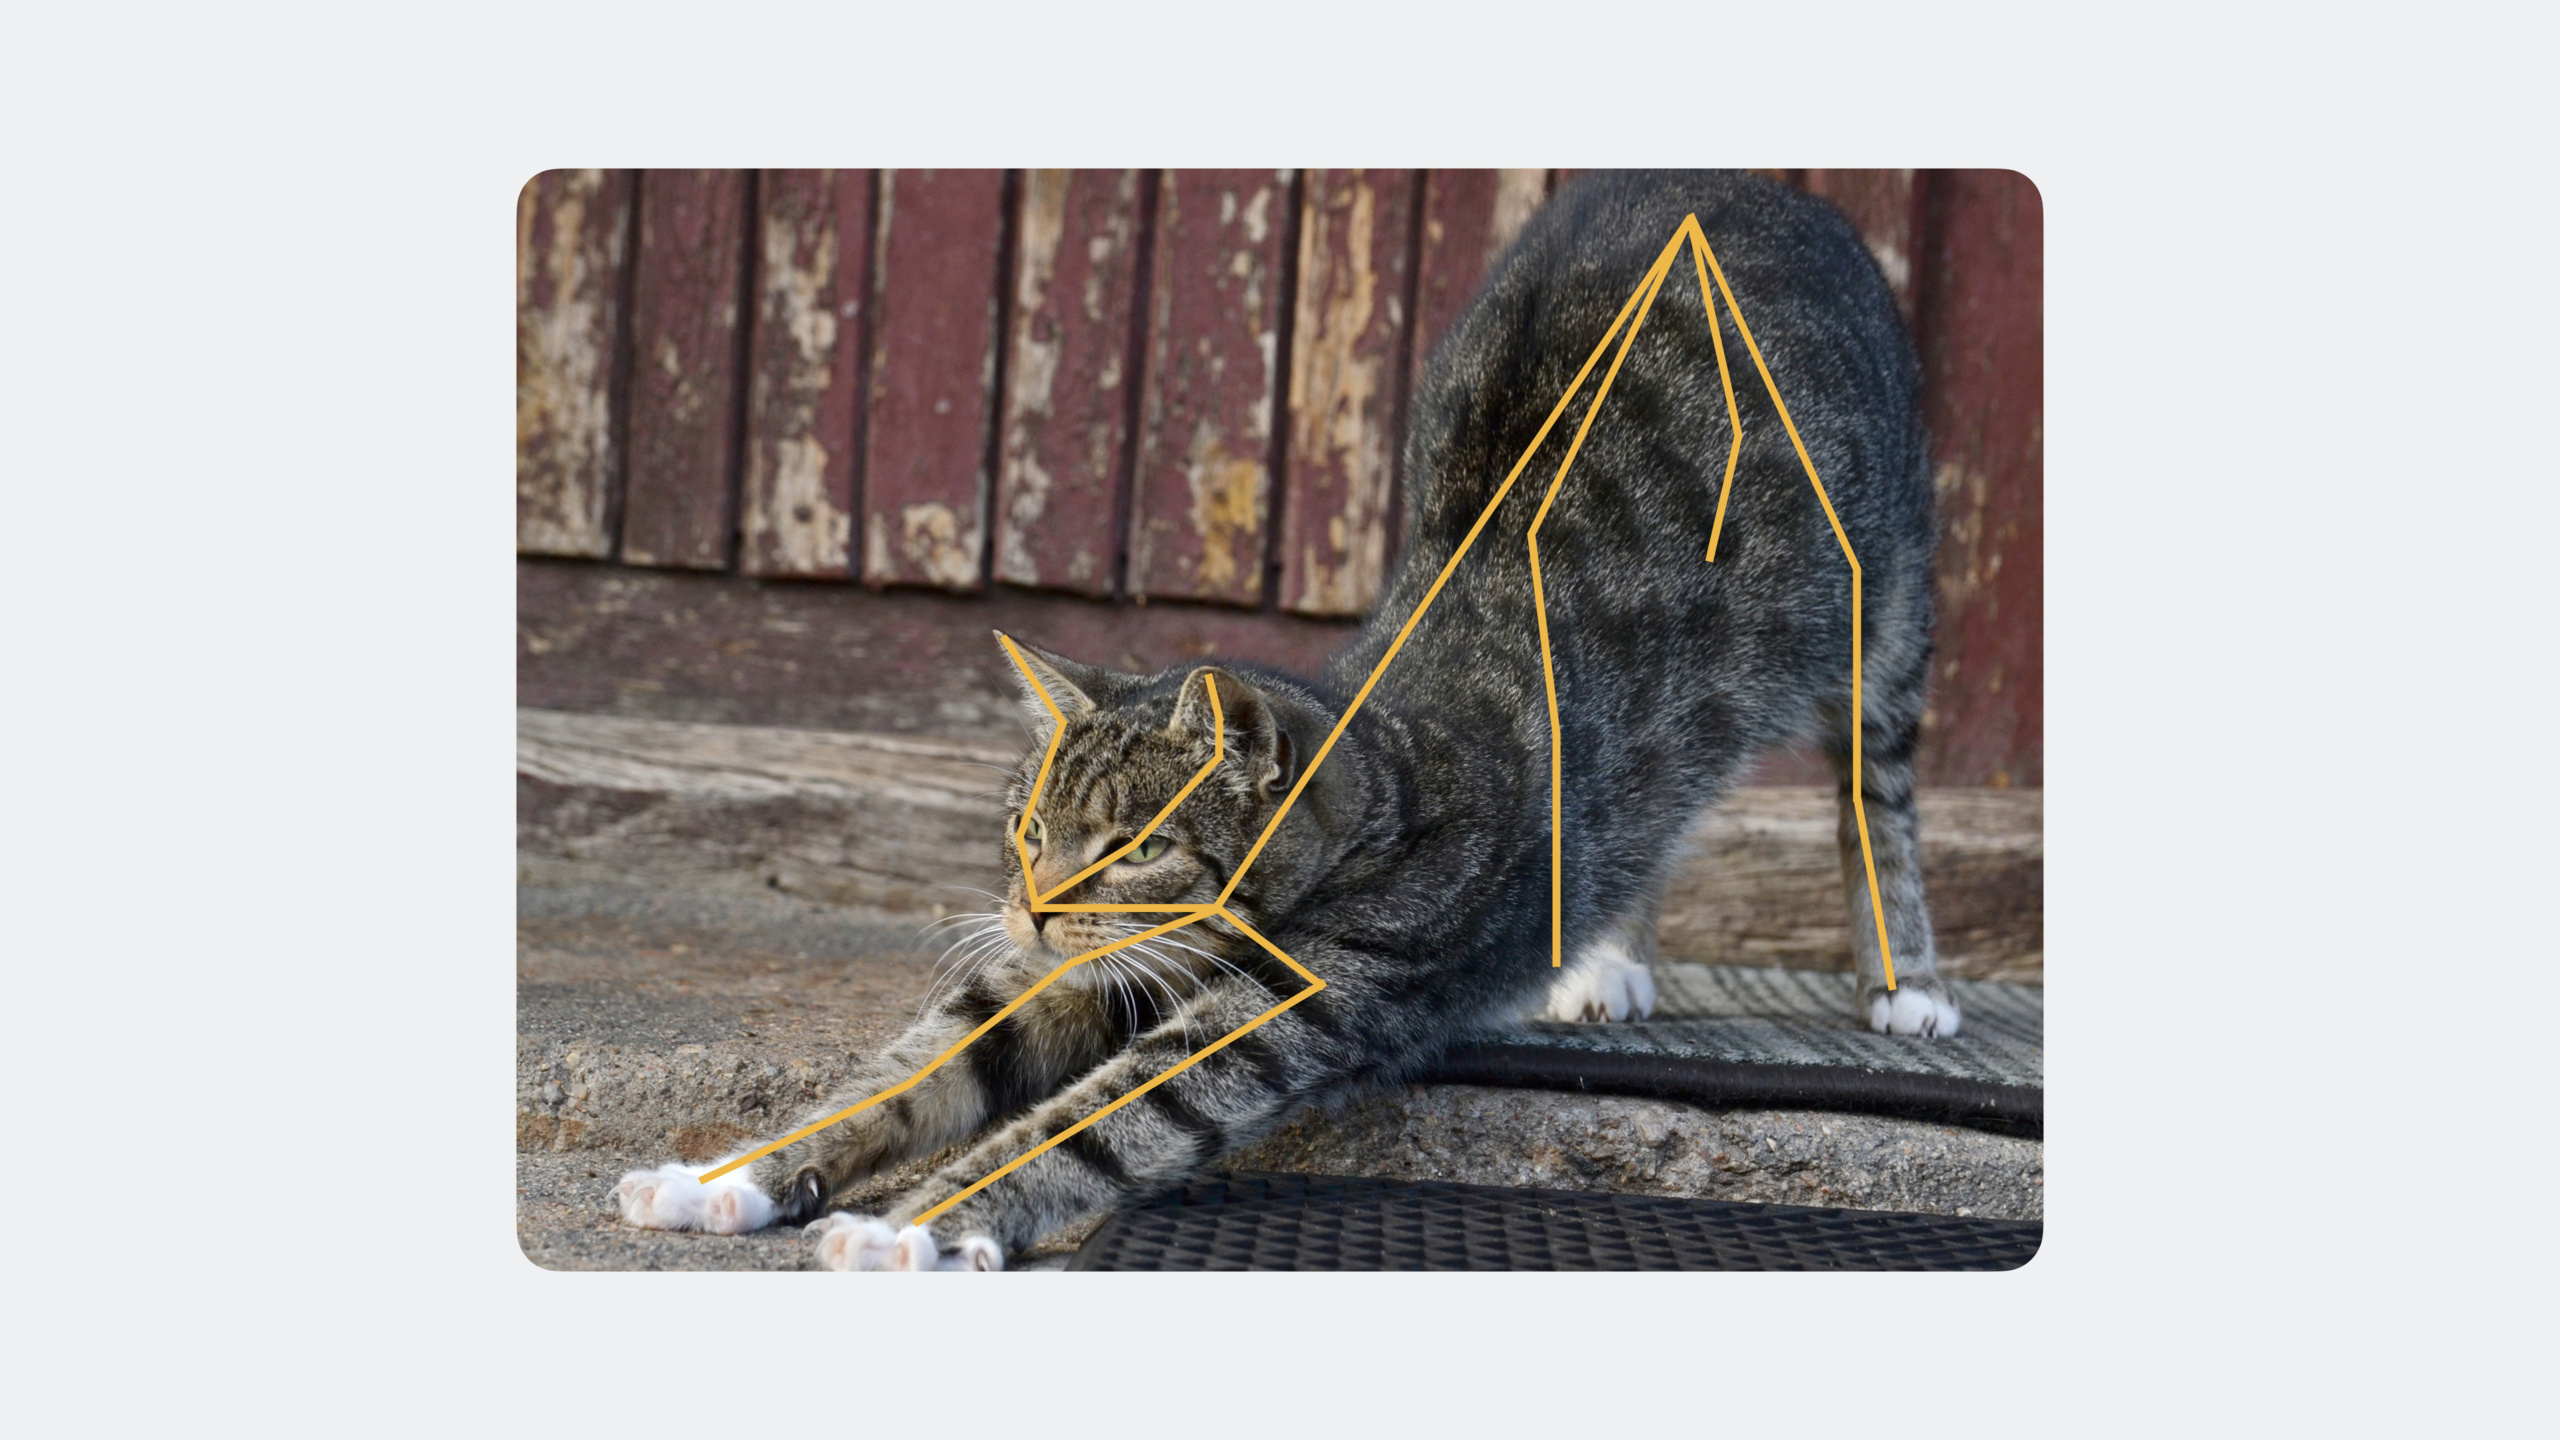
Vision 框架新增 Animal Body Pose API,支持实时检测猫和狗的 25 个身体关节点(包括尾巴和耳朵),分为 Head、Forelegs、Hindlegs、Trunk、Tail、All 六个关节组。单张图片最多检测两只动物,最小输入尺寸 64x64 像素,利用 Neural Engine 可达到实时相机流的性能。
核心内容
三年前 Vision 引入了 Human Body Pose,可以检测人体的 19 个关节点。开发者用它做了大量健康和健身应用。但现实世界不只有人类——宠物也是很多应用的核心场景。
Vision 之前已经有 Animal Recognition,可以检测和识别猫和狗,返回边界框、标签和置信度。但这只能告诉你”画面里有一只狗”,无法告诉你狗在做什么。狗是站着、坐着、奔跑还是蜷缩睡觉?从边界框很难推断。
Animal Body Pose 填补了这个空白。它检测猫和狗的 25 个身体关节点,包括耳朵、眼睛、鼻子、四条腿、颈部和尾巴。这些关节点组成六个组:Head(头部)、Forelegs(前腿)、Hindlegs(后腿)、Trunk(躯干)、Tail(尾巴)和 All(全部)。
输入可以是静态图片或视频流。处理后在每只动物上返回一组关节点位置,开发者可以用这些位置绘制骨架、分析姿态、追踪运动轨迹,或者做 AR 装饰叠加。
详细内容
创建和运行检测请求
(04:52)从相机流获取 CMSampleBuffer 后,创建 VNDetectAnimalBodyPoseRequest:
// 在 captureOutput(_:didOutput:from:) 中处理相机帧
func captureOutput(
    _ output: AVCaptureOutput,
    didOutput sampleBuffer: CMSampleBuffer,
    from connection: AVCaptureConnection
) {
    // 1. 创建检测请求
    let request = VNDetectAnimalBodyPoseRequest()

    // 2. 创建请求处理器
    let handler = VNImageRequestHandler(
        cmSampleBuffer: sampleBuffer,
        orientation: .up,
        options: [:]
    )

    // 3. 执行请求
    do {
        try handler.perform([request])

        // 4. 获取检测结果
        guard let observations = request.results as? [VNAnimalBodyPoseObservation] else {
            return
        }

        for observation in observations {
            processAnimalPose(observation)
        }
    } catch {
        print("Detection failed: \(error)")
    }
}
关键点:
VNDetectAnimalBodyPoseRequest是新的 Vision 请求类型VNImageRequestHandler接受CMSampleBuffer用于处理视频流request.results返回VNAnimalBodyPoseObservation数组,每个元素对应一只检测到的动物- 单张图片最多返回两只动物的观测结果
访问关节点数据
(05:36)从观测结果中获取关节点:
func processAnimalPose(_ observation: VNAnimalBodyPoseObservation) {
    // 获取所有关节点
    let allPoints = try? observation.recognizedPoints(.all)

    // 或者只获取头部关节点
    let headPoints = try? observation.recognizedPoints(.head)

    // 遍历关节点
    for (jointName, point) in allPoints ?? [:] {
        // point.location 是归一化坐标 (0.0 - 1.0)
        // point.confidence 是置信度 (0.0 - 1.0)
        if point.confidence > 0.5 {
            let x = point.location.x * viewBounds.width
            let y = point.location.y * viewBounds.height
            drawJoint(at: CGPoint(x: x, y: y), label: jointName.rawValue)
        }
    }
}
关键点:
recognizedPoints(_:)接受VNAnimalBodyPoseObservation.JointsGroupName参数- 可选值:
.head、.forelegs、.hindlegs、.trunk、.tail、.all - 返回字典,key 是
VNAnimalBodyPoseObservation.JointName,value 是VNRecognizedPoint location是归一化坐标,需要乘以视图尺寸转换为屏幕坐标confidence表示检测可信度,建议过滤掉低于 0.5 的点
绘制骨架
(06:04)连接关节点绘制动物骨架:
func drawSkeleton(observation: VNAnimalBodyPoseObservation, in context: CGContext) {
    guard let allPoints = try? observation.recognizedPoints(.all) else { return }

    // 定义头部连接关系
    let headConnections: [(VNAnimalBodyPoseObservation.JointName, VNAnimalBodyPoseObservation.JointName)] = [
        (.leftEar, .leftEye),
        (.leftEye, .nose),
        (.nose, .rightEye),
        (.rightEye, .rightEar),
        (.leftEar, .nose),
        (.rightEar, .nose)
    ]

    context.setStrokeColor(UIColor.green.cgColor)
    context.setLineWidth(2.0)

    for (startJoint, endJoint) in headConnections {
        guard let startPoint = allPoints[startJoint],
              let endPoint = allPoints[endJoint],
              startPoint.confidence > 0.5,
              endPoint.confidence > 0.5 else { continue }

        context.move(to: CGPoint(
            x: startPoint.location.x * viewBounds.width,
            y: startPoint.location.y * viewBounds.height
        ))
        context.addLine(to: CGPoint(
            x: endPoint.location.x * viewBounds.width,
            y: endPoint.location.y * viewBounds.height
        ))
    }

    context.strokePath()
}
关键点:
- 需要定义关节点之间的连接关系来绘制骨架
- 头部连接:左耳-左眼-鼻子-右眼-右耳
- 腿部连接:肩膀/臀部到对应的腿部关节
- 只连接置信度都高于阈值的关节点对
- 尾巴关节可以单独绘制曲线
在关节点位置叠加 AR 装饰
(09:24)利用关节点位置放置表情符号或装饰物:
func addEmojiOverlay(observation: VNAnimalBodyPoseObservation, on view: UIView) {
    guard let allPoints = try? observation.recognizedPoints(.all) else { return }

    // 在耳朵位置放头盔
    if let leftEar = allPoints[.leftEar],
       let rightEar = allPoints[.rightEar],
       leftEar.confidence > 0.5,
       rightEar.confidence > 0.5 {
        let centerX = (leftEar.location.x + rightEar.location.x) / 2 * view.bounds.width
        let centerY = (leftEar.location.y + rightEar.location.y) / 2 * view.bounds.height
        let width = abs(rightEar.location.x - leftEar.location.x) * view.bounds.width * 1.5

        let helmetLabel = UILabel()
        helmetLabel.text = "⛑️"
        helmetLabel.font = .systemFont(ofSize: width)
        helmetLabel.center = CGPoint(x: centerX, y: centerY - width / 2)
        view.addSubview(helmetLabel)
    }

    // 在眼睛位置放墨镜
    if let leftEye = allPoints[.leftEye],
       let rightEye = allPoints[.rightEye],
       leftEye.confidence > 0.5,
       rightEye.confidence > 0.5 {
        let centerX = (leftEye.location.x + rightEye.location.x) / 2 * view.bounds.width
        let centerY = (leftEye.location.y + rightEye.location.y) / 2 * view.bounds.height
        let width = abs(rightEye.location.x - leftEye.location.x) * view.bounds.width * 2

        let glassesLabel = UILabel()
        glassesLabel.text = "🕶️"
        glassesLabel.font = .systemFont(ofSize: width)
        glassesLabel.center = CGPoint(x: centerX, y: centerY)
        view.addSubview(glassesLabel)
    }
}
关键点:
- 使用两个耳朵的中点作为头盔位置,耳朵间距作为头盔大小参考
- 使用两个眼睛的中点作为墨镜位置,眼间距作为墨镜大小参考
- 装饰物大小应与动物在画面中的实际尺寸成比例
- 可以结合
VNRecognizeAnimalsRequest获取动物边界框,进一步调整装饰物尺寸
组合 Animal Recognition 和 Animal Body Pose
(07:43)同时使用两个请求获取更完整的信息:
let animalRecognitionRequest = VNRecognizeAnimalsRequest()
let bodyPoseRequest = VNDetectAnimalBodyPoseRequest()

let handler = VNImageRequestHandler(ciImage: image, options: [:])
try? handler.perform([animalRecognitionRequest, bodyPoseRequest])

// 动物识别结果:种类、边界框
if let recognitionResults = animalRecognitionRequest.results as? [VNRecognizedObjectObservation] {
    for result in recognitionResults {
        print("Detected: \(result.labels.first?.identifier ?? "unknown")")
        print("Bounding box: \(result.boundingBox)")
    }
}

// 姿态检测结果:关节点
if let poseResults = bodyPoseRequest.results as? [VNAnimalBodyPoseObservation] {
    for result in poseResults {
        print("Joints detected: \(result.availableJointNames.count)")
    }
}
关键点:
VNRecognizeAnimalsRequest返回动物种类和边界框VNDetectAnimalBodyPoseRequest返回关节点位置- 两个请求可以在同一个
VNImageRequestHandler中同时执行 - 组合使用可以知道”画面里有什么动物、在哪里、在做什么姿态”
其他 Vision 更新
(11:07)本 session 还提到了几项其他 Vision 更新:
- Stateful Requests:基于
VNTargetedImage的请求现在支持有状态请求,命名中使用”Track”动词,更适合追踪场景 - MLComputeDevice 支持:可以查询和指定请求在哪个计算设备(CPU、GPU、Neural Engine)上执行
- Barcode Revision 4:新增 MSIPlessey 条码格式,支持颜色反转的 QR 码
- Text Recognition:新增泰语和越南语支持
- FaceCaptureQuality Revision 3:提升质量和准确性
核心启发
-
做一个宠物姿态识别相机 App
- 实时检测宠物的姿态,自动分类为”站立”、“坐下”、“奔跑”、“睡觉”等标签
- 为什么值得做:宠物主人想知道宠物在家做了什么,自动分类比手动整理照片高效得多
- 怎么开始:用
VNDetectAnimalBodyPoseRequest获取关节点,计算关节角度和相对位置,建立简单的姿态分类规则
-
开发宠物 AR 贴纸相机
- 在宠物身上实时叠加帽子、眼镜、围巾等装饰,跟随宠物移动
- 为什么值得做:Animal Body Pose 提供了精确的关节点位置,比人脸关键点更适合做宠物特效
- 怎么开始:在相机预览层上叠加
CALayer,根据关节点位置实时更新装饰物的position和transform
-
构建宠物行为分析工具
- 录制宠物视频,分析一段时间内的姿态变化,生成活动报告(活动时间、休息时长、异常行为提醒)
- 为什么值得做:兽医和宠物行为学家需要量化数据来评估宠物健康状况
- 怎么开始:用
VNDetectAnimalBodyPoseRequest处理视频每一帧,记录关节点轨迹,用简单的规则引擎识别行为模式
关联 Session
- Explore 3D body pose and person segmentation in Vision — 3D 人体姿态和人物分割 API,与 Animal Body Pose 同属 Vision 框架的姿态检测家族
- Discover machine learning enhancements in Create ML — Create ML 的多标签分类增强,可以训练自定义的动物行为分类模型
- Lift subjects from images in your app — 从图像中分割任意前景对象,可以与 Animal Body Pose 组合实现更精确的宠物抠图
评论
GitHub Issues · utterances