
Highlight
Swift Playgrounds 4 新增了一套教学系统,让内容作者可以在 App 项目里嵌入引导式学习体验。Stephanie 和 Marcus 演示了如何用 Guide Module、Walkthrough Task 和 Experiment Task 把一段 SwiftUI 动画代码变成互动教程,学习者在 Learning Center 里一步步跟着做,还能动手修改代码看效果。
核心内容
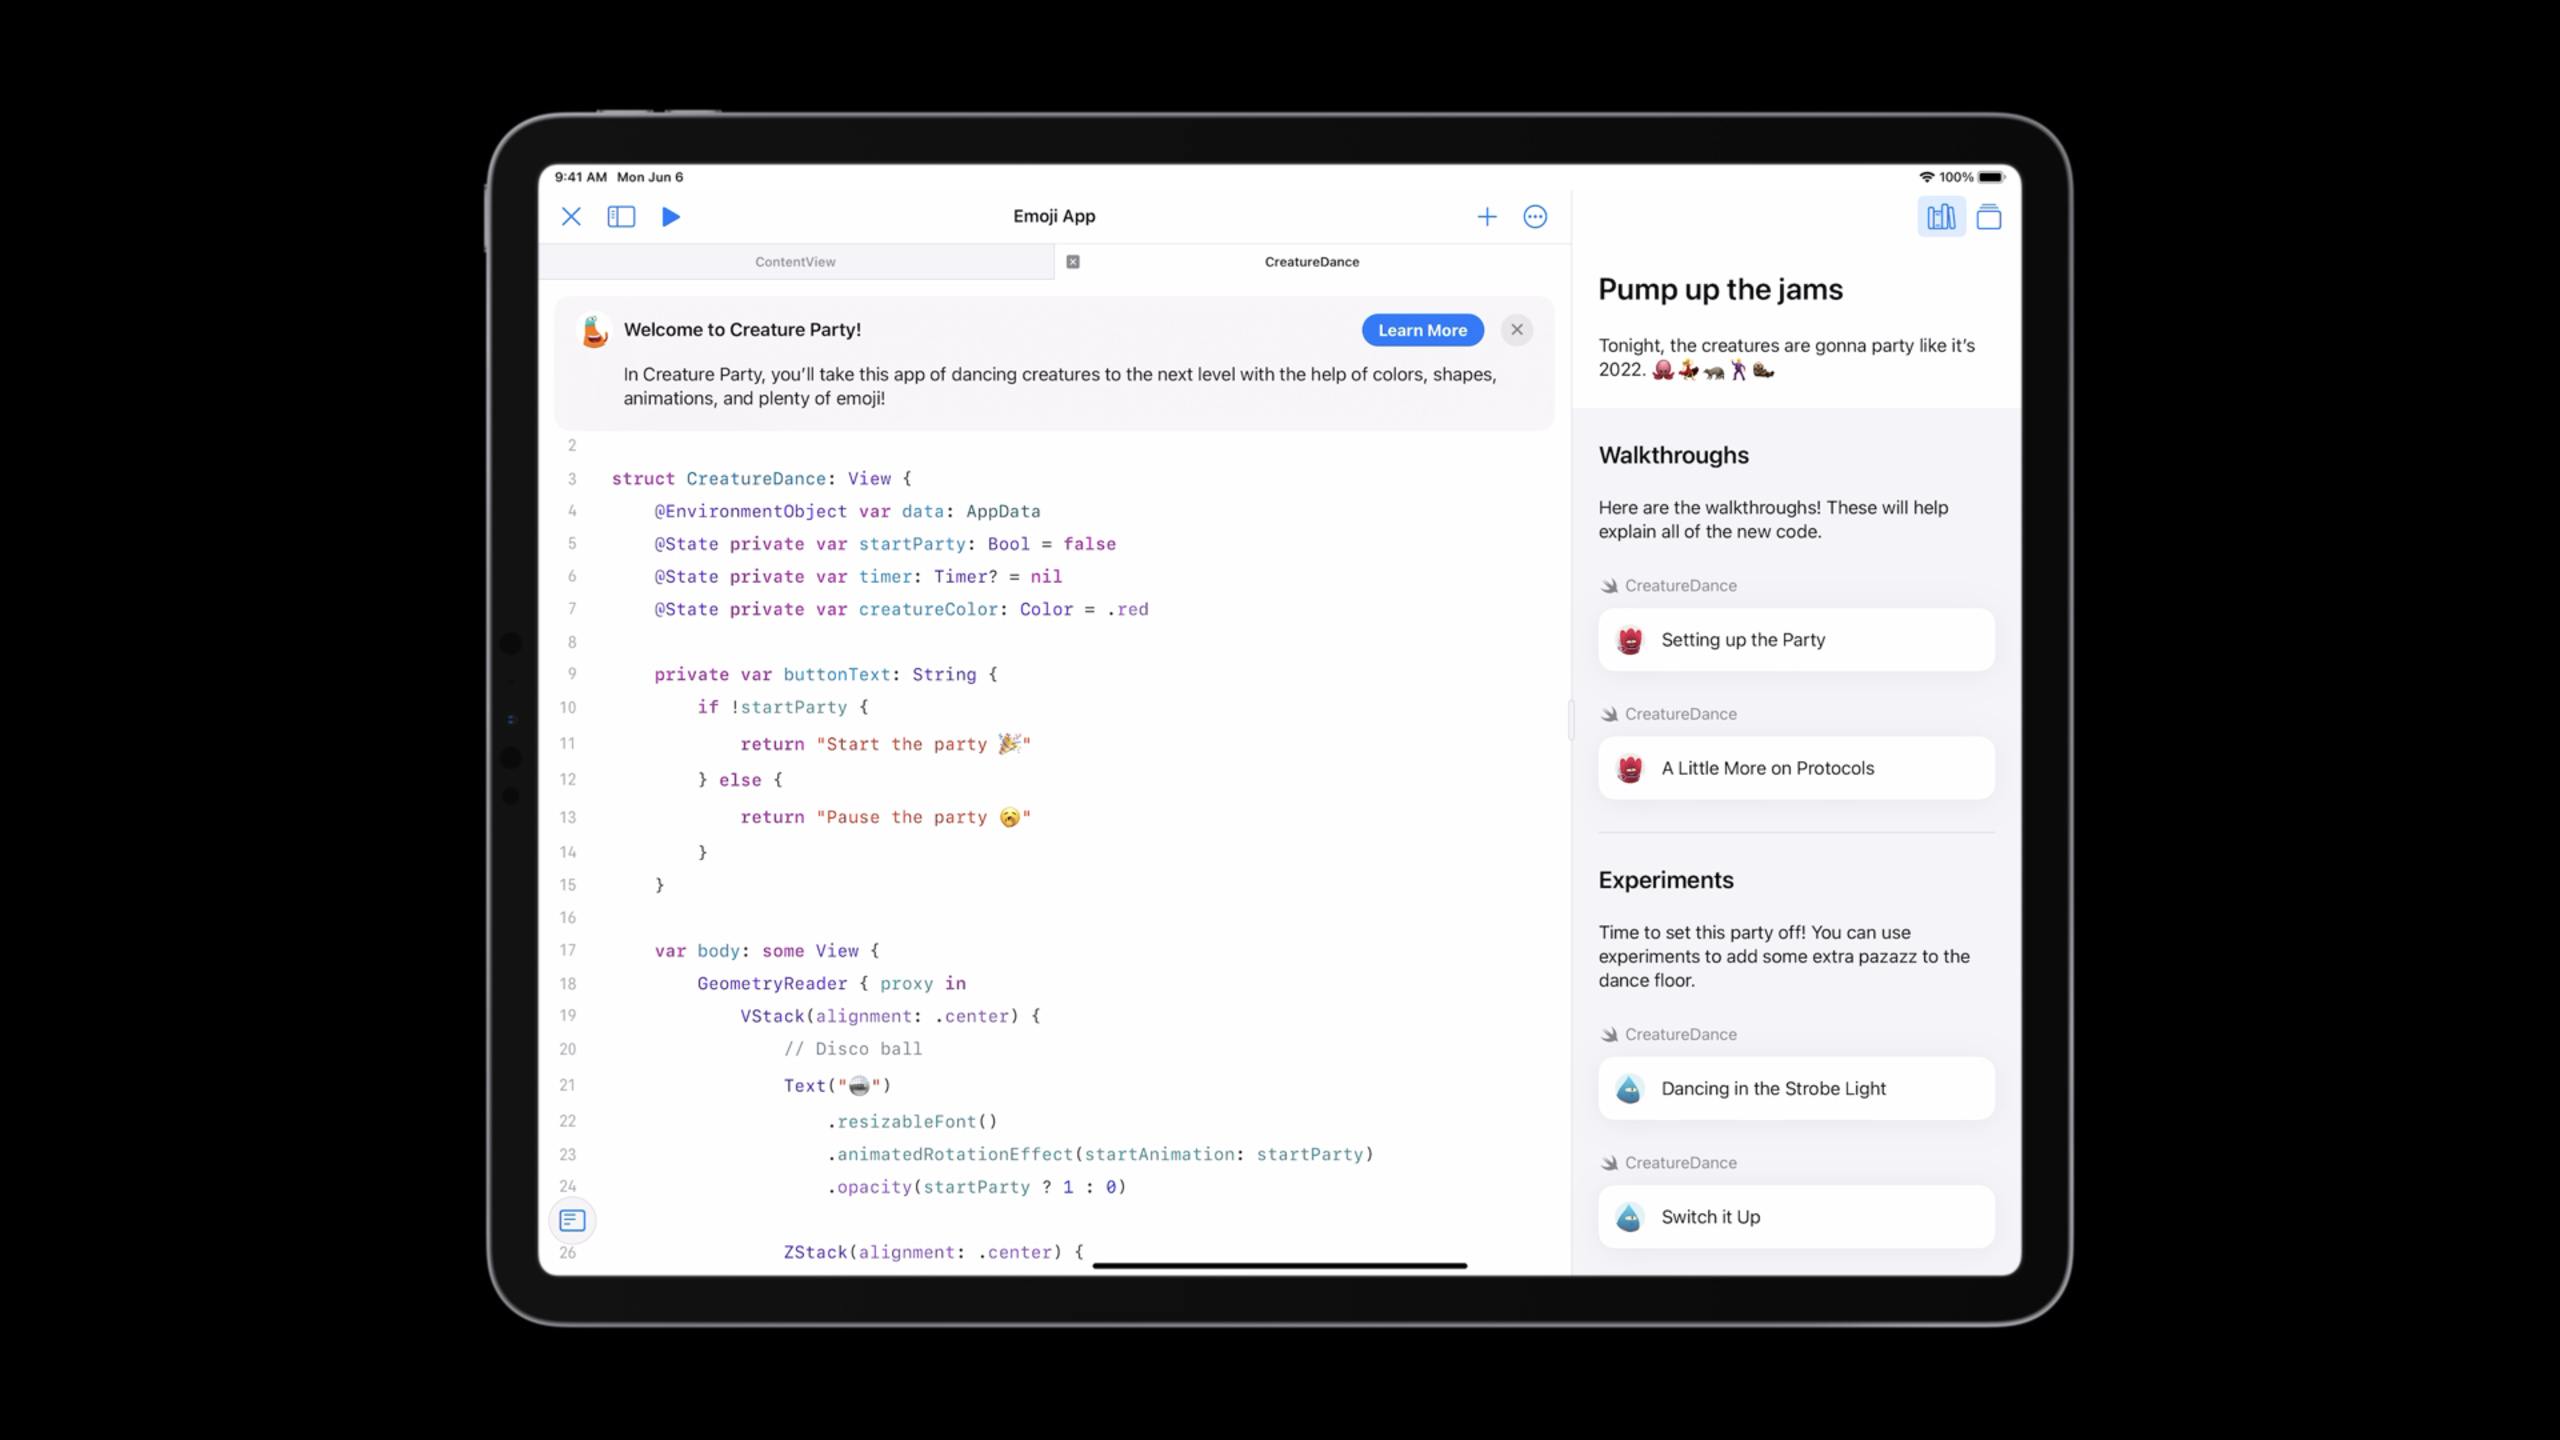
Swift Playgrounds 4 让任何人都能创建 App,但怎么教别人写 App?Apple 的内容团队发布了一套新的教学系统,把教程直接嵌入到项目代码里。学习者打开项目后,左侧是源码编辑器,右侧是 Learning Center,里面包含文字说明、图片、代码片段和任务按钮。(00:21)
Stephanie 和 Marcus 用一个叫 “Creature Party” 的项目做演示。这个项目基于 “Keep Going with Apps” 教程的终点项目 Emoji App, learners 已经能做出一个动物列表,点击动物能看到它们跳舞。Stephanie 给跳舞界面加了几个新功能:10x10 的彩色舞池地砖、让动物自动缩放/旋转/偏移的自定义 View Modifier、顶部旋转的迪斯科球。这些改动很酷,但代码复杂度上去了,学习者需要引导才能理解。(01:27)
教学系统的核心是一个叫 Guide Module 的新模块。默认的 swiftpm 项目把所有源码放在根目录,要使用教学系统,需要先调整文件结构:创建一个 App Module,把所有源码和资源移进去;Package.swift 留在根目录;再创建一个和 App Module 同级的 Guide Module,里面放 Guide 文件。(04:09)
Guide 文件用 Directives(指令)和 Markdown 混合编写。Directive 是 Markdown 的扩展,可以接受字符串参数,也可以嵌套其他 Directive 或 Markdown 元素。最外层是 @GuideBook,里面包含 @WelcomeMessage、@Guide、@Step、@ContentAndMedia、@TaskGroup、@Task、@Page 等指令。(05:12)
Marcus 负责讲解两种任务类型:Walkthrough 和 Experiment。Walkthrough 用于解释代码——点击任务按钮后,系统会打开指定文件,在源码编辑器上方显示教学卡片,并高亮相关代码行。Experiment 用于让学习者动手修改——卡片里显示一段可添加的代码,旁边有一个 Add 按钮,点击后代码自动插入到源文件的指定位置。(07:15)
详细内容
项目结构调整与 Guide Module
(04:09)使用教学系统前,需要把项目从默认的 flat 结构调整成模块化结构。
调整前:
MyApp.swiftpm/
  Package.swift
  MyApp.swift
  ContentView.swift
  Assets/
调整后:
MyApp.swiftpm/
  Package.swift
  App/
    MyApp.swift
    ContentView.swift
    Assets/
  Guide/
    Guide.swift
关键点:
- App Module 包含所有应用源码和资源
- Package.swift 必须留在根目录
- Guide Module 和 App Module 同级
- Guide Module 里至少需要一个 Guide 文件
Guide 文件的基本结构
(05:12)Guide 文件用 Swift 的宏风格 Directive 语法编写:
@GuideBook(title: "Creature Party!", icon: icon.png, background: background.png, firstFile: CreatureDance.swift) {
    @WelcomeMessage(title: "Welcome to Creature Party!") {
        In Creature Party, you'll take this app of dancing creatures to the next level with the help of colors, shapes, animations, and plenty of emoji!
    }

    @Guide {
        @Step(title: "Pump up the jams") {
            @ContentAndMedia {
                Tonight, the creatures are gonna party like it's 2022. 🐙💃🦝🕺🦦
            }
        }
    }
}
关键点:
@GuideBook是整个 Guide 的容器,参数包括 title、icon、background、firstFile@WelcomeMessage可选,学习者首次打开项目时显示在源码编辑器顶部@Guide包含所有步骤@Step对应 Learning Center 中的一个学习单元@ContentAndMedia里的 Markdown 显示在 Learning Center 顶部
Walkthrough Task:解释代码
(07:15)Walkthrough 用于引导学习者理解代码。创建 Walkthrough 需要 TaskGroup 和 Task 指令:
@TaskGroup(title: "Walkthroughs") {
    Here are the walkthroughs! These will help explain all of the new code.

    @Task(type: walkthrough, id: "partyMode", title: "Setting up the Party", file: CreatureDance.swift) {
        @Page(id: "1.modifier", title: "") {
            This is a [view modifier](https://developer.apple.com/documentation/swiftui/viewmodifier). Modifiers let you create unique versions of a view in SwiftUI.
        }
    }
}
关键点:
type: walkthrough指定任务类型id必须全局唯一file指定打开哪个源文件title显示在 Learning Center 的任务按钮上@Page是教学卡片中的一页,id也须全局唯一title留空时,系统使用 Task 的 title
代码高亮通过在源文件中添加注释标记实现:
ForEach(data.creatures) { creature in
    Text(creature.emoji)
        .resizableFont()
        /*#-code-walkthrough(1.modifier)*/
        .animatedScalingEffect(startAnimation: startParty)
        /*#-code-walkthrough(1.modifier)*/
        .randomizedOffsetEffect(startAnimation: startParty,
                                x: midX * 0.6,
                                y: midY * 0.6)
        .animatedRotationEffect(startAnimation: startParty)
        .opacity(startParty ? 1.0 : 0.0)
}
关键点:
/*#-code-walkthrough(页面id)*/包裹要高亮的代码行- 开始标记和结束标记之间的代码会在教学卡片显示时高亮
- 如果高亮代码不在可视区域,源码编辑器会自动滚动到对应位置
- 多页 Walkthrough 可以用 Next 按钮翻页,最后一页显示 “Next Walkthrough” 自动进入下一个任务
Experiment Task:动手修改
(14:21)Experiment 让学习者添加自己的代码。和 Walkthrough 的主要区别是 type: experiment 和 isAddable 参数:
@TaskGroup(title: "Experiments") {
    Time to set this party off! You can use experiments to add some extra pazazz to the dance floor.

    @Task(type: experiment, id: "colors", title: "Dancing in the Strobe Light", file: CreatureDance.swift) {
        @Page(id: "3.lights", title: "") {
            Next, add some colors to the creatures so it looks like they're dancing under the lights!
        }
        @Page(id: "3.code", title: "", isAddable: true) {
.colorMultiply(creatureColor)
}
}
}
关键点:
isAddable: true在代码片段旁显示 Add 按钮- 可添加的代码必须用 Markdown 代码块(三个反引号)包裹
- 建议代码块不超过 10 行,避免学习者需要滚动
代码插入位置通过在源文件中添加任务注释标记:
ForEach(data.creatures) { creature in
    Text(creature.emoji)
        .resizableFont()
        .animatedScalingEffect(startAnimation: startParty)
        .randomizedOffsetEffect(startAnimation: startParty,
                                x: midX * 0.6,
                                y: midY * 0.6)
        .animatedRotationEffect(startAnimation: startParty)
        .opacity(startParty ? 1.0 : 0.0)
        //#-learning-task(colors)
}
关键点:
//#-learning-task(任务id)是单行注释- 点击 Add 按钮后,代码片段会插入到该注释所在位置
- 一个 Experiment Task 可以有多个代码页和说明页交替
核心启发
-
做什么:给团队内部的技术分享或新人培训制作一个 Swift Playgrounds 互动教程。
为什么值得做:传统的代码讲解是”我演示你看”,而 Walkthrough + Experiment 的模式让学习者亲手操作。Stephanie 和 Marcus 的 Creature Party 演示证明,一段复杂的 SwiftUI 动画代码可以被拆解成 4 个渐进式任务,学习者在 15 分钟内就能理解并修改。
怎么开始:选一个你团队常用的代码模式(比如自定义 View Modifier、网络请求封装),创建一个 Swift Playgrounds 项目,用 Guide Module 写 2-3 个 Walkthrough 解释核心概念,再加 1 个 Experiment 让学习者动手改参数。 -
做什么:用 Experiment Task 做交互式 API 文档。
为什么值得做:Experiment 的isAddable机制让文档不再只是静态说明。学习者可以一键插入代码片段,实时看到效果。这比看 README 或 DocC 文档更直观。
怎么开始:在你的开源库或内部框架的示例项目里添加 Guide Module,为每个核心 API 写一个 Experiment,提供几个预设的代码片段(不同参数组合),让使用者一键尝试。 -
做什么:把现有教程项目迁移到新的教学系统。
为什么值得做:Swift Playgrounds 的旧教程格式依赖页面式的 step-by-step,学习者需要在页面和代码之间来回切换。新系统的 Learning Center 把说明和代码放在同一屏,代码高亮和自动滚动让注意力更集中。
怎么开始:把现有教程的文本内容拆分成@ContentAndMedia和@Page,把”看这里”改成/*#-code-walkthrough*/高亮标记,把”试着加上这行代码”改成 Experiment Task。
关联 Session
- Build your first app in Swift Playgrounds — learn how you can easily prototype and build apps with swift playgrounds.
- What’s new in SwiftUI — learn about the latest updates to swiftui, including new apis and features for building great apps.
- Meet Swift Package plugins — learn how swift package plugins can help you automate build tasks and customize your workflow.
评论
GitHub Issues · utterances