
Highlight
Sign in with Apple 的核心问题之一是账号重复:用户可能先用邮箱密码注册,后来又用 Sign in with Apple 创建了第二个账号。Session 的前半部分专门解决这个痛点。
核心内容
一个 App 同时支持邮箱密码和 Sign in with Apple 后,登录入口会变多。老用户已经有密码账号,新用户可能直接点 Apple 登录。如果 App 在这个时刻直接创建新账号,同一个人就会得到两个账号。
这个 session 的第一个目标是减少这种重复账号。Apple 建议先做好 Password AutoFill,再用 Authentication Services 在 App 启动时展示设备上已经存在的凭据。用户还没进入登录页,就能选回原来的账号。
第二个目标是把账号生命周期处理完整。Sign in with Apple 返回的 ASAuthorizationAppleIDCredential 里有稳定用户标识、姓名、邮箱、真实性指标、identity token 和 authorization code。它们的返回时机不同,服务端校验方式也不同,App 不能只把登录按钮接上就结束。
第三个目标是把同一套体验扩展到 Web。网站需要 Services ID、域名、redirect URL,以及 Sign in with Apple JS。授权成功后,页面通过 DOM 事件拿到 authorization code、identity token 和用户信息。
详细内容
启动时只展示现有凭据
(04:03)preferImmediatelyAvailableCredentials 是 iOS 16 新增的选项,适合在 App 启动时调用。它告诉系统:只展示设备上立即可用的凭据,不引导用户新建 Sign in with Apple 账号。
import AuthenticationServices

let controller = ASAuthorizationController(authorizationRequests: [
    ASAuthorizationAppleIDProvider().createRequest(),
    ASAuthorizationPasswordProvider().createRequest()
])

controller.delegate = self
controller.presentationContextProvider = self

if #available(iOS 16.0, *) {
    controller.performRequests(options: .preferImmediatelyAvailableCredentials)
} else {
    controller.performRequests()
}
关键点:
ASAuthorizationAppleIDProvider().createRequest()查询现有的 Sign in with Apple 凭据。ASAuthorizationPasswordProvider().createRequest()查询现有的密码凭据。ASAuthorizationController同时接收两类请求,让系统把可用登录方式放在一个选择界面里。delegate接收用户选中凭据后的结果。presentationContextProvider提供展示授权界面需要的窗口上下文。preferImmediatelyAvailableCredentials避免在启动阶段弹出创建新账号流程。- 旧系统回退到普通
performRequests(),保持兼容。
(05:14)用户选中凭据后,delegate 会收到不同类型的 credential。没有可用凭据时,系统调用错误回调,App 再展示标准登录界面。
func authorizationController(controller: ASAuthorizationController,
                             didCompleteWithAuthorization authorization: ASAuthorization) {
    switch authorization.credential {
    case let appleIDCredential as ASAuthorizationAppleIDCredential:
        // Sign the user in with Apple ID credential.
        // ...

    case let passwordCredential as ASPasswordCredential:
        // Sign the user in with password credential
        // ...
    }
}

func authorizationController(controller: ASAuthorizationController,
                             didCompleteWithError error: Error) {
    // No credential found. Fall back to login UI.
}
关键点:
didCompleteWithAuthorization是用户选中已有凭据后的入口。ASAuthorizationAppleIDCredential对应 Sign in with Apple 账号。ASPasswordCredential对应密码账号,适合把老用户带回原账号。didCompleteWithError在没有现有凭据时触发,适合回到普通登录或注册流程。
正确读取 Apple ID Credential
(06:24)Sign in with Apple 授权成功后,App 拿到的是 ASAuthorizationAppleIDCredential。session 明确列出几个字段:user、fullName、email、realUserStatus、identityToken、authorizationCode。
// Conceptual sketch based on the fields discussed in the session.
let userID = appleIDCredential.user
let fullName = appleIDCredential.fullName
let email = appleIDCredential.email
let realUserStatus = appleIDCredential.realUserStatus
let identityToken = appleIDCredential.identityToken
let authorizationCode = appleIDCredential.authorizationCode
关键点:
user是稳定用户标识,同一个开发团队下的 App 会得到同一个标识。fullName只应在业务确实需要时请求,用户可以提供自己选择的名字。email可能是 Apple ID 邮箱,也可能是 Hide My Email 生成的转发邮箱。realUserStatus用设备端机器学习、账号历史和硬件证明计算,用于辅助反欺诈。identityToken是 JWT,服务端需要验证 Apple 签名、issuer、audience、过期时间和 nonce。authorizationCode是短期、一次性 token,可交给 Apple ID 服务器换取 refresh token。
(08:37)fullName、email 和 realUserStatus 只在首次创建账号时返回。后续登录不会再次返回这些值。App 如果需要姓名和邮箱,要在账号创建确认前安全缓存。
(09:35)服务端校验 identity token 时,至少要检查四件事:issuer 是 appleid.apple.com,audience 是 App 的 bundle identifier,过期时间大于当前时间,nonce 与创建授权请求前生成的值一致。
监控凭据状态和账号删除
(12:00)授权完成后,用户会话由 App 管理。用户可能在 Settings 里停用 Apple ID 登录,也可能从设备退出。App 启动时应检查 credential state。
let appleIDProvider = ASAuthorizationAppleIDProvider()
appleIDProvider.getCredentialState(forUserID: "currentUserIdentifier") { (credentialState, error) in
    switch credentialState {
    case .authorized:
        // Found valid Apple ID credential
    case .revoked:
        // Apple ID credential revoked. Log the user out.
    case .notFound:
        // No credential found. Show login UI.
    case .transferred:
        // Team is transferred
    }
}
关键点:
ASAuthorizationAppleIDProvider()是查询 Apple ID credential state 的入口。getCredentialState(forUserID:)用当前用户标识检查凭据状态。.authorized表示凭据仍有效。.revoked表示凭据已撤销,App 应注销当前用户。.notFound表示没有找到凭据,App 应显示登录界面。.transferred处理开发团队转移场景。
(12:18)除了主动查询,App 还应该监听凭据撤销通知。
let notificationName = ASAuthorizationAppleIDProvider.credentialRevokedNotification

NotificationCenter.default.addObserver(self,
                                       selector: #selector(signOut(_:)),
                                       name: notificationName,
                                       object: nil)
关键点:
credentialRevokedNotification是 Apple ID 凭据撤销事件。NotificationCenter.default.addObserver让 App 在事件到达时收到通知。selector: #selector(signOut(_:))把撤销事件接到退出登录逻辑。- 发现状态变化时,session 建议假设已有不同用户登录,并注销当前用户。
(12:32)有服务端的 App 还应订阅 server-to-server notifications。Apple 会把事件作为由 Apple 签名的 JWT 发到同一个 endpoint。事件包括 email-disabled、consent-revoked、account-delete。
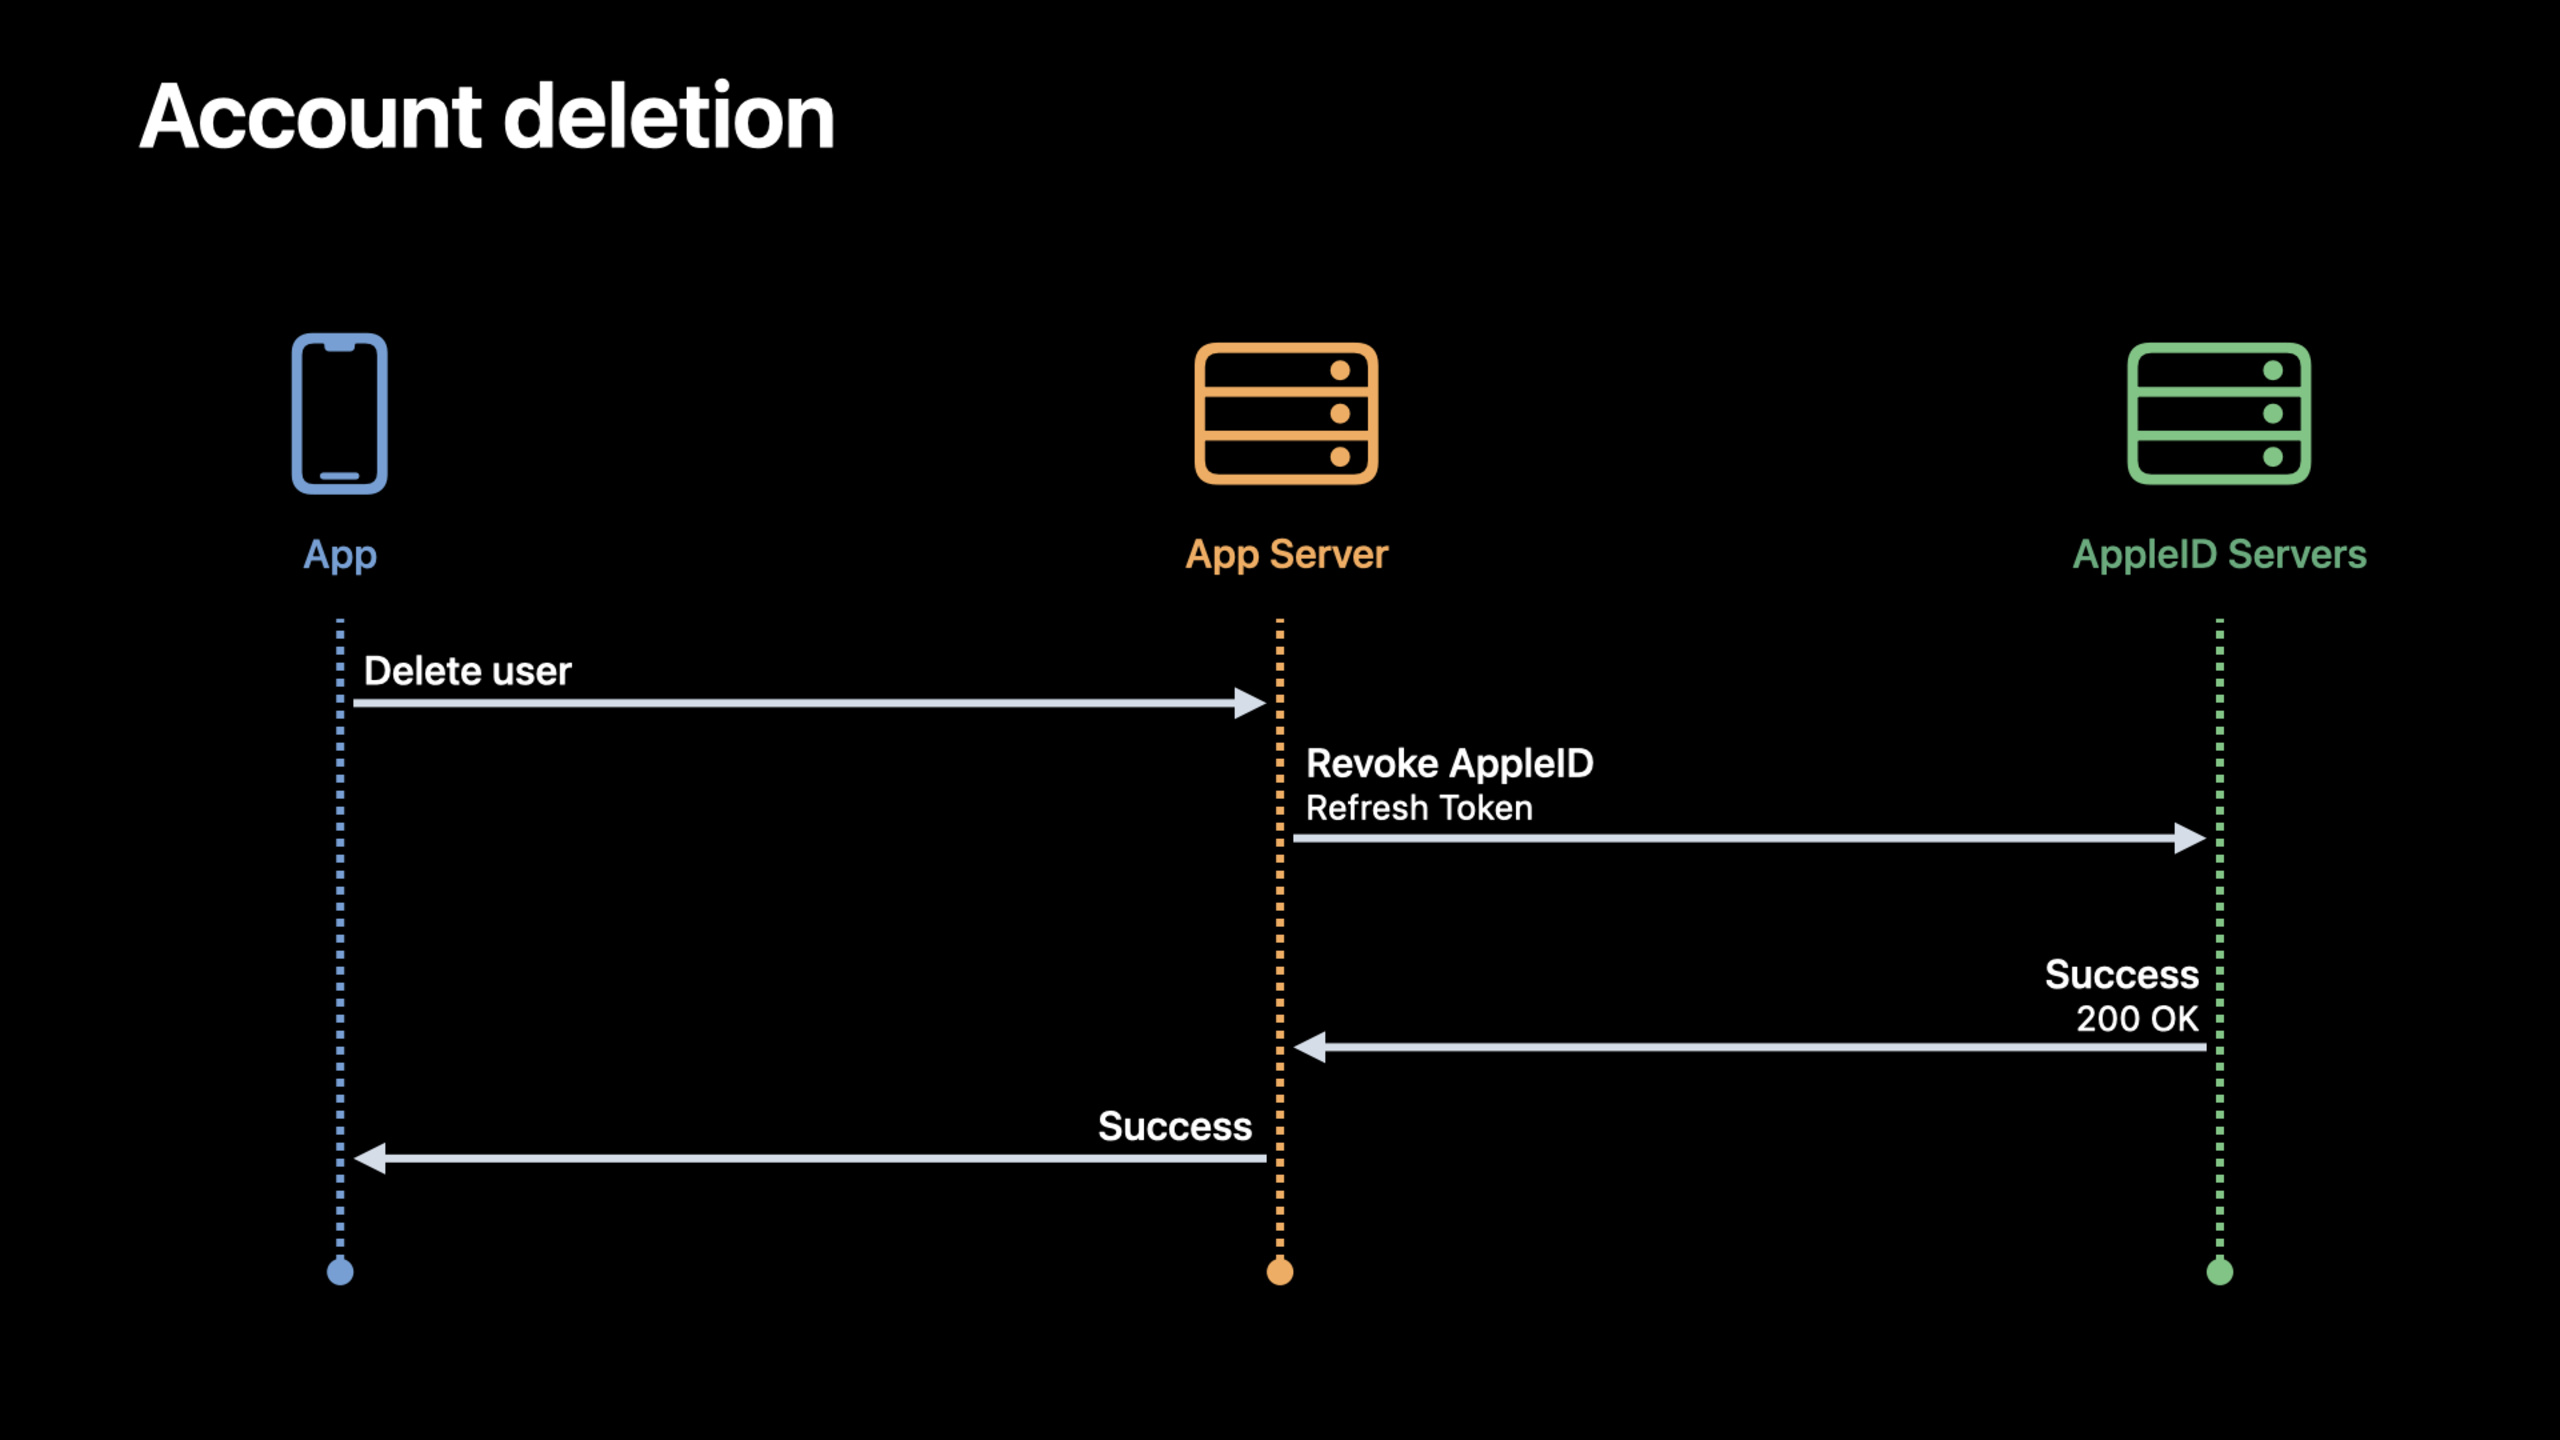
(14:22)账号删除流程可以调用新的 REST 端点。服务端先准备有效 refresh token 或 access token,再调用 auth/revoke。如果使用 refresh token,token_type_hint 对应 REFRESH_TOKEN;如果使用 access token,对应 ACCESS_TOKEN。成功后,token 和用户活跃会话会立即失效。
在 Web 上接入 Sign in with Apple
(16:35)网站接入前,需要在 Apple Developer Portal 创建 Services ID,配置 Primary App ID、网站域名和 redirect URL。相关 App 建议分组,这样用户只需要同意一次信息共享。
(17:55)Sign in with Apple JS 负责加载按钮和发起授权请求。页面引入 Apple 的 JS 文件后,用一个 div 声明按钮,再调用 AppleID.auth.init。
<html>
    <body>
        <script type="text/javascript" src="https://appleid.cdn-apple.com/appleauth/static/jsapi/appleid/1/en_US/appleid.auth.js"></script>
        <div id="appleid-signin" data-color="white" data-border="true" data-type="sign in"/>
        <script type="text/javascript">
            AppleID.auth.init({
                clientId : '[CLIENT_ID]',
                scope : '[SCOPES]',
                redirectURI : '[REDIRECT_URI]',
                state : '[STATE]',
                nonce : '[NONCE]',
                usePopup : true
            });
        </script>
    </body>
</html>
关键点:
appleid.auth.js是 Sign in with Apple JS 的入口脚本。id="appleid-signin"的div会生成 Sign in with Apple 按钮。data-color、data-border、data-type控制按钮外观和文字。clientId是 Developer Portal 中创建的 Services ID。scope只填写网站实际需要的姓名或邮箱范围。redirectURI必须是 Developer Portal 已注册的 URL。state和nonce用于保护授权请求。usePopup控制登录界面使用弹窗,还是跳转当前窗口。
(18:28)按钮可以通过属性调整。session 展示了白色、黑色、Continue with Apple 和 logo-only 四种写法。
<div id="appleid-signin" data-color="white" data-border="true" data-type="sign in"/>
<div id="appleid-signin" data-color="black" data-border="true" data-type="sign in"/>
<div id="appleid-signin" data-color="black" data-border="true" data-type="continue"/>
<div id="appleid-signin" data-color="black" data-border="true" data-mode="logo-only"/>
关键点:
data-color="white"生成白色按钮。data-color="black"生成黑色按钮。data-type="continue"把按钮文字改成 Continue with Apple。data-mode="logo-only"只展示 Apple 标志。
(21:11)授权结果通过 DOM 事件返回。成功事件包含 authorization code、identity token,以及请求过的用户信息。
document.addEventListener('AppleIDSignInOnSuccess', (event) => {
    // Handle successful response.
    console.log(event.detail.data);
});

document.addEventListener('AppleIDSignInOnFailure', (event) => {
     // Handle error.
     console.log(event.detail.error);
});
关键点:
AppleIDSignInOnSuccess在授权成功后触发。event.detail.data包含成功响应数据。AppleIDSignInOnFailure在授权失败后触发。event.detail.error包含失败信息,页面应在这里恢复 UI 或展示错误。
核心启发
-
做一个启动即登录的账号选择器:在 App 启动时调用
performRequests(options: .preferImmediatelyAvailableCredentials),同时请求 Apple ID 和密码凭据。用户选到旧密码账号时,直接进入原账号,减少重复账号。 -
做一个密码账号升级入口:在设置页或登录后提示用户把密码账号升级到 Sign in with Apple。实现入口是 Account Authentication Modification Extension,适合帮助用户少记一个密码。
-
做一个凭据状态守护器:App 启动时调用
getCredentialState(forUserID:),运行时监听credentialRevokedNotification。状态变成 revoked 或 notFound 时,清理本地 session 并回到登录页。 -
做一个服务端账号删除流程:删除账号时,服务端用 refresh token 或 access token 调用
auth/revoke。成功后,再执行自家数据库的删除或匿名化流程,保证 Apple ID 关联关系一起失效。 -
做一个网站版统一登录页:在 Developer Portal 配置 Services ID、域名和 redirect URL,用 Sign in with Apple JS 渲染按钮,监听
AppleIDSignInOnSuccess后把 authorization code 交给服务端换取 token。
关联 Session
- Discover Sign in with Apple at Work & School — 讲 managed Apple IDs、Roster API,以及组织环境下的 Sign in with Apple 配置。
- Meet passkeys — 使用 Authentication Services 接入 passkeys,和本 session 的登录凭据选择流程直接相关。
- Replace CAPTCHAs with Private Access Tokens — 解释如何用隐私保护方式提高真实用户判断信心,可补充
realUserStatus的反欺诈场景。 - Streamline local authorization flows — 介绍 LocalAuthentication 对本地敏感资源的授权保护,适合和账号登录后的安全操作搭配使用。
评论
GitHub Issues · utterances