
Highlight
iOS 16 和 macOS Ventura 引入了 Collaboration with Messages 功能,允许用户通过 Messages 直接发起和参与协作。协作者可以将文档绑定到对话中,协作活动会实时显示在 Messages 对话和 FaceTime 通话中。
核心内容
多人一起编辑文档时,最容易断开的环节通常不在编辑器里,而在沟通里。
文件已经共享,讨论却散落在 Messages。有人改了标题,有人新增评论,有人退出群聊,应用还要自己想办法把这些状态同步给参与者。
01:02 iOS 16 和 macOS Ventura 把协作入口接进 Messages。用户从分享面板或拖放发起协作后,文档会和一个 Messages 对话绑定。协作活动可以出现在 Messages thread 顶部,也可以出现在正在进行的 FaceTime 通话里。
这场 session 讲的是系统侧的接入路径。Apple 支持三类协作基础设施:CloudKit、iCloud Drive,以及自定义协作系统。CloudKit 使用新的 NSItemProvider API 包装 CKShare;iCloud Drive 直接使用文件 URL;自定义系统使用 SWCollaborationMetadata。
详细内容
先把协作对象交给系统
03:13 CloudKit App 的第一步,是创建系统可以识别的协作对象。这个对象基于 NSItemProvider,它携带 CKShare、CKContainer,以及可选的权限配置。
// CloudKit collaboration object

// Starting collaboration
let itemProvider = NSItemProvider()
itemProvider.registerCKShare(container: container,
                             allowedSharingOptions: CKAllowedSharingOptions.standard,
                             preparationHandler: {
    // Create your share and save to server, or throw error
    return savedShare
})

// Inviting to existing collaboration
let itemProvider = NSItemProvider()
itemProvider.registerCKShare(share,
                             container: container,
                             allowedSharingOptions: CKAllowedSharingOptions.standard)
关键点:
NSItemProvider()创建一个可交给系统分享服务的数据提供者。registerCKShare(container:allowedSharingOptions:preparationHandler:)用于还没有开始的协作。preparationHandler必须创建CKShare,并把它保存到服务器。CKAllowedSharingOptions.standard使用默认的访问和权限组合。- 已经存在的协作直接传入
share,系统用它继续邀请新参与者。
如果 App 使用 iCloud Drive,协作对象就是文件 URL。系统会识别它,不需要开发者手动构造 CKShare。
分享面板进入协作模式
06:16 发起协作有两条路:新的 Share Sheet 协作模式,以及把文档拖到 Messages。Share Sheet 的头部会出现协作指示器,用户可以选择协作或发送副本。
在 iOS 和 Mac Catalyst 上,入口仍然是 UIActivityViewController。
// Setting up Share Sheet - iOS and Mac Catalyst

let activityViewController = UIActivityViewController(activityItems: [collaborationObject], applicationActivities: nil)

presentingViewController.present(activityViewController, animated: true)
关键点:
collaborationObject是前面准备好的NSItemProvider、文件 URL 或自定义协作元数据。UIActivityViewController接收这个对象后,系统会展示协作模式。present负责把分享面板显示给用户。
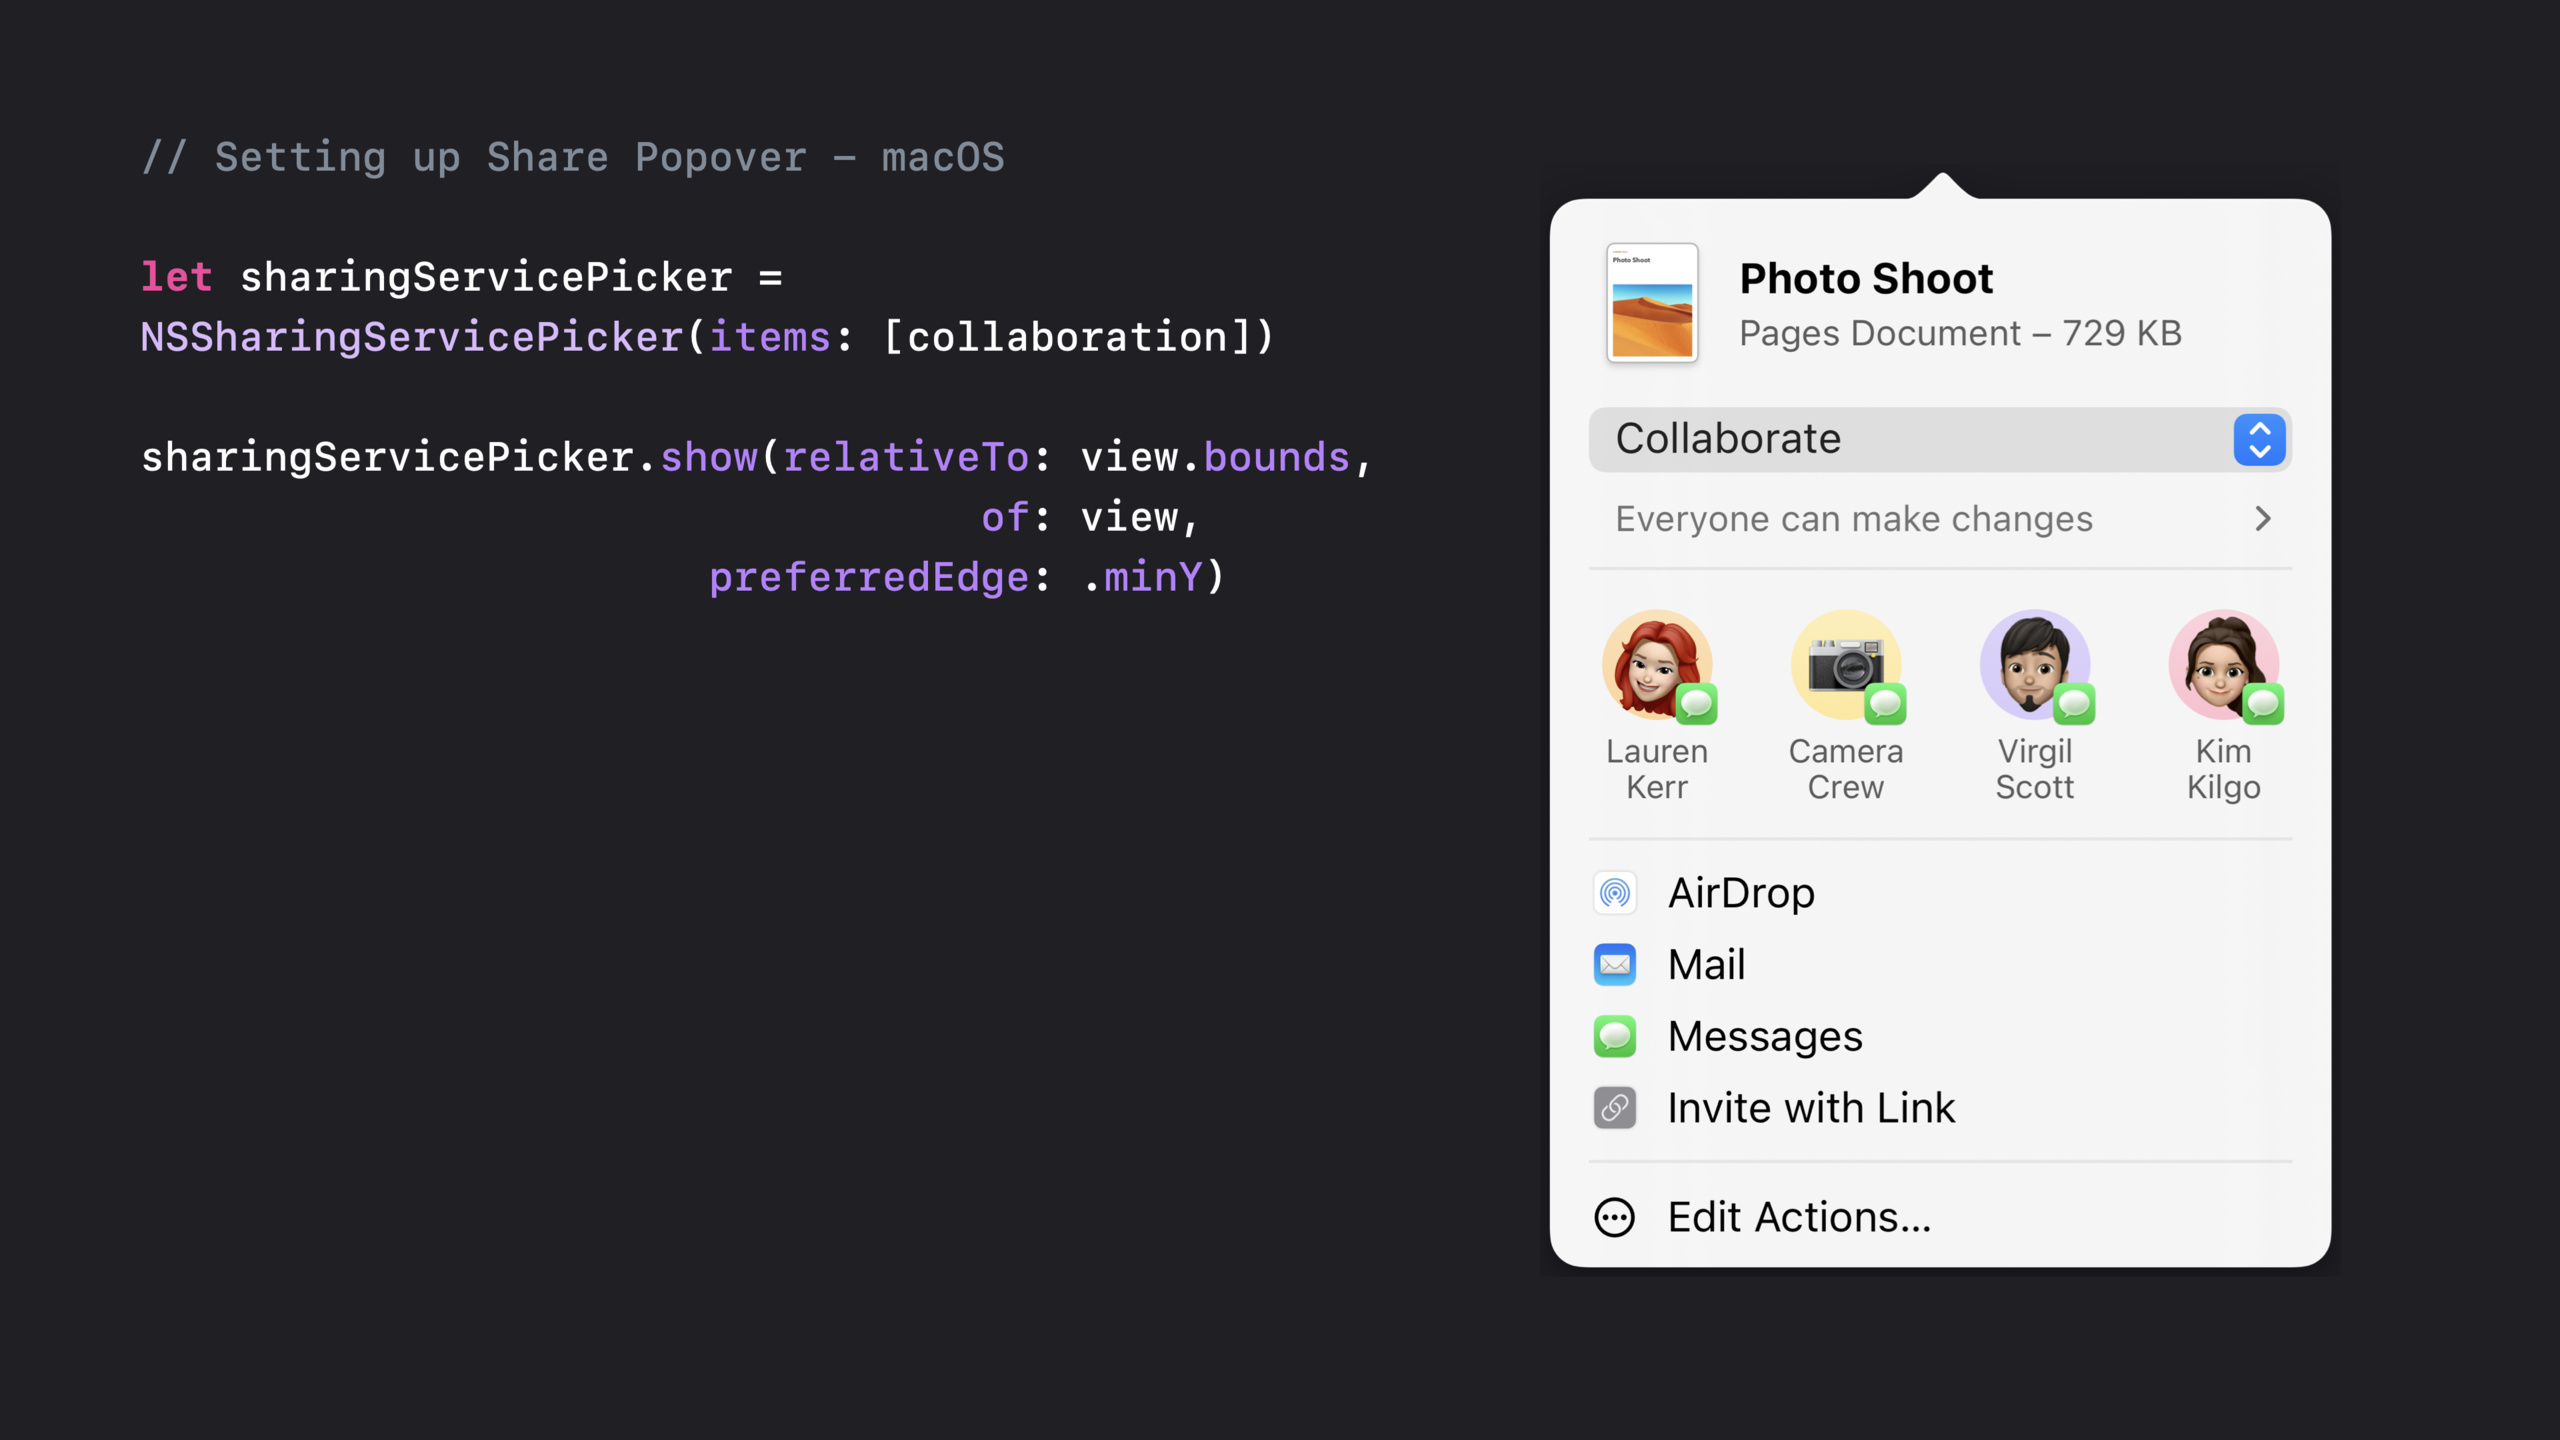
07:47 macOS 使用 NSSharingServicePicker,并在 Ventura 中显示新的 Share Popover。
// Setting up Share Popover - macOS

let sharingServicePicker = NSSharingServicePicker(items: [collaborationObject])

sharingServicePicker.show(relativeTo: view.bounds, of: view, preferredEdge: .minY)
关键点:
NSSharingServicePicker(items:)同样接收协作对象。show(relativeTo:of:preferredEdge:)在指定视图附近弹出分享 UI。- 系统会在弹窗中显示标题、图片、对话建议和可用分享方式。
CloudKit 需要补充分享头部元数据
07:57 CloudKit App 还需要给分享头部提供标题和图片。否则系统知道这是一次协作,却没有足够信息展示被分享的内容。
iOS 和 Mac Catalyst 可以通过 UIActivityItemsConfiguration 返回 LPLinkMetadata。
// Providing CloudKit metadata - iOS

let configuration = UIActivityItemsConfiguration(itemProviders: [collaborationItemProvider])
configuration.perItemMetadataProvider = { (_, key) in
    switch key {
    case .linkPresentationMetadata:
        // Create LPLinkMetadata with title and imageProvider
        return metadata
    default:
        return nil
    }
}

let activityViewController = UIActivityViewController(activityItemsConfiguration: configuration)
关键点:
UIActivityItemsConfiguration绑定 CloudKit 的协作 item provider。perItemMetadataProvider按 metadata key 提供展示信息。.linkPresentationMetadata对应 Share Sheet 头部需要的标题和图片。- 其他 key 返回
nil,交给系统默认处理。 UIActivityViewController(activityItemsConfiguration:)使用这份配置展示分享面板。
09:03 macOS 使用 NSPreviewRepresentingActivityItem,把 item、标题、预览图和来源图标打包给分享弹窗。
// Providing CloudKit metadata - macOS

let title = "Shared Item"
let image = NSImage(contentsOfFile: "Shared_Item_Preview_Image.png")
let icon = NSImage(contentsOfFile: "App_Icon.png") // Shared item source

let previewRepresentingItem = NSPreviewRepresentingActivityItem(item: collaborationItemProvider,
                                                                title: title,
                                                                image: image,
                                                                icon: icon)

let picker = NSSharingServicePicker(items: [previewRepresentingItem])
关键点:
title是分享内容的名称。image表示被分享的文档或项目。icon表示内容来源,例如 App 图标。NSPreviewRepresentingActivityItem把协作 item provider 和预览元数据组合起来。NSSharingServicePicker接收 preview item 后展示完整的 macOS 分享弹窗。
SwiftUI 使用 Transferable 和 ShareLink
09:41 SwiftUI 的 ShareLink 也支持协作模式。前提是被分享的模型符合 Transferable。
CloudKit App 通过 CKShareTransferRepresentation 描述如何获得 CKShare。
// SwiftUI CloudKit Transferable

struct Note: Transferable {
    // Properties of the note e.g. name, preview image, content, ID, …
    var share: CKShare?
    func saveCKShareToServer() async throws -> CKShare { … }

    static var transferRepresentation: some TransferRepresentation {
        CKShareTransferRepresentation { note in
            if let share = note.share {
                return .existing(share, container: container, options: options)
            } else {
                return .prepareShare(container: container, options: options) {
                    return try await note.saveCKShareToServer()
                }
            }
        }
    }
}
关键点:
Note: Transferable让 SwiftUI 分享系统知道这个模型可以被传递。share: CKShare?表示文档可能已经处于协作中。saveCKShareToServer()在需要新建协作时创建并保存CKShare。CKShareTransferRepresentation把模型转换为 CloudKit 协作表示。.existing处理已有CKShare的邀请流程。.prepareShare处理首次发起协作的流程。
11:33 有了 Transferable 模型后,视图层只需要放置 ShareLink。
// SwiftUI ShareLink adoption

struct ContentView: View {
    @State let item = ShareItem()

    var body: some View {
        ShareLink(item: item, preview: SharePreview(item.title, image: item.previewImage))
    }
}
关键点:
@State let item保存要分享的协作对象。ShareLink(item:preview:)负责调起系统分享 UI。SharePreview提供分享头部的标题和图片。- 如果
item的Transferable表示返回 CloudKit 协作,ShareLink 会进入协作模式。
在 App 内显示协作入口和弹窗
13:42 发起协作只是第一步。用户回到 App 后,还需要看到当前文档正在和哪个 Messages 群组协作,有多少人在线,以及如何继续沟通。
SharedWithYou 框架提供 SWCollaborationView。它是导航栏里的协作按钮,并负责弹出协作 popover。
// Collaboration View

let collaborationView = SWCollaborationView(itemProvider: itemProvider)

collaborationView.activeParticipantCount = myModel.activePeople.count

collaborationView.contentView = MyView(model: myModel)

collaborationView.manageButtonTitle = "Custom Manage Button"
关键点:
SWCollaborationView(itemProvider:)用协作对象初始化按钮视图。activeParticipantCount显示当前活跃参与者数量。contentView把自定义内容放进 popover,例如参与者列表或协作开关。manageButtonTitle自定义管理按钮标题。- CloudKit 和 iCloud Drive 会获得系统提供的管理按钮,用来添加、移除参与者或修改分享设置。
监听 share 开始和停止
17:44 CloudKit App 需要知道一次分享什么时候真正开始,什么时候停止。CKSystemSharingUIObserver 提供了这两个回调,且不要求开发者自己展示 CloudKit Sharing UI。
// Observing CKShare Changes

let observer = CKSystemSharingUIObserver(container: container)

observer.systemSharingUIDidSaveShareBlock = { _, result in
    switch result {
    case .success(let share):
        // Handle successfully starting share
    case .failure(let error):
        // Handle error
    }
}
关键点:
CKSystemSharingUIObserver(container:)绑定当前 App 的 CloudKit container。systemSharingUIDidSaveShareBlock在CKShare保存后执行。.success(let share)表示协作已经开始,并返回对应的CKShare。.failure(let error)表示保存失败,App 应该处理错误。
18:47 停止分享也有对应回调。
// Observing CKShare Changes

observer.systemSharingUIDidStopSharingBlock = { _, result in
    switch result {
    case .success(let share):
        // Handle successfully starting share
    case .failure(let error):
        // Handle error
    }
}
关键点:
systemSharingUIDidStopSharingBlock在文档所有者停止分享后执行。- 成功时,返回的
CKShare已经被删除。 - 失败时,闭包收到错误,App 可以恢复本地状态或提示用户。
把协作更新发回 Messages
19:14 系统还允许 App 把协作更新发布到相关 Messages thread 顶部。用户可以看到谁做了什么更新。
这些 notice 基于 SWCollaborationHighlight 和 SWHighlightEvent。支持的事件包括内容变更、提及、移动或重命名、成员增减。
// Post an SWHighlightChangeEvent Notice

let highlightCenter: SWHighlightCenter = self.highlightCenter

let highlight = try highlightCenter.collaborationHighlight(forURL: ckShareURL, error: &error)

let editEvent = SWHighlightChangeEvent(highlight: highlight, trigger: .edit)

highlightCenter.postNotice(for: editEvent)
关键点:
SWHighlightCenter是发布 notice 的入口。collaborationHighlight(forURL:error:)用CKShareURL 找到对应协作 highlight。SWHighlightChangeEvent表示内容更新或评论。.edittrigger 表示这次更新来自编辑操作。postNotice(for:)把事件发布到相关 Messages 对话。
21:30 提及某个参与者时,要使用 mention event,并传入被提及用户的 CloudKit share handle。
// Post an SWHighlightMentionEvent Notice

let highlightCenter: SWHighlightCenter = self.highlightCenter

let highlight = try highlightCenter.collaborationHighlight(forURL: ckShareURL, error: &error)

let mentionEvent = SWHighlightMentionEvent(highlight: highlight,
           mentionedPersonCloudKitShareHandle: ckShareParticipantHandle)

highlightCenter.postNotice(for: mentionEvent)
关键点:
SWHighlightMentionEvent表示协作内容里提到了某个用户。mentionedPersonCloudKitShareHandle指向被提及的CKShare参与者。- 这个 notice 只会展示给被提及的用户。
21:58 文档被重命名、移动或删除时,使用 persistence event。
// Post an SWHighlightPersistenceEvent Notice

let highlightCenter: SWHighlightCenter = self.highlightCenter

let highlight = try highlightCenter.collaborationHighlight(forURL: ckShareURL, error: &error)

let renamedEvent = SWHighlightPersistenceEvent(highlight: highlight, trigger: .renamed)

highlightCenter.postNotice(for: renamedEvent)
关键点:
SWHighlightPersistenceEvent表示内容的持久化状态发生变化。.renamedtrigger 表示文档名称被修改。- 同一类事件也用于移动或删除等变化。
22:11 成员变化使用 membership event。
// Post an SWHighlightMembershipEvent Notice

let highlightCenter: SWHighlightCenter = self.highlightCenter

let highlight = try highlightCenter.collaborationHighlight(forURL: ckShareURL, error: &error)

let membershipEvent = SWHighlightMembershipEvent(highlight: highlight,
                                           trigger: .addedCollaborator)

highlightCenter.postNotice(for: membershipEvent)
关键点:
SWHighlightMembershipEvent表示协作者成员发生变化。.addedCollaborator表示新增协作者。- 也可以使用移除协作者对应的 trigger。
- CloudKit 和 iCloud Drive 会在 Messages 群组成员变化时提示文档所有者更新 share。
核心启发
-
做什么:给笔记 App 增加“在 Messages 中协作”入口。
为什么值得做:CloudKit 文档可以通过NSItemProvider.registerCKShare进入系统协作流程。
怎么开始:先为文档模型保存CKShare,再把 item provider 交给UIActivityViewController或NSSharingServicePicker。 -
做什么:在文档导航栏显示当前协作群组和在线人数。
为什么值得做:SWCollaborationView能显示 Messages 群组头像、活跃人数和系统 popover。
怎么开始:用协作 item provider 初始化SWCollaborationView,设置activeParticipantCount和自定义contentView。 -
做什么:把评论、提及和重命名同步到 Messages 对话。
为什么值得做:SWHighlightEvent可以把协作更新直接展示在相关 thread 顶部。
怎么开始:用SWHighlightCenter从CKShareURL 取回 highlight,再按场景创建 change、mention、persistence 或 membership event。 -
做什么:给 SwiftUI 文档模型做原生分享按钮。
为什么值得做:ShareLink支持协作模式,模型只要实现Transferable。
怎么开始:在模型的transferRepresentation中返回CKShareTransferRepresentation,视图里使用ShareLink(item:preview:)。
关联 Session
- Integrate your custom collaboration app with Messages — 适用于 CloudKit 或 iCloud Drive 之外的协作后端,讲
SWCollaborationMetadata、自定义邀请和参与者同步。 - Add Shared with You to your app — 讲 SharedWithYou shelf、attribution view 和内容菜单,是理解
SWHighlightCenter的基础。 - Meet Transferable — 讲
Transferable如何支撑分享、拖放、复制粘贴和 SwiftUIShareLink。 - What’s new in SwiftUI — 总览 SwiftUI 2022 的分享相关更新,其中包含
ShareLink和Transferable。
评论
GitHub Issues · utterances