
Highlight
Health 应用团队的 Sara Frederixon 以亲身经验讲解了如何在现有 UIKit 应用中逐步引入 SwiftUI。Session 覆盖了四个方面:UIHostingController 的更新、SwiftUI 视图与现有数据源的对接、用 SwiftUI 构建 Collection View 和 Table View cell、以及混合使用时的数据流管理。
核心内容
很多 iOS 应用已经用 UIKit 写了多年。数据模型、view controller、collection view、table view 都在工作。团队想用 SwiftUI 写新界面时,最怕的事情是迁移范围失控:为了一个新 cell,牵动整套页面结构。
Health 应用也遇到这个问题。它有大量健康数据可视化,UIKit 代码已经承载了现有模型和导航。Sara Frederixon 在开场说明,这场 session 的目标,是把 SwiftUI 放进已有 UIKit 应用,而不要求重写应用结构(00:18)。
Apple 给出的路径分成三步:用 UIHostingController 把 SwiftUI 视图当作 view controller 使用;用 ObservableObject 把 UIKit 侧已有数据桥接给 SwiftUI;用 iOS 16 新增的 UIHostingConfiguration 直接在 collection view 和 table view cell 里写 SwiftUI(00:50)。
详细内容
UIHostingController 仍然是入口
UIHostingController 是一个包含 SwiftUI view hierarchy 的 UIViewController。它能出现在 UIKit 里任何需要 view controller 的地方,比如 modal、popover、child view controller(01:33)。
// Presenting a UIHostingController

let heartRateView = HeartRateView() // a SwiftUI view
let hostingController = UIHostingController(rootView: heartRateView)

// Present the hosting controller modally
self.present(hostingController, animated: true)
关键点:
HeartRateView()是 SwiftUI 视图,UIKit 不需要知道它内部的布局方式。UIHostingController(rootView:)把 SwiftUI 视图包装成 UIKit 的 view controller。present(_:animated:)仍然是标准 UIKit API,调用方式没有变化。
如果页面需要嵌入而非弹出,可以把 hosting controller 加成 child view controller(02:31)。
// Embedding a UIHostingController

let heartRateView = HeartRateView() // a SwiftUI view
let hostingController = UIHostingController(rootView: heartRateView)

// Add the hosting controller as a child view controller
self.addChild(hostingController)
self.view.addSubview(hostingController.view)
hostingController.didMove(toParent: self)

// Now position & size the hosting controller’s view as desired…
关键点:
addChild(_:)把 SwiftUI 承载控制器接入 UIKit 的 view controller 层级。addSubview(_:)只负责把承载视图放到当前 view 中。didMove(toParent:)完成 child view controller 生命周期通知。- 最后一行提醒开发者继续用 UIKit 的布局方式定位和约束这个 view。
iOS 16 给 UIHostingController 增加了 sizingOptions。SwiftUI 内容变化时,hosting controller 可以自动更新 preferredContentSize 或 view 的 intrinsic content size。popover 这类依赖内容尺寸的场景会直接受益(02:43)。
// Presenting UIHostingController as a popover

let heartRateView = HeartRateView() // a SwiftUI view
let hostingController = UIHostingController(rootView: heartRateView)

// Enable automatic preferredContentSize updates on the hosting controller
hostingController.sizingOptions = .preferredContentSize

hostingController.modalPresentationStyle = .popover
self.present(hostingController, animated: true)
关键点:
sizingOptions = .preferredContentSize要求 hosting controller 根据 SwiftUI 内容更新 preferred content size。modalPresentationStyle = .popover让 UIKit 用 popover 形式呈现。- SwiftUI 内容尺寸改变后,popover 可以继续贴合内容。
外部数据先用值传入,再用 ObservableObject 自动更新
UIKit 应用里的数据通常由已有 model layer 持有。SwiftUI 视图只是新加入的界面层,所以 @State 和 @StateObject 这种由 SwiftUI 创建并拥有的数据并不适合这里。session 先给出最直接的做法:把值传给 SwiftUI view,再在 UIKit 侧手动更新 hosting controller 的 rootView(05:06)。
// Passing data to SwiftUI with manual UIHostingController updates

struct HeartRateView: View {
    var beatsPerMinute: Int

    var body: some View {
        Text("\(beatsPerMinute) BPM")
    }
}

class HeartRateViewController: UIViewController {
    let hostingController: UIHostingController< HeartRateView >
    var beatsPerMinute: Int {
        didSet { update() }
    }

    func update() {
        hostingController.rootView = HeartRateView(beatsPerMinute: beatsPerMinute)
    }
}
关键点:
HeartRateView只接收一个Int,它本身不拥有数据来源。Text("\(beatsPerMinute) BPM")用传入值生成界面。beatsPerMinute在 UIKit view controller 中保存。didSet { update() }表示 UIKit 侧数据变化后要主动触发刷新。hostingController.rootView = ...重新创建 SwiftUI root view,把最新值送进去。
这种方式简单,但每次数据变化都要手动更新。session 接着建议把已有模型改成 ObservableObject,把会变化的属性标记为 @Published,再让 SwiftUI 视图用 @ObservedObject 读取它(06:49)。
// Passing an ObservableObject to automatically update SwiftUI views

class HeartData: ObservableObject {
    @Published var beatsPerMinute: Int

    init(beatsPerMinute: Int) {
       self.beatsPerMinute = beatsPerMinute
    }
}

struct HeartRateView: View {
    @ObservedObject var data: HeartData

    var body: some View {
        Text("\(data.beatsPerMinute) BPM")
    }
}
关键点:
HeartData: ObservableObject让 SwiftUI 可以观察这个外部模型。@Published var beatsPerMinute是触发刷新信号的属性。@ObservedObject var data把外部模型接进 SwiftUI view。Text("\(data.beatsPerMinute) BPM")直接读取模型属性。- 属性变化后,SwiftUI 自动刷新相关视图,UIKit 不需要再改
rootView。
UIKit view controller 初始化时只需要保存同一个 model,并把它传给 SwiftUI view(08:30)。
// Passing an ObservableObject to automatically update SwiftUI views

class HeartRateViewController: UIViewController {
    let data: HeartData
    let hostingController: UIHostingController<HeartRateView>

    init(data: HeartData) {
        self.data = data
        let heartRateView = HeartRateView(data: data)
        self.hostingController = UIHostingController(rootView: heartRateView)
    }
}
关键点:
data是 UIKit 侧持有的同一个HeartData实例。HeartRateView(data: data)把模型引用交给 SwiftUI。UIHostingController(rootView:)只在初始化时包装 SwiftUI view。- 后续心率样本从 78 变成 94 时,
@Published会驱动 SwiftUI 更新界面(09:14)。
UIHostingConfiguration 把 SwiftUI 放进 cell
iOS 16 新增 UIHostingConfiguration,它是一个 cell content configuration。开发者把它赋给 UICollectionViewCell 或 UITableViewCell 的 contentConfiguration,就能在 cell 里直接写 SwiftUI。这里不需要额外嵌入 view 或 view controller(09:52)。
cell.contentConfiguration = UIHostingConfiguration {
  // Start writing SwiftUI here!
}
关键点:
contentConfiguration是 UIKit cell 的现代配置入口。UIHostingConfiguration { ... }接收 SwiftUIViewBuilder。- 花括号内部直接写 SwiftUI view。
session 用心率 cell 展示了迁移收益。原来复杂的自定义 cell 布局,可以拆成几个 SwiftUI 小视图(11:02)。
// Building a custom cell using SwiftUI with UIHostingConfiguration

cell.contentConfiguration = UIHostingConfiguration {
    HeartRateTitleView()
}

struct HeartRateTitleView: View {
    var body: some View {
        HStack {
            Label("Heart Rate", systemImage: "heart.fill")
                .foregroundStyle(.pink)
                .font(.system(.subheadline, weight: .bold))
            Spacer()
            Text(Date(), style: .time)
                .foregroundStyle(.secondary)
                .font(.footnote)
        }
    }
}
关键点:
HeartRateTitleView()被放进UIHostingConfiguration,成为 cell 内容。Label("Heart Rate", systemImage:)显示标题和系统图标。.foregroundStyle(.pink)和.font(...)使用标准 SwiftUI modifier 调整样式。Spacer()把标题推到左侧,把时间推到右侧。Text(Date(), style: .time)用 SwiftUI 的日期文本显示当前时间。
继续扩展时,只要在 configuration 中组合 VStack、HStack 和其他 SwiftUI view。session 还把 Swift Charts 的 Chart 放进 cell,用 LineMark 显示心率曲线(13:25)。
// Building a custom cell using SwiftUI with UIHostingConfiguration

cell.contentConfiguration = UIHostingConfiguration {
    VStack(alignment: .leading) {
        HeartRateTitleView()
        Spacer()
        HStack(alignment: .bottom) {
            HeartRateBPMView()
            Spacer()
            Chart(heartRateSamples) { sample in
                LineMark(x: .value("Time", sample.time),
                         y: .value("BPM", sample.beatsPerMinute))
                   .symbol(Circle().strokeBorder(lineWidth: 2))
                   .foregroundStyle(.pink)
            }
        }
    }
}
关键点:
VStack(alignment: .leading)组织 cell 的纵向内容。HeartRateTitleView()复用前面提取的标题视图。HeartRateBPMView()显示当前心率数字。Chart(heartRateSamples)以样本集合驱动图表。LineMark把每个样本映射到时间和 BPM 两个轴。.symbol(...)和.foregroundStyle(.pink)调整折线点和颜色。
cell 的边距、背景、滑动动作和选中态
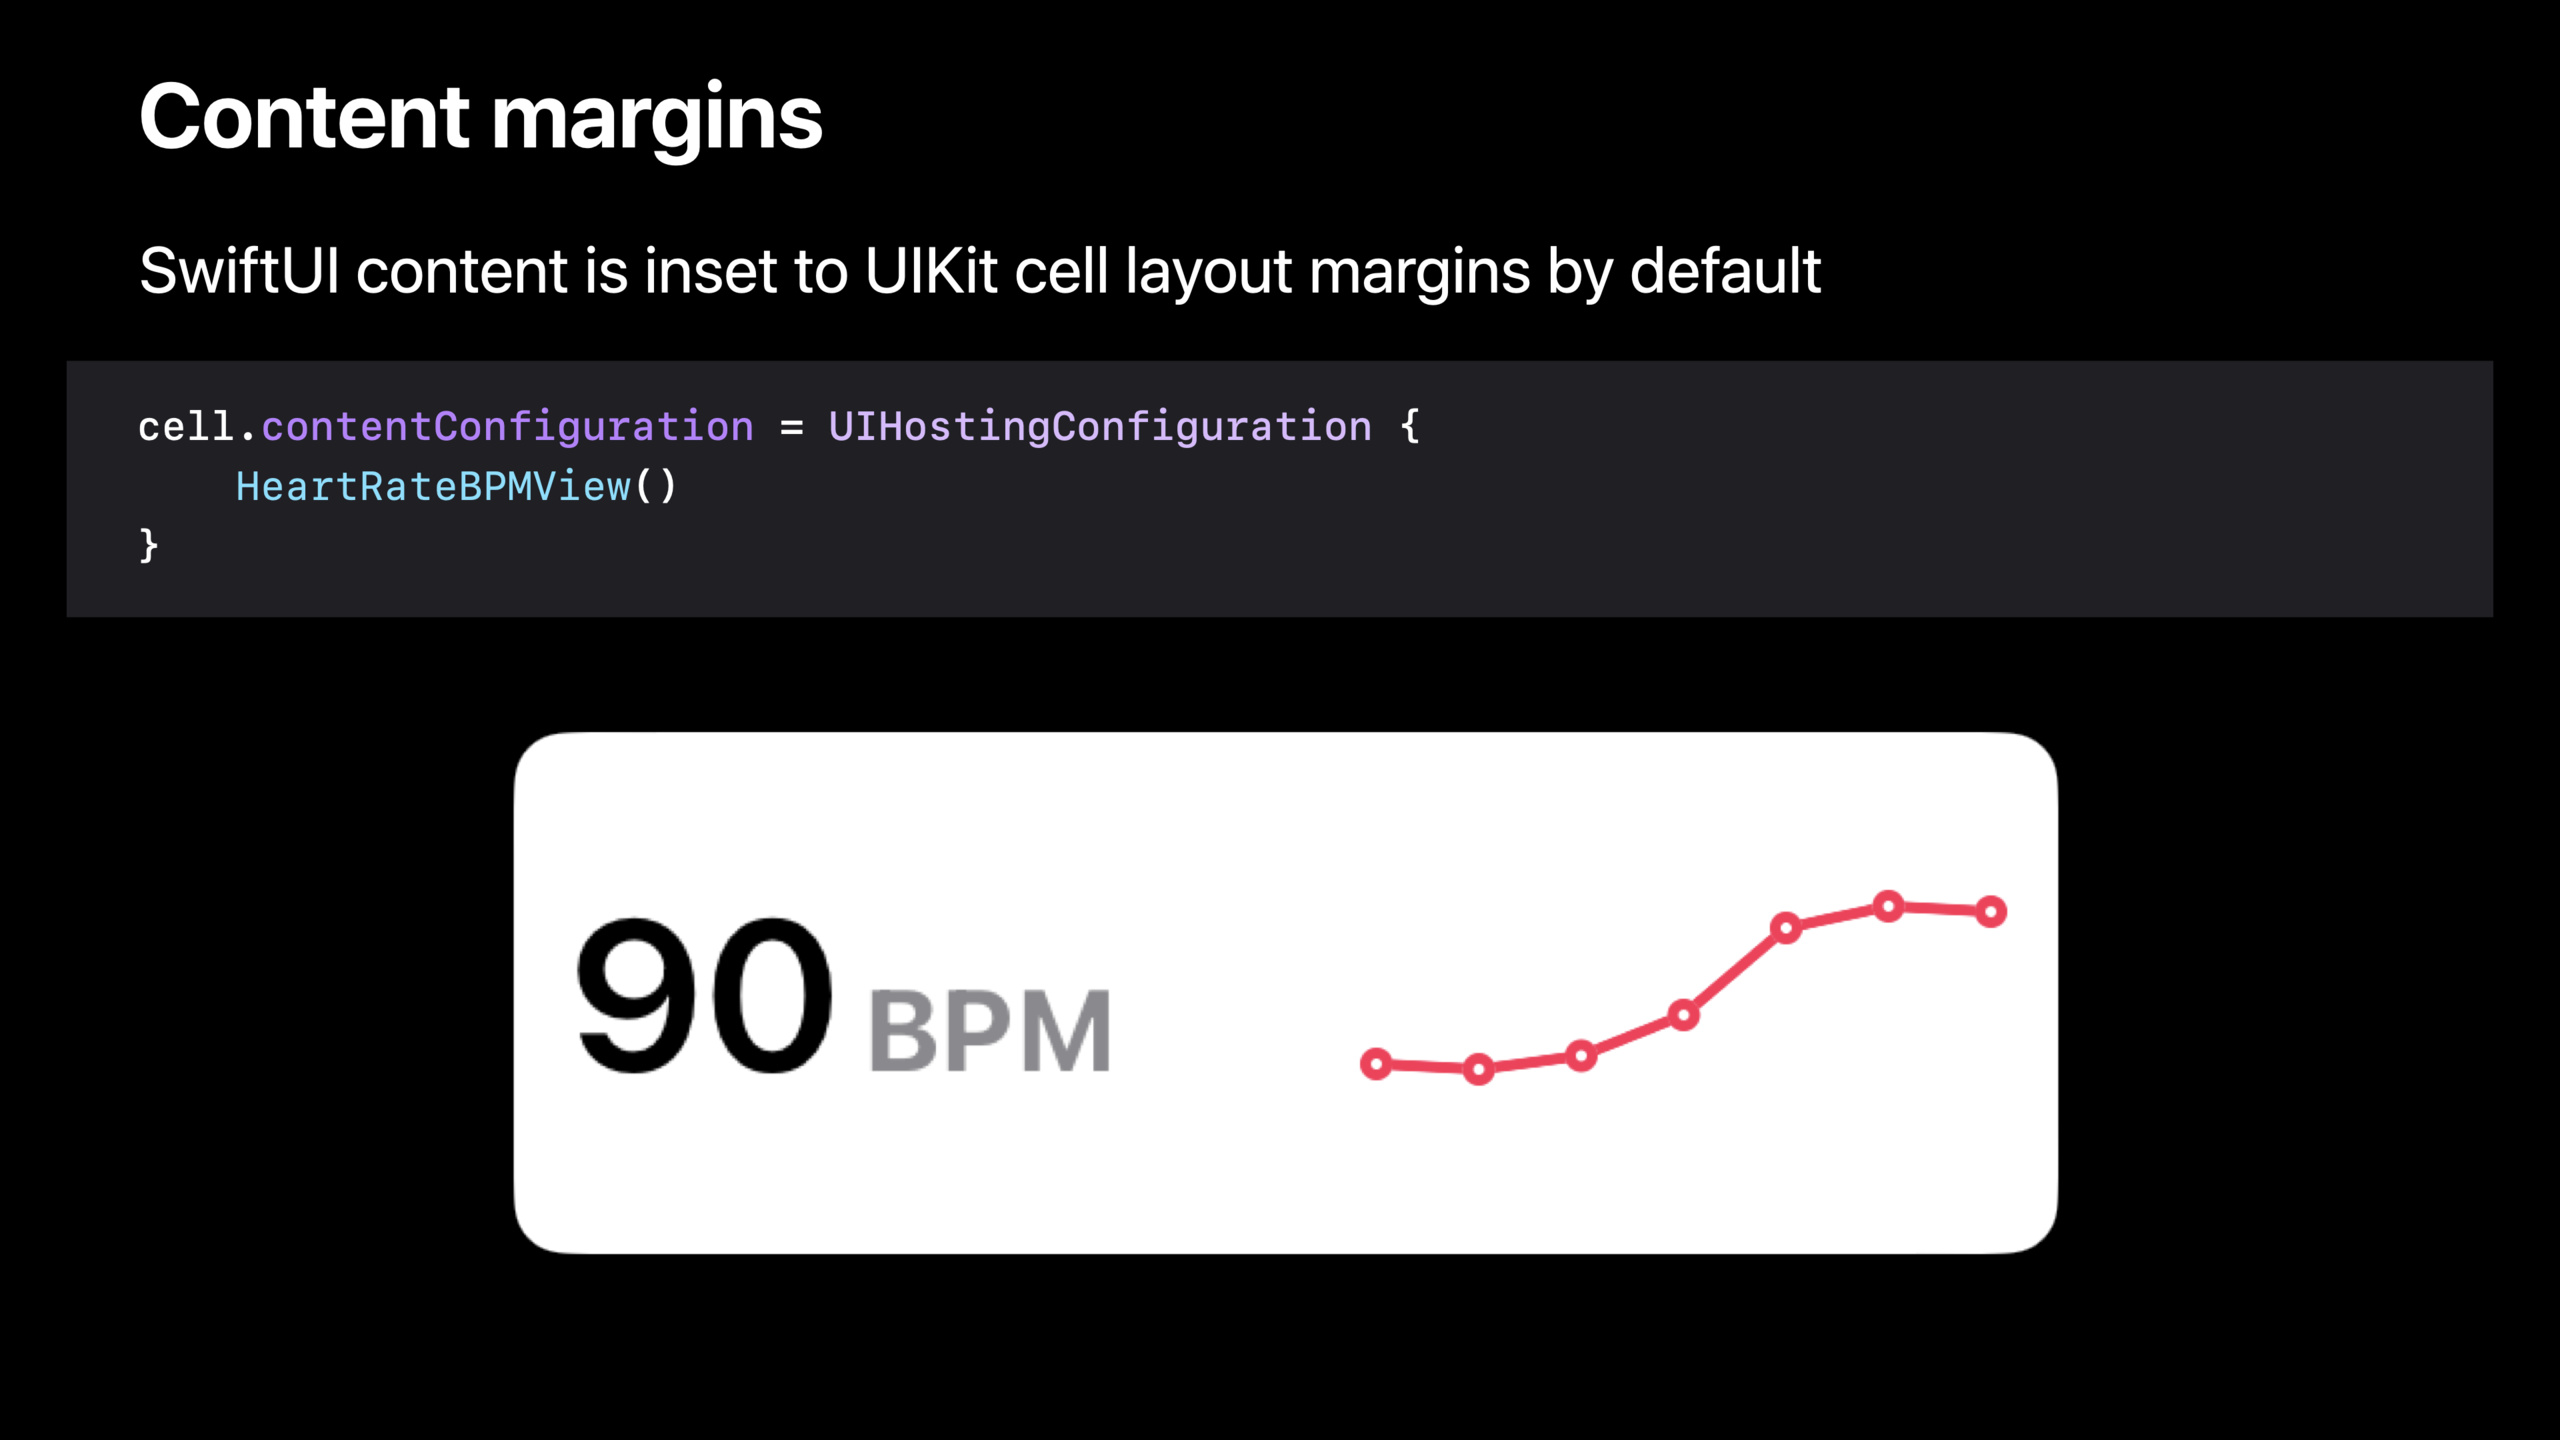
UIHostingConfiguration 支持几类 cell 场景常用能力。默认情况下,根 SwiftUI 内容会根据 UIKit cell 的 layout margins 内缩。如果需要改边距,可以在 configuration 后加 .margins(14:37)。
cell.contentConfiguration = UIHostingConfiguration {
    HeartRateBPMView()
}
.margins(.horizontal, 16)
关键点:
HeartRateBPMView()是 cell 的 SwiftUI 内容。.margins(.horizontal, 16)覆盖水平方向默认边距。- 这个 modifier 的作用对象是
UIHostingConfiguration,而非单独的 UIKit view。
背景也能直接用 SwiftUI modifier 设置。session 说明背景托管在 cell 背面,并且背景会延伸到 cell 边缘;self-sizing cell 的尺寸只由内容决定,背景不参与决定尺寸(15:16)。
cell.contentConfiguration = UIHostingConfiguration {
   HeartTitleView()
}
.background(.pink)
关键点:
HeartTitleView()是前景内容。.background(.pink)设置 configuration 的背景。- 背景位于 cell content view 中 SwiftUI 内容的后面。
列表里的 swipe actions 也可以直接写在 SwiftUI view 上。Apple 特别提醒,按钮执行动作时要使用 item 的稳定标识符,不要使用 index path;index path 在 cell 可见期间也可能变化(16:32)。
cell.contentConfiguration = UIHostingConfiguration {
    MedicalConditionView()
        .swipeActions(edge: .trailing) { … }
}
关键点:
MedicalConditionView()是某个医疗状况 cell 的 SwiftUI 内容。.swipeActions(edge: .trailing)在列表右侧滑动时显示操作。{ … }中放按钮和业务动作。- 业务动作应绑定到稳定 item identifier,避免误操作其他行。
如果 SwiftUI 内容要响应 UIKit cell 的选中态或高亮态,需要在 configurationUpdateHandler 里重新创建 configuration,并读取 UIKit 提供的 state(17:25)。
// Incorporating UIKit cell states

cell.configurationUpdateHandler = { cell, state in
    cell.contentConfiguration = UIHostingConfiguration {
      HStack {
        HealthCategoryView()
            Spacer()
            if state.isSelected {
                Image(systemName: "checkmark")
            }
        }
    }
}
关键点:
configurationUpdateHandler会在 cell 状态变化时再次运行。state包含选中、高亮等 UIKit cell 状态。UIHostingConfiguration在 handler 内重建,所以 SwiftUI 内容能使用最新状态。if state.isSelected只在选中时显示 checkmark。
diffable data source 只管集合变化,ObservableObject 负责 cell 内刷新
当 collection view 或 table view 的 cell 由 SwiftUI 构建时,数据流要分两类处理。第一类是集合变化,比如插入、删除、重排;继续用 diffable data source snapshot 处理。snapshot 里应该放每个 MedicalCondition 的唯一标识符,而非 model 对象本身,这样 diffable data source 才能准确计算 identity(18:41)。
第二类是单个 model 的属性变化。传统 UIKit 做法通常要 reconfigure 或 reload snapshot 里的 item。使用 SwiftUI cell 时,可以把 model 做成 ObservableObject,让 SwiftUI view 用 @ObservedObject 观察它。@Published 属性变化后,cell 内 SwiftUI view 会直接刷新,不需要先经过 diffable data source 或 collection view(20:35)。
iOS 16 还补上了尺寸问题。UIHostingConfiguration 利用 UIKit 新的 self-resizing cells:SwiftUI cell 内容变化后,包含它的 UICollectionViewCell 或 UITableViewCell 会在需要时自动调整尺寸,这个能力默认开启(21:44)。
最后,SwiftUI 也能把数据写回 model。session 用 MedicalCondition 举例:model 是 ObservableObject,text 是 @Published。SwiftUI view 可以对这个 published 属性创建双向 binding,用户编辑后直接写回 model(22:48)。
// Creating a two-way binding to data in SwiftUI

class MedicalCondition: Identifiable, ObservableObject {
    let id: UUID

    @Published var text: String
}

struct MedicalConditionView: View {
    @ObservedObject var condition: MedicalCondition

    var body: some View {
        HStack {

            Spacer()
        }
    }
}
关键点:
MedicalCondition: Identifiable提供 diffable data source 可以使用的稳定身份。ObservableObject让 SwiftUI 可以观察这个 model。@Published var text是可被 SwiftUI 读取并刷新界面的属性。@ObservedObject var condition把 cell 对应的 model 接进 SwiftUI view。- 逐字稿说明,把只读
Text改成TextField,并给condition.text加$前缀,就能创建写回 model 的 binding(23:47)。
两种承载方式的边界
session 结尾给了一个容易踩坑的边界。UIHostingController 是 view controller,使用时要把 view controller 和它的 view 一起加入 UIKit 层级。工具栏、键盘快捷键、使用 UIViewControllerRepresentable 的 SwiftUI view,都依赖 UIKit view controller hierarchy(24:33)。
UIHostingConfiguration 则用于 cell,它不创建 UIViewController。它支持大多数 SwiftUI 功能,但依赖 UIViewControllerRepresentable 的 SwiftUI view 不能放在 cell 里(25:01)。
核心启发
-
做什么:把一个复杂的 UIKit 自定义 cell 改成
UIHostingConfiguration。 为什么值得做:cell 内部布局可以拆成 SwiftUI 小视图,样式、图表和状态展示更容易组合。 怎么开始:保留现有 collection view 或 table view,只替换 cell 的contentConfiguration。 -
做什么:把一个已有 UIKit 详情页中的局部卡片改成 SwiftUI。 为什么值得做:
UIHostingController可以作为 child view controller 嵌入,不要求替换整个页面。 怎么开始:创建 SwiftUI card view,用UIHostingController(rootView:)承载,再通过addChild接入现有 view controller。 -
做什么:让 UIKit model 的变化自动驱动 SwiftUI 局部界面刷新。 为什么值得做:手动改
rootView容易遗漏,ObservableObject和@Published能把刷新绑定到数据变化。 怎么开始:把已有 model conform 到ObservableObject,在 SwiftUI view 中用@ObservedObject保存它。 -
做什么:给列表 cell 增加 SwiftUI swipe actions。 为什么值得做:列表交互继续由 UIKit 管理,行内动作可以用 SwiftUI modifier 写在内容附近。 怎么开始:在
UIHostingConfiguration的 root SwiftUI view 上添加.swipeActions,动作里使用 item 的稳定 ID。 -
做什么:给可编辑 cell 建立双向数据流。 为什么值得做:用户在 SwiftUI
TextField中输入后,可以直接写回 UIKit 侧仍在使用的 model 对象。 怎么开始:让 model 的可编辑字段使用@Published,在 SwiftUI 中通过$condition.text传给输入控件。
关联 Session
- What’s new in SwiftUI — 了解 SwiftUI 在 iOS 16 的整体更新,包含 Swift Charts、布局和 app 结构。
- Compose custom layouts with SwiftUI — 深入 SwiftUI 布局能力,适合作为重写复杂 cell 内部布局的补充。
- What’s new in UIKit — 了解 iOS 16 UIKit 更新,其中包含 self-resizing cells 的背景。
- Build a desktop-class iPad app — 继续使用 UIKit collection view、菜单和导航 API 构建复杂 iPad 应用。
评论
GitHub Issues · utterances