
Highlight
Apple 为 PyTorch 1.12 加入 Metal Performance Shaders 后端,并扩展 TensorFlow Metal 与 MPS Graph,让 Mac 上的机器学习训练、定制算子和计算图同步都能使用 Apple GPU。
核心内容
机器学习训练最耗算力。模型要反复跑前向、反向和梯度更新,CPU 很快会成为瓶颈。GPU 适合并行工作,但开发者还需要框架把训练代码接到 GPU 上。
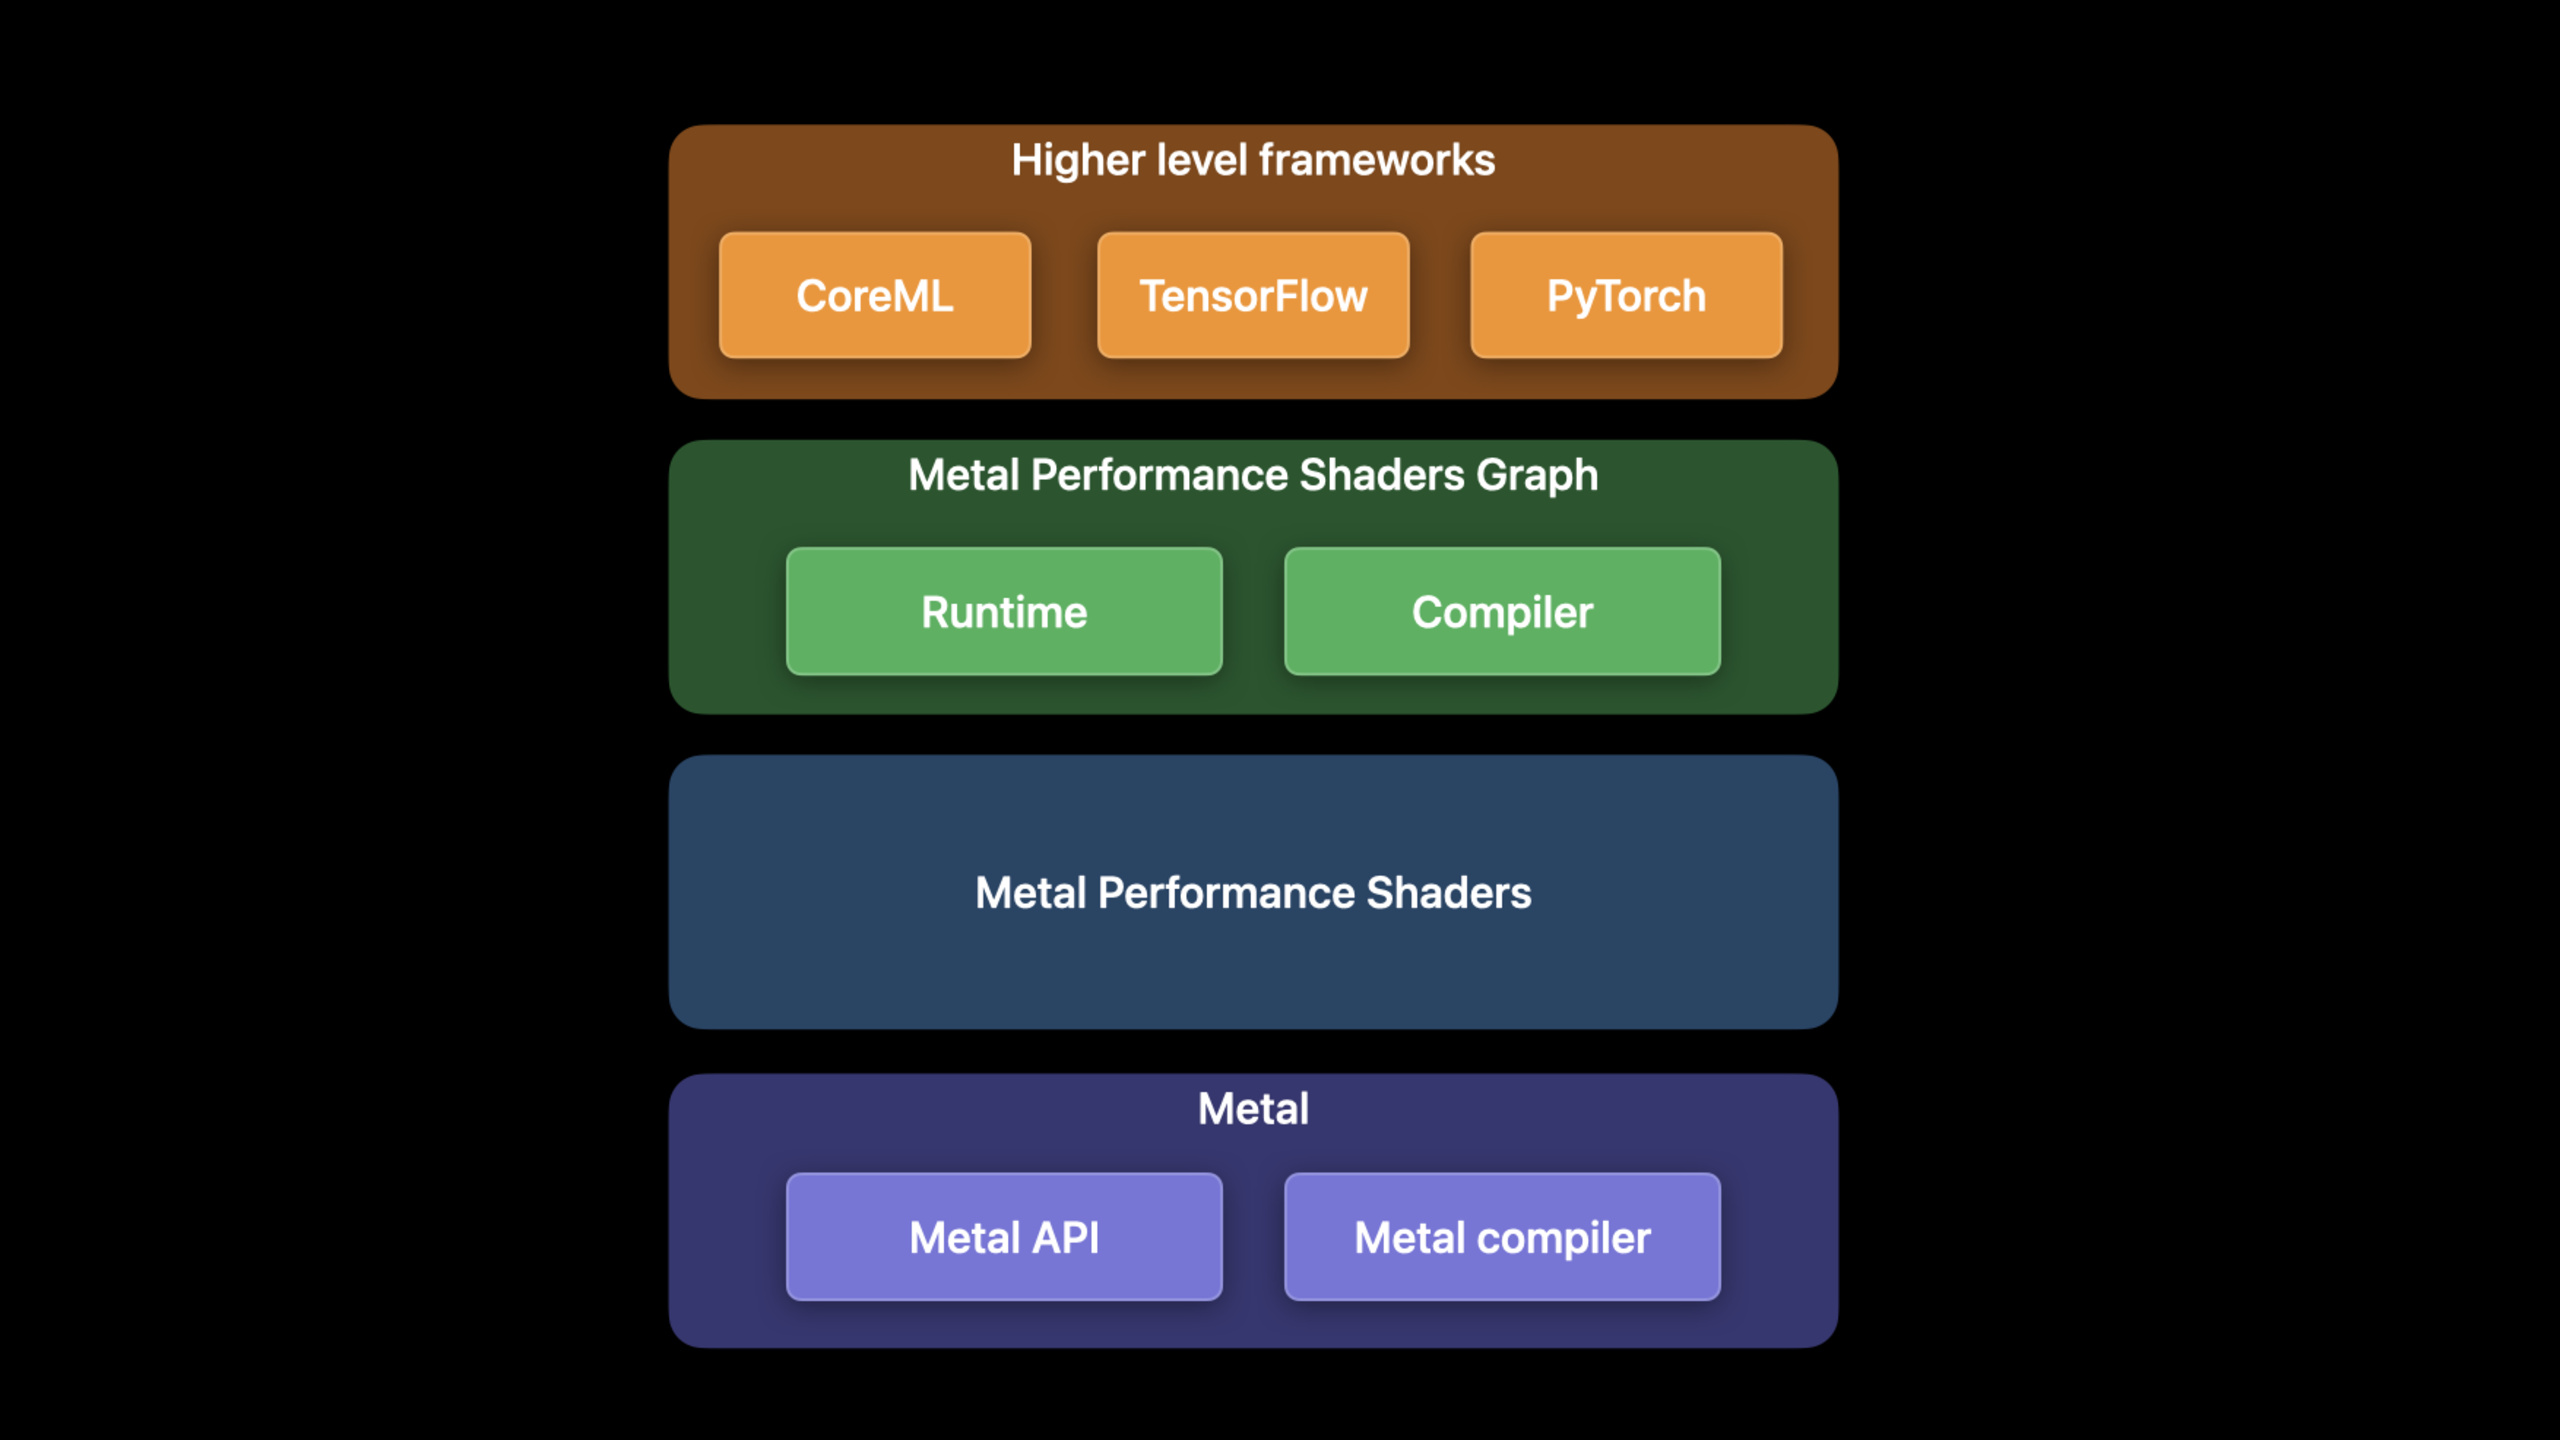
Metal 的机器学习入口是 Metal Performance Shaders(MPS)。MPS 提供高性能 GPU primitives,MPS Graph 在它之上提供通用计算图和多维张量支持。Core ML、TensorFlow、PyTorch 这类上层框架可以把算子落到 MPS Graph、MPS 和 Metal command queue 上。
这场 session 分三段讲清楚:PyTorch 现在有官方 MPS backend;TensorFlow Metal 支持更大的 batch、自定义 op 和分布式训练;MPS Graph 增加 shared events、RNN/LSTM/GRU、max pooling indices、Philox random 和张量变换操作。
PyTorch:三步切到 MPS device
(03:32)PyTorch 社区最常请求的能力之一,是在 Apple silicon 上使用 GPU 加速。Apple 把 MPS backend 合入 PyTorch 官方 GitHub repo,并进入 PyTorch 1.12。它包含 PyTorch operation kernels 和 runtime framework:算子调用 MPS Graph/MPS,runtime 使用 Metal 的 command queue、command buffer 和同步 primitives。
开发者不需要换训练框架。安装 PyTorch,创建 MPS device,把模型和输入都移到这个 device 上,就能让后续操作在 GPU 上执行。
TensorFlow:让缺失算子留在 GPU timeline
(08:01)TensorFlow Metal 从 TensorFlow 2.5 开始通过插件提供 GPU 加速。2022 年的更新包括更大的 batch size、新 GPU 加速操作、custom op、RNN 改进和分布式训练。
问题出现在自定义 loss 或 TensorFlow API 尚未支持的算子上。如果这段工作回到 CPU timeline,会引入同步开销,并让 GPU 等待。TensorFlow Metal Stream protocol 给自定义 op 暴露 command buffer、dispatch queue、commit 和 commitAndWait,让开发者把自定义 GPU kernel 编码到同一条 Metal 流里。
MPS Graph:多队列同步和更多训练算子
(18:13)有些应用会把 compute、post processing、display 分到不同 command queue,以获得更多 GPU 并行度。这样做会带来数据竞争:后处理可能在 compute 产出结果前开始执行。MPS Graph 的 shared events API 用 signal/wait 建立跨 queue 依赖。
(20:43)MPS Graph 还补上了一批训练和推理常用操作:RNN、LSTM、GRU;带 return indices 的 max pooling;Philox random;Hamming distance;expandDims、squeeze、split、stack、coordinateAlongAxis 等张量变换。
详细内容
PyTorch MPS backend 的最小路径
(03:44)从 PyTorch 1.12 开始,基础包可以直接通过 pip 安装。
python -m pip install torch关键点:
python -m pip使用当前 Python 环境里的 pip,避免装到另一个解释器环境。install torch安装官方 PyTorch 包;MPS backend 是 PyTorch 1.12 的一部分。
(03:59)创建 device 时,先检测 MPS 是否可用,再回退到 CPU。
import torch

mpsDevice = torch.device("mps" if torch.backends.mps.is_available() else "cpu")
关键点:
import torch引入 PyTorch。torch.backends.mps.is_available()判断当前环境能否使用 MPS backend。torch.device("mps" ...)创建 MPS device;不可用时使用cpu,同一段代码仍能运行。
(04:15)模型默认在 CPU 上运行。要让中间 tensor 也走 MPS,需要把模型移动到 MPS device。
import torchvision

model = torchvision.models.resnet50()

model_mps = model.to(device=mpsDevice)
关键点:
torchvision.models.resnet50()创建一个 ResNet50 模型。model.to(device=mpsDevice)把模型转到 MPS device。model_mps后续执行时,模型内部产生的 intermediate tensors 也会使用加速后的 MPS backend。
(04:46)输入 tensor 也要放到同一个 device。默认 tensor 分配在 CPU 上,如果忘了指定 device,模型和输入会落在不同位置。
sample_input = torch.randn((32, 3, 254, 254), device=mpsDevice)

prediction = model_mps(sample_input)
关键点:
torch.randn(...)创建一个 batch 的随机输入。device=mpsDevice让输入 tensor 直接分配在 MPS device 上。model_mps(sample_input)执行推理,后续 tensor 操作会在 GPU 上加速。
(05:15)Apple 用 StyleTransfer 网络展示训练效果。在 M1 Ultra 上,PyTorch benchmark 最高有 20 倍加速,平均 8.3 倍。这个数字来自 session 中展示的 PyTorch benchmarks。
TensorFlow Metal custom op
(09:21)自定义 TensorFlow op 要接入 Metal,核心是 TF_MetalStream protocol。它提供当前 command buffer、用于 CPU 侧同步的 dispatch queue,以及提交 GPU 工作的方法。
@protocol TF_MetalStream

- (id <MTLCommandBuffer>)currentCommandBuffer;
- (dispatch_queue_t)queue;
- (void)commit;
- (void)commitAndWait;

@end
关键点:
currentCommandBuffer返回当前可编码 GPU kernel 的 Metal command buffer。queue返回 dispatch queue;多线程提交工作时,用它序列化编码过程。commit把当前 command buffer 提交给 GPU。commitAndWait会等待当前 command buffer 完成,适合调试提交顺序。
(10:04)实现 custom op 分三步:注册 op,使用 Metal stream 实现 op,在训练脚本中导入动态库。
// Register the operation
REGISTER_OP("ZeroOut")
    .Input("to_zero: int32")
    .Output("zeroed: int32")
    .SetShapeFn([](::tensorflow::shape_inference::InferenceContext* c) {
      c->set_output(0, c->input(0));
      return Status::OK();
    });
关键点:
REGISTER_OP("ZeroOut")向 TensorFlow 注册名为ZeroOut的操作。.Input("to_zero: int32")声明输入 tensor 名称和类型。.Output("zeroed: int32")声明输出 tensor 名称和类型。SetShapeFn说明输出 shape 与输入 shape 相同。
(10:41)计算函数里先取输入和输出,再通过 TF_GetStream 取得 Metal stream,并在 stream 的 queue 中编码 GPU kernel。
// Define Compute function
void MetalZeroOut::Compute(TF_OpKernelContext *ctx) {
    // Get input and allocate outputs
    TF_Tensor* input = nullptr;
    TF_GetInput(ctx, 0, &input, status);
    TF_Tensor* output;
    OP_REQUIRES_OK(ctx, ctx->allocate_output(0, input.shape(), &output));

    // Use TF_MetalStream to encode the custom op
    id<TF_MetalStream> metalStream = (id<TF_MetalStream>)(TF_GetStream(ctx, status));
    dispatch_sync(metalStream.queue, ^() {
        id<MTLCommandBuffer> commandBuffer = metalStream.currentCommandBuffer;
        // Create encoder and encode GPU kernel
        [metalStream commit];
    });

    // Delete the TF_Tensors
    TF_DeleteTensor(input);
    TF_DeleteTensor(output);
}
关键点:
TF_GetInput取得 TensorFlow 传入的输入 tensor。allocate_output为输出 tensor 分配空间。TF_GetStream从当前 op context 中取出 Metal stream。dispatch_sync(metalStream.queue, ^{ ... })把编码过程放到 stream 提供的队列里,避免多线程提交互相踩踏。metalStream.currentCommandBuffer是后续创建 encoder 和编码 GPU kernel 的入口。[metalStream commit]提交这一段 GPU 工作。TF_DeleteTensor释放输入和输出 tensor 引用。
(11:30)动态库构建完成后,可以在 Python 训练脚本中加载。
# Import operation in python script for training
import tensorflow as tf
zero_out_module = tf.load_op_library('./zero_out.so')
print(zero_out_module.zero_out([[1, 2], [3, 4]]).numpy())
关键点:
import tensorflow as tf引入 TensorFlow。tf.load_op_library('./zero_out.so')加载 custom op 的共享动态库。zero_out_module.zero_out(...)像普通 Python 函数一样调用注册好的 op。.numpy()把结果转成 NumPy 表示,便于检查输出。
(12:00)Apple 用 NeRF 示例解释 custom op 的价值。原始双层 MLP 版本每个 epoch 约 100 秒,训练 30 分钟后仍然模糊;加入自定义 hash table op 后,每个 epoch 约 10 秒,并能更快得到清晰模型。这个示例证明:TensorFlow 不原生支持的 hash table 也可以放到 Metal 插件里执行。
MPS Graph shared events
(19:21)当 compute graph 和 post-process graph 运行在不同 command queue 上时,需要显式同步。shared event 的用法是:第一个 descriptor signal,第二个 descriptor wait。
// Using shared events
let executionDescriptor = MPSGraphExecutionDescriptor()
let event = MTLCreateSystemDefaultDevice()!.makeSharedEvent()!
executionDescriptor.signal(event, atExecutionEvent: .completed, value: 1)

let fetch = computeGraph.runAsync(with: commandQueue1,
                                  feeds: [input0Tensor: input0,
                                          input1Tensor: input1],
                                  targetTensors: [finalTensor],
                                  targetOperations: nil,
                                  executionDescriptor: executionDescriptor)

let executionDescriptor2 = MPSGraphExecutionDescriptor()
executionDescriptor2.wait(for: event, value: 1)

let fetch2 = postProcessGraph.runAsync(with: commandQueue2,
                                       feeds: [input0Tensor: fetch[finalTensor]!,
                                               input1Tensor: input1],
                                       targetTensors: [finalTensor],
                                       targetOperations: nil,
                                       executionDescriptor: executionDescriptor2)
关键点:
MPSGraphExecutionDescriptor()创建运行图时使用的执行描述符。makeSharedEvent()在 Metal device 上创建 shared event。signal(... .completed, value: 1)要求 compute graph 完成时发出信号。computeGraph.runAsync(...)在commandQueue1上异步运行 compute graph。executionDescriptor2.wait(for: event, value: 1)要求第二个 graph 等待同一个 event 达到指定值。postProcessGraph.runAsync(...)在commandQueue2上运行后处理图,但依赖已经通过 event 约束。
MPS Graph 新操作:LSTM、pooling indices、random 和 tensor 操作
(22:03)RNN、LSTM、GRU 是 recurrent neural network 常用层。过去可以手写复杂 subgraph,现在可以直接用 MPSGraphLSTMDescriptor 和 graph.LSTM(...)。
let descriptor = MPSGraphLSTMDescriptor()

descriptor.inputGateActivation = .sigmoid
descriptor.forgetGateActivation = .sigmoid
descriptor.cellGateActivation = .tanh
descriptor.outputGateActivation = .sigmoid
descriptor.activation = .tanh
descriptor.bidirectional = false
descriptor.training = true

let lstm = graph.LSTM(inputTensor,
                      recurrentWeight: recurrentWeightsTensor,
                      inputWeight: weightsTensor,
                      bias: nil,
                      initState: nil,
                      initCell: nil,
                      descriptor: descriptor,
                      name: nil)
关键点:
MPSGraphLSTMDescriptor()保存 LSTM 的配置。- 四个 gate activation 分别设置 input、forget、cell、output gate 的激活函数。
descriptor.activation设置 cell 输出使用的激活函数。bidirectional = false表示单向 LSTM。training = true表示这个 LSTM 用于训练路径。graph.LSTM(...)把 LSTM 单元加入计算图,并传入 input、recurrent weight、input weight 和 descriptor。
(23:35)Max pooling API 可以返回最大值所在位置的 indices。训练时反向传播要把梯度传回最大值位置,重用 indices 在 PyTorch 和 TensorFlow 中最高可快 6 倍。
// Forward pass
let descriptor = MPSGraphPooling4DOpDescriptor(kernelSizes: @[1,1,3,3],
                                               paddingStyle: .TF_SAME)
descriptor.returnIndicesMode = .globalFlatten4D

let [poolingTensor, indicesTensor] = graph.maxPooling4DReturnIndices(sourceTensor,
                                                                     descriptor: descriptor,
                                                                     name: nil)

// Backward pass
let outputShape = graph.shapeOf(destination, name: nil)
let gradientTensor = graph.maxPooling4DGradient(gradient: gradientTensor,
                                                indices: indicesTensor,
                                                outputShape: outputShape,
                                                descriptor: descriptor,
                                                name: nil)
关键点:
MPSGraphPooling4DOpDescriptor描述 pooling window 和 padding。returnIndicesMode = .globalFlatten4D指定 indices 的返回模式。maxPooling4DReturnIndices同时返回 pooling 结果和 indices。indicesTensor可以缓存到训练 pipeline 的反向阶段。maxPooling4DGradient使用 indices 把梯度传回 forward pass 中取到最大值的位置。
(24:42)新的 random operation 使用 Philox algorithm。给定相同 seed 时,它返回与 TensorFlow 一致的结果,可用于训练图的权重初始化。
// Declare Philox state tensor
let stateTensor = graph.randomPhiloxStateTensor(seed: 2022, name: nil)

// Declare RandomOp descriptor
let descriptor = MPSGraphRandomOpDescriptor(distribution: .truncatedNormal,
                                            dataType: .float32)
descriptor.mean = -1.0
 descriptor.standardDeviation = 2.5
descriptor.min = descriptor.mean - 2 * descriptor.standardDeviation
descriptor.max = descriptor.mean + 2 * descriptor.standardDeviation

let [randomTensor, stateTensor] = graph.randomTensor(shapeTensor: shapeTensor,
                                                     descriptor: descriptor,
                                                     stateTensor: stateTensor,
                                                     name: nil)
关键点:
randomPhiloxStateTensor(seed:)创建带 seed 的 Philox state tensor。MPSGraphRandomOpDescriptor指定分布类型和数据类型。.truncatedNormal表示截断正态分布。mean、standardDeviation、min、max定义分布范围。randomTensor(...)输出随机 tensor 和新的 state tensor;新的 state 可继续传给下一次 random operation。
(26:18)MPS Graph 还加入了一组张量变换操作,用来扩维、压缩维度、切分、堆叠和生成坐标。
// Expand the input tensor dimensions, 4x2 -> 4x1x2
let expandedTensor = graph.expandDims(inputTensor,
                                      axis: 1,
                                      name: nil)

// Squeeze the input tensor dimensions, 4x1x2 -> 4x2
let squeezedTensor = graph.squeeze(expandedTensor,
                                   axis: 1,
                                   name: nil)

// Split the tensor in two, 4x2 -> (4x1, 4x1)
let [split1, split2] = graph.split(squeezedTensor,
                                   numSplits: 2,
                                   axis: 0,
                                   name: nil)

// Stack the tensor back together, (4x1, 4x1) -> 2x4x1
let stackedTensor = graph.stack([split1, split2],
                                axis: 0,
                                name: nil)
关键点:
expandDims(... axis: 1)在第 1 维插入新维度。squeeze(... axis: 1)删除第 1 维上的单元素维度。split(... numSplits: 2, axis: 0)沿第 0 维把 tensor 平均切成两份。stack([split1, split2], axis: 0)沿第 0 维把多个 tensor 重新堆叠。
核心启发
-
做什么:给 PyTorch 训练脚本加 MPS device 开关
- 为什么值得做:session 展示 PyTorch 1.12 的 MPS backend 已进入官方包,模型和输入移到 MPS device 后,后续 tensor 操作会走 GPU。
- 怎么开始:先用
torch.backends.mps.is_available()创建 device,再把model.to(device=mpsDevice)和输入 tensor 的device=mpsDevice补齐。
-
做什么:把 TensorFlow 训练中的自定义 loss 留在 GPU 上
- 为什么值得做:自定义 loss 回到 CPU 会带来同步开销,并让 GPU timeline 出现空洞。
- 怎么开始:用
REGISTER_OP注册操作,在Compute中通过TF_GetStream取得TF_MetalStream,再在metalStream.queue中编码 Metal kernel。
-
做什么:用 shared events 拆开 ML 后处理 pipeline
- 为什么值得做:compute 和 post processing 放在不同 command queue 可以利用更多 GPU 并行度,但必须处理数据依赖。
- 怎么开始:在 compute graph 的
MPSGraphExecutionDescriptor上 signal shared event,在 post-process graph 的 descriptor 上 wait 同一个 event。
-
做什么:为训练图替换手写 LSTM subgraph
- 为什么值得做:MPS Graph 新增 LSTM operation,session 明确指出它能高效编码 recurrent unit 所需的 GPU 工作。
- 怎么开始:创建
MPSGraphLSTMDescriptor,设置 gate activation、training 等属性,再调用graph.LSTM(...)把单元加入图。
-
做什么:在 pooling 反向传播中缓存 indices
- 为什么值得做:max pooling return indices API 让反向阶段复用 forward 的最大值位置,session 给出的 PyTorch 和 TensorFlow 训练最高加速为 6 倍。
- 怎么开始:forward 用
graph.maxPooling4DReturnIndices(...)取出indicesTensor,backward 用graph.maxPooling4DGradient(...)传入同一个 indices。
关联 Session
- Discover Metal 3 — Metal 3 总览,包含机器学习训练加速在 Metal 3 能力中的位置。
- Scale compute workloads across Apple GPUs — 继续讨论如何把 GPU compute 工作拆分、排布并提升利用率。
- Optimize your Core ML usage — 从 Core ML 角度分析模型在 CPU、GPU 和 Neural Engine 上的性能选择。
- Explore the machine learning development experience — 覆盖机器学习模型发现、转换、训练和评估的完整开发流程。
评论
GitHub Issues · utterances