
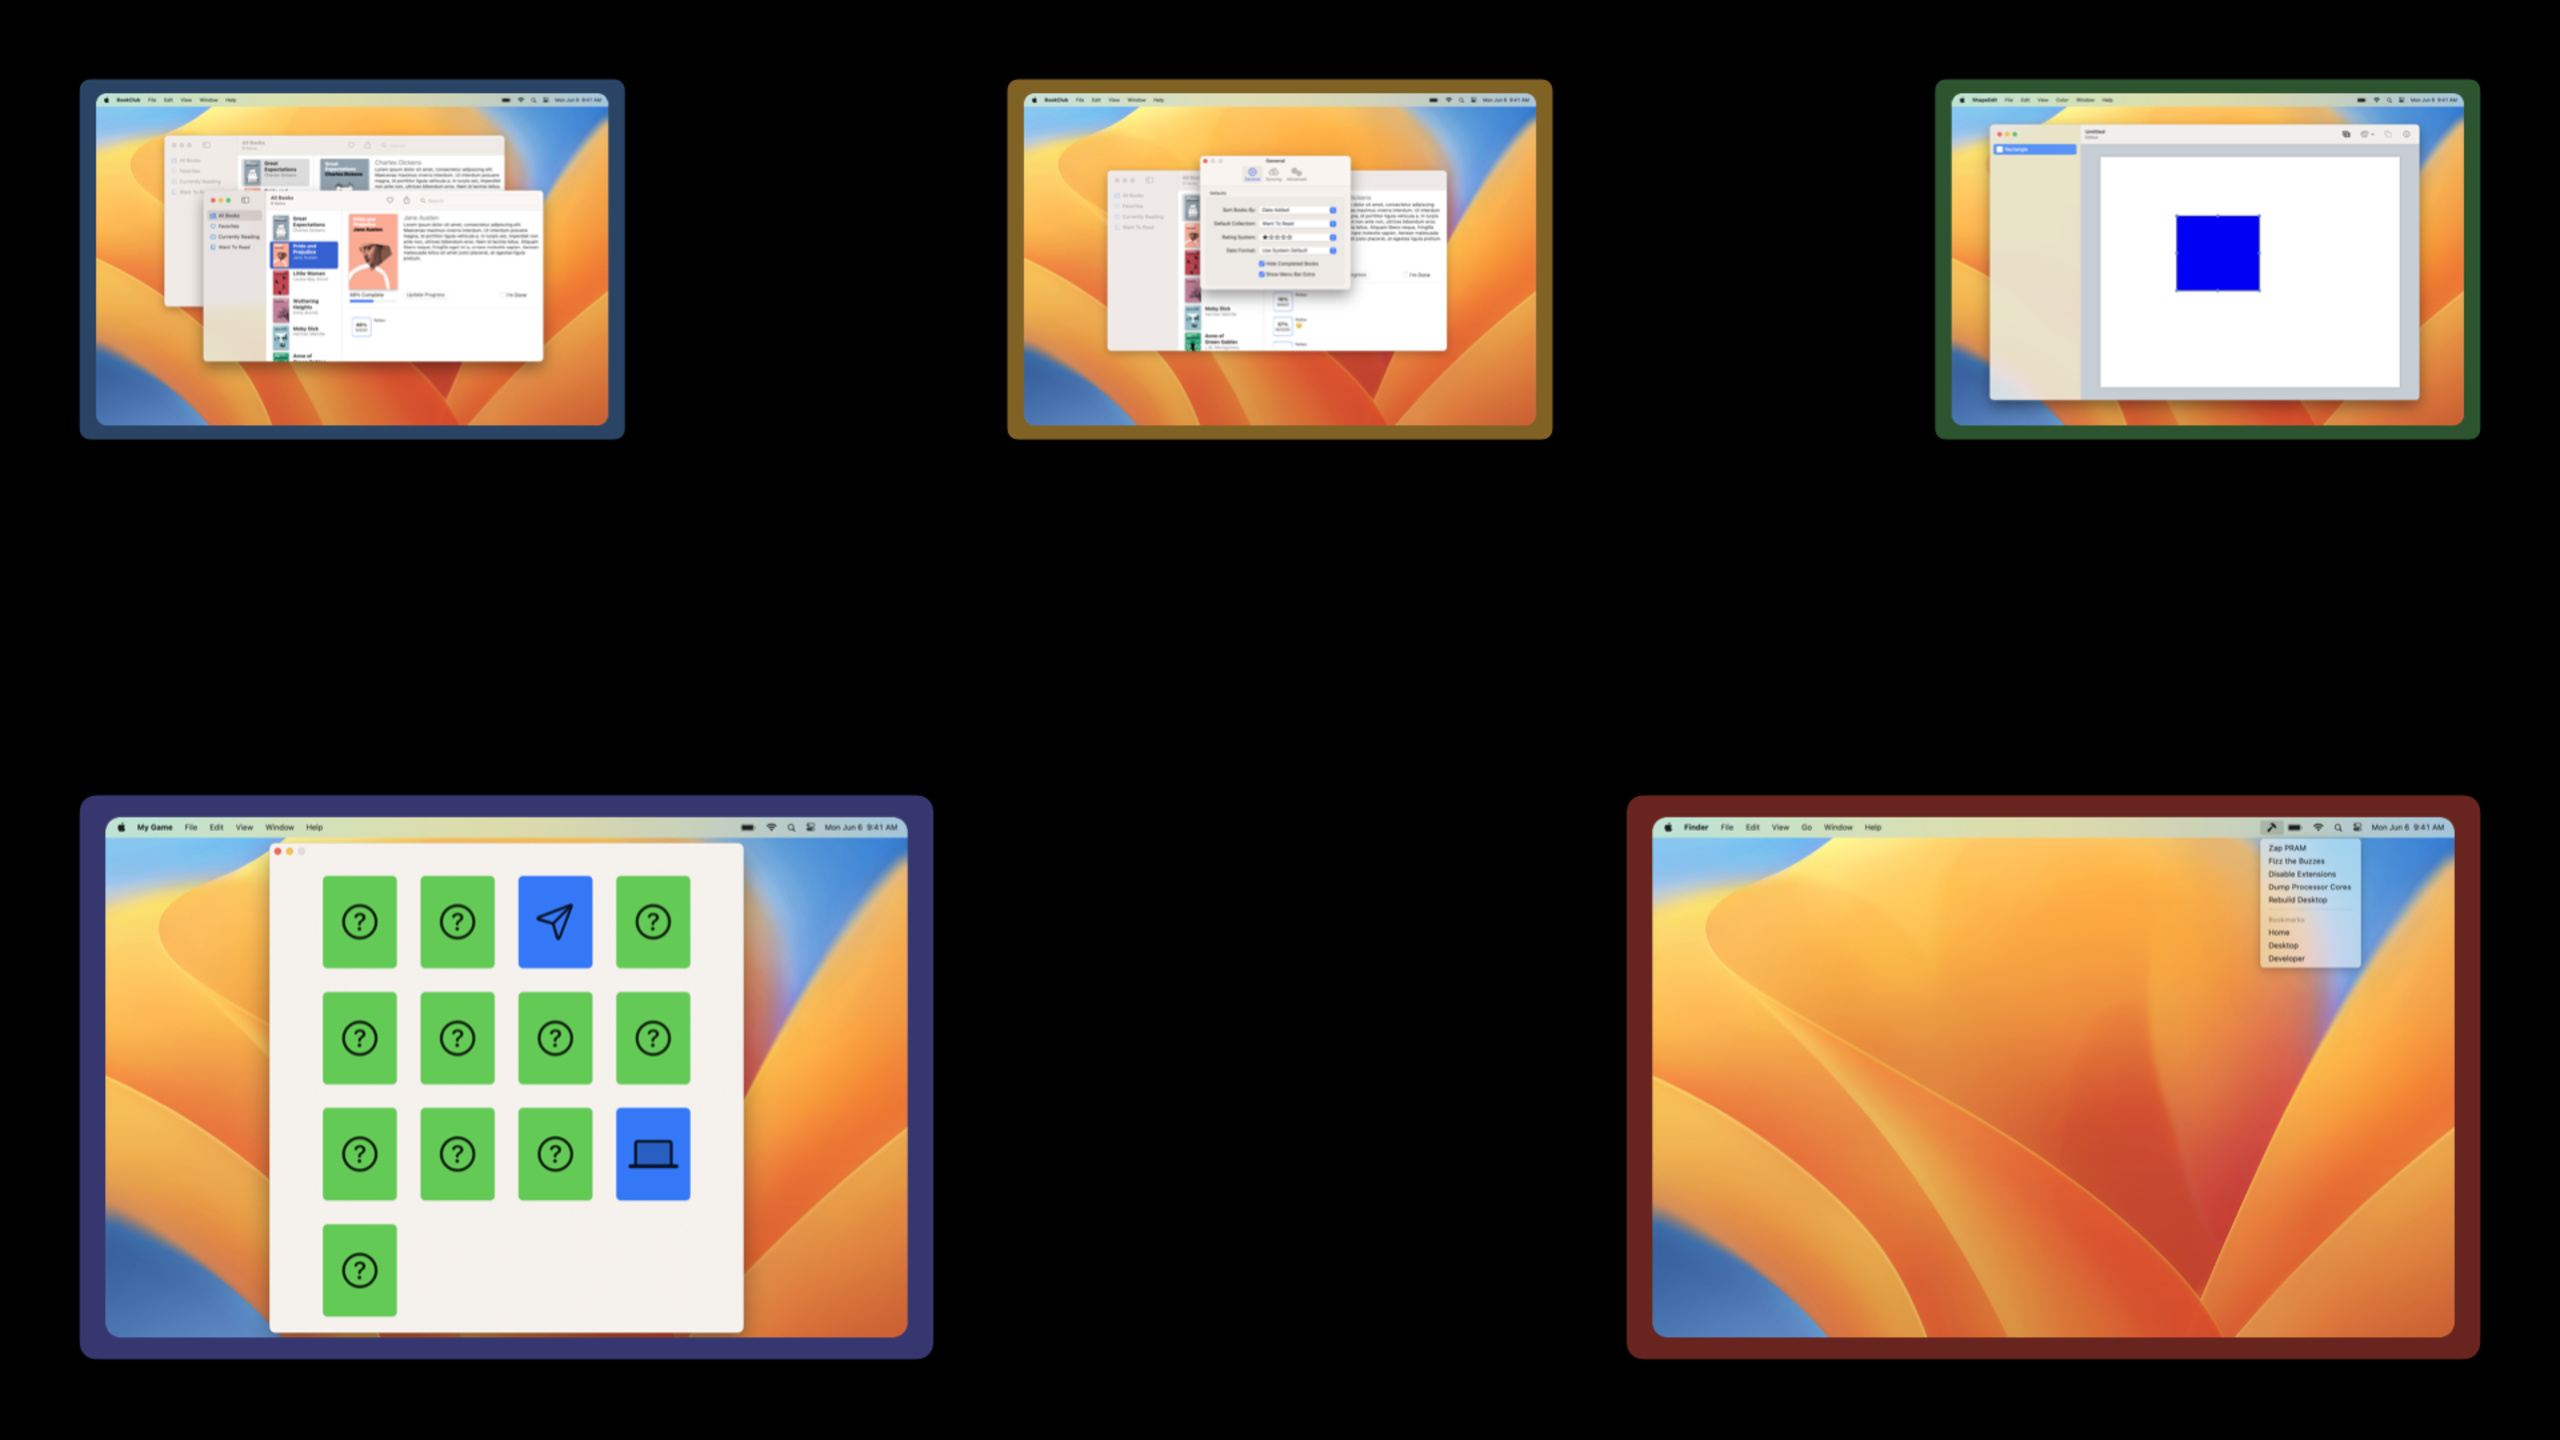
Highlight
SwiftUI 自诞生起在窗口管理上就存在明显短板:你没法方便地打开新窗口、管理多个窗口实例、或者为不同场景定义不同类型的窗口。iOS 16 和 macOS Ventura 通过增强
WindowGroup和引入新的Windowscene 类型,大幅改善了这一局面。
核心内容
SwiftUI app 由 App、Scene 和 View 组成。View 负责界面,Scene 负责把界面放到系统窗口、文档窗口、设置窗口这类外壳里。
过去,很多 SwiftUI app 只有一个 WindowGroup。这对主窗口够用,但一旦要做桌面级体验,就会遇到具体问题:阅读列表需要一个单独的活动统计窗口;书籍详情适合从上下文菜单打开新窗口;文档 app 需要从按钮创建新文档或打开已有文件;菜单栏工具希望常驻系统菜单栏。
这场 Session 把这些问题拆成三类。
第一类是新的 scene 类型。Window 表示单一窗口,适合全局状态;MenuBarExtra 是 macOS 专用 scene,会在系统菜单栏放一个常驻入口。
第二类是从界面代码主动打开窗口。SwiftUI 通过环境提供 openWindow、newDocument、openDocument。按钮不需要知道 AppKit 或 UIKit 的窗口对象,只要调用对应 action。
第三类是窗口行为定制。scene 现在可以移除默认命令、指定默认位置和大小、绑定打开窗口的键盘快捷键。这样,窗口不再只是系统默认行为,而是 app 结构的一部分。
详细内容
Scene 可以组合:一个 App 定义多个入口
(02:01)SwiftUI 的 App body 可以返回多个 scene。主界面用 WindowGroup,文档界面用 DocumentGroup,macOS 设置用 Settings。每个 scene 都描述一种系统级入口。
import SwiftUI
import UniformTypeIdentifiers

@main
struct MultiSceneApp: App {
    var body: some Scene {
        WindowGroup {
            ContentView()
        }

        #if os(iOS) || os(macOS)
        DocumentGroup(viewing: CustomImageDocument.self) { file in
            ImageViewer(file.document)
        }
        #endif

        #if os(macOS)
        Settings {
            SettingsView()
        }
        #endif
    }
}

struct ContentView: View {
    var body: some View {
        Text("Content")
    }
}

struct ImageViewer: View {
    var document: CustomImageDocument

    init(_ document: CustomImageDocument) {
        self.document = document
    }

    var body: some View {
        Text("Image")
    }
}

struct SettingsView: View {
    var body: some View {
        Text("Settings")
    }
}

struct CustomImageDocument: FileDocument {
    var data: Data

    static var readableContentTypes: [UTType] { [UTType.image] }

    init(configuration: ReadConfiguration) throws {
        guard let data = configuration.file.regularFileContents
        else {
            throw CocoaError(.fileReadCorruptFile)
        }
        self.data = data
    }

    func fileWrapper(configuration: WriteConfiguration) throws -> FileWrapper {
        FileWrapper(regularFileWithContents: data)
    }
}
关键点:
WindowGroup定义普通 app 窗口,在支持多窗口的平台上可以有多个实例。DocumentGroup把文件类型和文档界面绑定起来,系统负责文档窗口的生命周期。Settings只在 macOS 编译,表示 app 的设置界面。CustomImageDocument遵守FileDocument,通过readableContentTypes声明可读取的文件类型。
Window:给全局状态一个唯一窗口
(04:38)Window 是 2022 新增的 scene 类型。它和 WindowGroup 的差异很明确:同一个 Window scene 只会有一个窗口实例。BookClub 的 Activity 窗口展示全局阅读活动,重复打开多个没有意义,所以适合用 Window。
import SwiftUI

@main
struct BookClub: App {
    @StateObject private var store = ReadingListStore()

    var body: some Scene {
        WindowGroup {
            ReadingListViewer(store: store)
        }
        Window("Activity", id: "activity") {
            ReadingActivity(store: store)
        }
    }
}

struct ReadingListViewer: View {
    @ObservedObject var store: ReadingListStore

    var body: some View {
        Text("Reading List")
    }
}

struct ReadingActivity: View {
    @ObservedObject var store: ReadingListStore

    var body: some View {
        Text("Reading Activity")
    }
}

class ReadingListStore: ObservableObject {
}
关键点:
@StateObject private var store放在App里,主窗口和 Activity 窗口共享同一份 app 状态。WindowGroup继续负责阅读列表主界面。Window("Activity", id: "activity")定义一个带标识符的单例窗口。id: "activity"会在后面的openWindow(id:)中使用,字符串必须和 scene 定义匹配。
(05:34)打开这个窗口时,从环境取出 openWindow,在按钮 action 中调用即可。如果窗口已经存在,系统会把已有窗口带到前台。
struct OpenWindowButton: View {
    @Environment(\.openWindow) private var openWindow

    var body: some View {
        Button("Open Activity Window") {
            openWindow(id: "activity")
        }
    }
}
关键点:
@Environment(\.openWindow)读取 SwiftUI 提供的窗口打开动作。Button的 action 直接调用openWindow,不用接触平台窗口对象。openWindow(id: "activity")对应上面的Windowscene 标识符。
WindowGroup 可以按值打开详情窗口
(05:57)详情页不适合用 Window。每本书都可能有自己的详情窗口,所以要用带 for: 参数的新 WindowGroup 初始化器。按钮传入书籍 ID,scene 根据 ID 创建或复用窗口。
import SwiftUI

@main
struct BookClub: App {
    @StateObject private var store = ReadingListStore()

    var body: some Scene {
        WindowGroup {
            ReadingListViewer(store: store)
        }
        Window("Activity", id: "activity") {
            ReadingActivity(store: store)
        }
        WindowGroup("Book Details", for: Book.ID.self) { $bookId in
            BookDetail(id: $bookId, store: store)
        }
    }
}

struct OpenWindowButton: View {
    var book: Book
    @Environment(\.openWindow) private var openWindow

    var body: some View {
        Button("Open In New Window") {
            openWindow(value: book.id)
        }
    }
}

struct BookDetail: View {
    @Binding var id: Book.ID?
    @ObservedObject var store: ReadingListStore

    var body: some View {
        Text("Book Details")
    }
}

struct Book: Identifiable {
    var id: UUID
}

class ReadingListStore: ObservableObject {
}
关键点:
WindowGroup("Book Details", for: Book.ID.self)声明这个 scene 接收Book.ID类型的展示值。openWindow(value: book.id)传入同一种类型,SwiftUI 才能找到对应 scene。- view builder 收到的是
Binding<Book.ID?>,详情视图可以在打开后更新这个值。 - 演讲建议传模型标识符,而非整个值类型模型。这样多个窗口仍然通过
store指向同一份数据。 - 传入值必须遵守
Hashable和Codable:前者用于匹配已打开窗口,后者用于状态恢复。
(09:36)这个匹配规则解决了重复窗口问题。同一本书已经打开时,再次从上下文菜单打开,系统会复用已有窗口并把它排到前面。
文档窗口也有环境 action
(06:16)文档 app 可以用 newDocument 创建新文档窗口。前提是 App 定义了带编辑角色的 DocumentGroup,并且传入的文档类型匹配。
import SwiftUI
import UniformTypeIdentifiers

@main
struct TextFileApp: App {
    var body: some Scene {
        DocumentGroup(viewing: TextFile.self) { file in
            TextEditor(text: file.$document.text)
        }
    }
}

struct NewDocumentButton: View {
    @Environment(\.newDocument) private var newDocument

    var body: some View {
        Button("Open New Document") {
            newDocument(TextFile())
        }
    }
}

struct TextFile: FileDocument {
    var text: String

    static var readableContentTypes: [UTType] { [UTType.plainText] }

    init() {
        text = ""
    }

    init(configuration: ReadConfiguration) throws {
        guard let data = configuration.file.regularFileContents,
              let string = String(data: data, encoding: .utf8)
        else {
            throw CocoaError(.fileReadCorruptFile)
        }
        text = string
    }

    func fileWrapper(configuration: WriteConfiguration) throws -> FileWrapper {
        let data = text.data(using: .utf8)!
        return FileWrapper(regularFileWithContents: data)
    }
}
关键点:
DocumentGroup(viewing: TextFile.self)把TextFile文档和TextEditor界面连接起来。@Environment(\.newDocument)取得新建文档的 action。newDocument(TextFile())每次调用都会用新的TextFile值打开文档窗口。TextFile通过FileDocument处理文件读取和写回。
(06:41)已有文件用 openDocument。它接收文件 URL,并且是异步可抛错调用。
struct OpenDocumentButton: View {
    var documentURL: URL
    @Environment(\.openDocument) private var openDocument

    var body: some View {
        Button("Open Document") {
            Task {
                do {
                    try await openDocument(at: documentURL)
                } catch {
                    // Handle error
                }
            }
        }
    }
}
关键点:
@Environment(\.openDocument)取得打开已有文档的 action。Task用来调用异步的openDocument(at:)。documentURL指向磁盘上的文件。catch分支处理文件无法打开、类型不匹配等错误。
MenuBarExtra:macOS 菜单栏也变成 Scene
(03:01)MenuBarExtra 是 macOS 专用 scene。它不先显示主窗口,而是在系统菜单栏显示一个 label,点击后展示菜单或无边框窗口。
import SwiftUI

@main
struct UtilityApp: App {
    var body: some Scene {
        MenuBarExtra("Utility App", systemImage: "hammer") {
            AppMenu()
        }
    }
}

struct AppMenu: View {
    var body: some View {
        Text("App Menu Item")
    }
}
关键点:
MenuBarExtra直接出现在App的 scene 列表里。- 第一个参数是菜单栏项目标题。
systemImage使用 SF Symbol 作为菜单栏图标。- 内容闭包返回点击菜单栏项目后显示的 SwiftUI view。
(03:49)默认样式会拉下一个菜单。如果内容更像仪表盘,可以改成窗口样式。
import SwiftUI

@main
struct UtilityApp: App {
    var body: some Scene {
        MenuBarExtra("Time Tracker", systemImage: "rectangle.stack.fill") {
            TimeTrackerChart()
        }
        .menuBarExtraStyle(.window)
    }
}

struct TimeTrackerChart: View {
    var body: some View {
        Text("Time Tracker Chart")
    }
}
关键点:
.menuBarExtraStyle(.window)把展示方式改成锚定在菜单栏项目上的无边框窗口。- 这个样式适合图表、控制面板这类需要更多空间的内容。
MenuBarExtra可以单独构成工具 app,也可以和主窗口 scene 组合使用。
Scene 修饰符控制窗口命令、位置、大小和快捷键
(11:16)多个 WindowGroup 会带来默认菜单命令。Book details 只能从上下文菜单打开时,可以移除这个 scene 的默认命令。
WindowGroup("Book Details", for: Book.ID.self) { $bookId in
    BookDetail(id: $bookId, store: store)
}
.commandsRemoved()
关键点:
commandsRemoved()作用在 scene 上。- 它会移除这个 scene 自动提供的默认命令。
- 在演讲示例里,它让 File 菜单只保留打开主
WindowGroup的项目。
(11:46)当一个 scene 要挂多个修饰符时,可以抽成自定义 Scene。这样 App 定义更短,也方便复用。
struct ReadingActivityScene: Scene {
    @ObservedObject var store: ReadingListStore

    var body: some Scene {
        Window("Activity", id: "activity") {
            ReadingActivity(store: store)
        }
        #if os(macOS)
        .defaultPosition(.topTrailing)
        .defaultSize(width: 400, height: 800)
        #endif
        #if os(macOS) || os(iOS)
        .keyboardShortcut("0", modifiers: [.option, .command])
        #endif
    }
}
关键点:
ReadingActivityScene遵守Scene,和View抽组件的思路相同。.defaultPosition(.topTrailing)在没有历史状态时指定窗口默认位置。.defaultSize(width: 400, height: 800)给窗口一个初始尺寸,窗口仍然可以调整大小。.keyboardShortcut("0", modifiers: [.option, .command])把打开这个 scene 的命令绑定到 Option-Command-0。#if os(macOS)和#if os(macOS) || os(iOS)保留了平台边界,避免在不支持的平台编译相关修饰符。
核心启发
-
做一个阅读或学习 app 的详情窗口:列表保持在主窗口,条目详情用
WindowGroup("Details", for: Item.ID.self)打开。开始时先让模型遵守Identifiable,按钮里调用openWindow(value: item.id)。 -
做一个全局状态面板:统计、活动记录、同步状态这类内容适合
Window("Activity", id: "activity")。把共享状态放在App的@StateObject,主窗口和辅助窗口都读取同一个 store。 -
做一个菜单栏工具:计时器、剪贴板、构建状态都可以用
MenuBarExtra常驻 macOS 菜单栏。内容简单时使用默认菜单样式;需要图表或复杂控件时加.menuBarExtraStyle(.window)。 -
给窗口加桌面级入口:常用窗口可以加
.keyboardShortcut。如果某个窗口只应该从业务入口打开,用.commandsRemoved()去掉默认菜单命令,避免用户从 File 菜单打开一个没有上下文的空窗口。 -
给文档 app 加快捷打开按钮:新建文件用
newDocument(DocumentType()),打开已有文件用try await openDocument(at: url)。先确认DocumentGroup支持对应文档类型,再在按钮中接入环境 action。
关联 Session
- What’s new in SwiftUI — SwiftUI 2022 总览,包含 scene、导航、布局和跨平台结构更新。
- The SwiftUI cookbook for navigation — 讲解 SwiftUI 导航状态、deep link 和状态恢复,和按值打开窗口的思路相邻。
- SwiftUI on iPad: Organize your interface — 讲解 iPad 上的 SwiftUI 分栏、选择和上下文菜单,是多窗口体验的界面基础。
- Build a desktop-class iPad app — 从 UIKit 角度讲桌面级 iPad app,和本场的 iPadOS/macOS 窗口能力互补。
评论
GitHub Issues · utterances