
Highlight
Core ML 的使用流程可以分成三步:选模型、集成到 app、优化性能。今年的更新覆盖了全部三个阶段。
核心内容
Core ML 的性能问题,常常出现在模型已经跑起来之后。模型能预测,不代表它适合实时相机、交互式滤镜或低延迟界面。开发者需要知道模型加载要多久、单次预测要多久、每一层跑在 CPU、GPU 还是 Neural Engine 上。
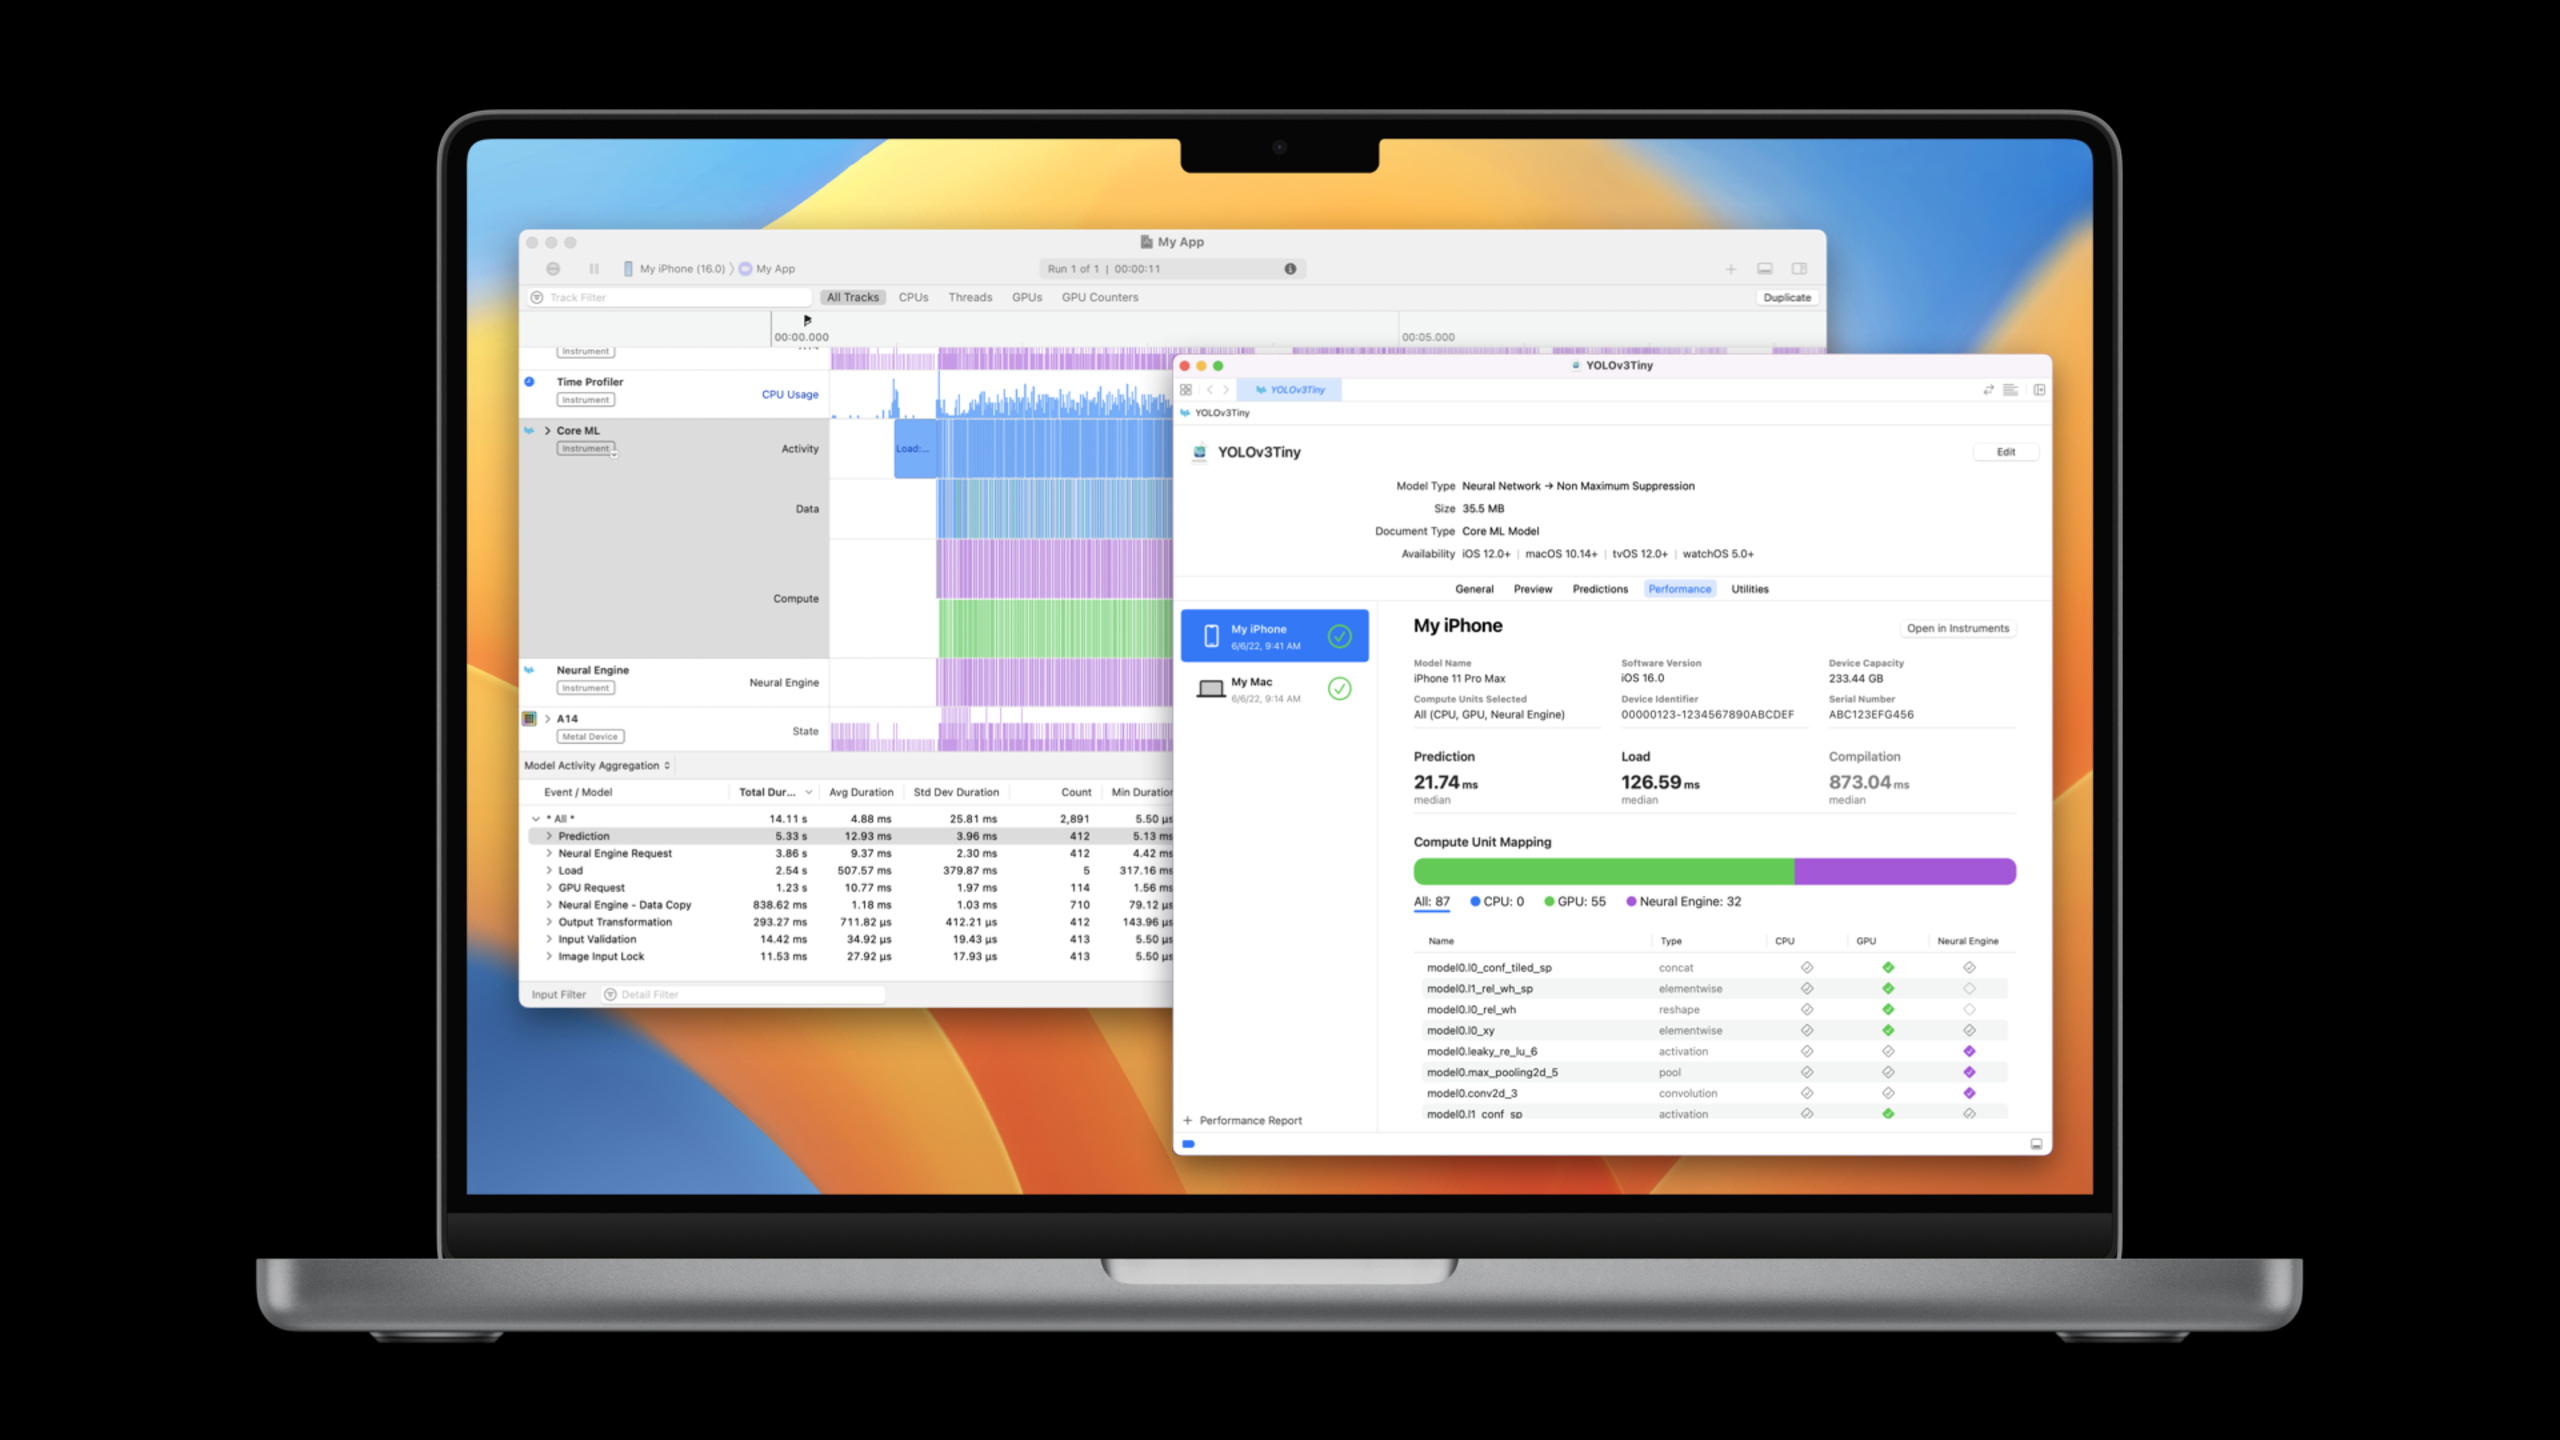
这场 session 把 Core ML 的使用拆成三步:选模型、集成模型、优化使用方式。Xcode 14 的 model viewer 加入 Performance tab,让开发者在写 app 代码之前,就能把模型发送到真机,生成编译、加载、预测的性能报告。
模型进入 app 后,性能瓶颈会变得更具体。演示里的风格迁移 app 帧率偏低,Core ML Instrument 显示加载模型的总耗时超过预测总耗时。原因是模型属性被写成 computed property,每次预测前都会重新加载。改成 lazy var 后,加载次数回到每个风格一次。
API 层面,iOS 16 和 macOS Ventura 为 Core ML 增加 Float16 输入输出支持、output backing、cpuAndNeuralEngine compute unit、ML Program 权重压缩、内存模型加载,以及 Swift Package 中自动编译和打包 Core ML 模型。这些更新的共同目标很明确:减少数据转换、减少重复分配、让模型更容易分发。
详细内容
用 Performance Report 先判断模型是否适合场景
(03:39)过去要评估模型性能,常见做法是先把模型集成进 app,或写一个小 prototype,再用 Instruments 测量。Xcode 14 让这件事前移到 model viewer。
Performance tab 的流程是:选择目标设备,选择 Core ML 可用的 compute units,点击 Run Test。Xcode 会把模型发送到设备上,多次执行 compile、load 和 prediction,然后生成报告。
演示中的 YOLOv3 模型在 iPhone 上的中位数预测时间是 22.19 ms,中位数加载时间约 400 ms,设备端编译时间约 940 ms。22 ms 的预测时间,对实时视频来说大约对应 45 FPS。
概念流程,来自 Performance tab 演示:

1. 选择目标设备:iPhone
2. 选择 compute units:All
3. 运行测试:Run Test
4. 读取报告:
   - median prediction time
   - median load time
   - compilation time
   - layer placement on CPU / GPU / Neural Engine
关键点:
- 第 1 行把测试放到真实硬件上,因为 Core ML 性能依赖设备。
- 第 2 行控制 Core ML 可以使用哪些计算单元。
- 第 4 行的 prediction time 用来判断实时性,load time 和 compilation time 用来判断启动或首次使用成本。
- layer placement 会显示每一层实际运行在哪个计算单元上;演示中 54 层跑在 GPU,32 层跑在 Neural Engine。
用 Core ML Instrument 找到 app 里的真实瓶颈
(07:32)Performance Report 只能说明模型在独立环境里的能力。模型进入 app 后,还要看调用方式是否浪费了时间。
Xcode 14 的 Instruments 增加 Core ML template。这个 template 包含 Core ML Instrument,并配合其他 Instruments 分析模型运行。Core ML Instrument 把事件分成三类:Activity、Data、Compute。
- Activity 对应开发者直接调用的 Core ML API,例如 load 和 prediction。
- Data 显示 Core ML 为输入输出做数据检查或数据转换。
- Compute 显示 Core ML 发给 Neural Engine 或 GPU 的计算请求。
演示里的 style transfer app,Aggregation view 显示 load 总耗时 6.41 秒,prediction 总耗时 2.69 秒。这个比例说明问题不在模型单次预测,而在重复加载。
// 概念示例:transcript 中的问题写法
// 每次读取 styleTransferModel,都会重新计算属性并加载模型。
var styleTransferModel: MLModel {
    loadSelectedStyleTransferModel()
}

// 概念示例:transcript 中的修复方向
// 第一次使用时加载,之后复用内存中的模型。
lazy var styleTransferModel: MLModel = {
    loadSelectedStyleTransferModel()
}()
关键点:
var styleTransferModel: MLModel { ... }是 computed property,访问属性会执行代码块。loadSelectedStyleTransferModel()代表模型加载工作;放在 computed property 中会在每次预测前重复发生。lazy var会在首次访问时初始化,之后复用同一个模型实例。- transcript 的验证结果是:修复后只有 5 次 load event,数量与 app 中使用的 5 个 style 相同。
(12:43)Core ML Instrument 还能按模型拆分 activity。对一个 style 对应一个模型的 app,这能把不同模型的 load 和 prediction 分开看。
更底层的执行也能继续展开。演示把 Core ML Instrument、GPU Instrument 和新的 Neural Engine Instrument 固定在一起。Core ML 区间显示完整预测区域,Neural Engine Instrument 显示前半段计算,GPU Instrument 显示后半段计算,开发者可以看到模型从 Neural Engine 交给 GPU 完成。
用 Float16 输入输出减少数据转换
(14:34)Core ML 以前支持 8-bit grayscale、32-bit color image,以及 Int32、Double、Float32 MultiArray。问题出现在 app 自己已经使用 Float16 数据时。
演示中的图像 sharpen filter 在 GPU 上做前后处理,单通道图像使用 OneComponent16Half。旧模型接口仍然是 8-bit grayscale,app 需要先把输入从 OneComponent16Half 降到 OneComponent8,拿到输出后再升回 OneComponent16Half。Core ML 内部为了在 Float16 精度计算,还会把 8-bit 输入再转换为 Float16。
iOS 16 和 macOS Ventura 起,Core ML 原生支持 OneComponent16Half grayscale image 和 Float16 MultiArray。模型转换时可以指定新的 image color layout 或 MultiArray data type。最低部署目标需要设为 iOS 16 或 macOS Ventura。
概念流程,来自 Float16 演示:

旧模型:
OneComponent16Half input in app
  -> app downcast to OneComponent8
  -> Core ML convert to Float16 for compute
  -> Core ML produce OneComponent8 output
  -> app upcast to OneComponent16Half

新模型:
OneComponent16Half CVPixelBuffer input
  -> Core ML prediction
  -> OneComponent16Half CVPixelBuffer output
关键点:
- 旧流程有 app 侧的降精度和升精度,也有 Core ML 内部的数据准备。
- 新流程让模型接口直接接受 Float16 grayscale buffer。
- transcript 明确提到,直接传入
OneComponent16Half CVPixelBuffer不会产生数据拷贝或转换。 - Instruments 的 Data lane 在修改后不再显示之前的数据转换步骤。
用 output backing 控制输出 buffer
(18:42)Core ML 还增加了 output backing API。开发者可以预先分配输出 buffer,把它设置到 prediction options 上,让 Core ML 写入这个 buffer,而不是每次预测都创建新输出。
概念伪代码,来自 transcript 描述的 output backing 用法:

outputBuffer = outputBackingBuffer()  // returns OneComponent16Half CVPixelBuffer
predictionOptions = new prediction options
predictionOptions.setOutputBacking(outputBuffer, forModelOutputName)
result = model.prediction(inputBuffer, options: predictionOptions)
关键点:
outputBackingBuffer()对应 transcript 中演示者写的函数,返回OneComponent16Half CVPixelBuffer。predictionOptions表示预测时传给模型的 options 对象。setOutputBacking是伪代码,表达“把预分配输出 buffer 设置到 prediction options 上”的步骤,不假设具体 Swift API 名称。model.prediction(inputBuffer, options: predictionOptions)对应 transcript 中“call the prediction method on my model with those prediction options”。forModelOutputName取决于模型生成的接口和模型输出名称。
(20:11)Apple 还建议尽量使用 IOSurface-backed buffer。这样 Core ML 可以利用 unified memory,让数据在不同 compute units 之间传递时减少拷贝。
其他 Core ML 集成能力
(20:31)ML Program model type 扩展了 16-bit 和 8-bit 权重压缩支持,并新增 sparse representation。coremltools utilities 可以对 ML Program weights 做 quantize、palettize 和 sparsify。
(21:09)MLModelConfiguration 的 computeUnits 增加 cpuAndNeuralEngine。如果 app 自己重度使用 GPU,就可以让 Core ML 避开 GPU,把计算限制在 CPU 和 Neural Engine。
// 概念示例:选择不使用 GPU 的 Core ML compute units
let configuration = MLModelConfiguration()
configuration.computeUnits = .cpuAndNeuralEngine

let model = try MyModel(configuration: configuration)
关键点:
MLModelConfiguration是 Core ML 模型加载配置。computeUnits控制 Core ML 的计算单元偏好。.cpuAndNeuralEngine是 session 中提到的新选项。- 适用场景是 GPU 已经被 app 的渲染、视频或其他计算任务占用。
(21:44)Core ML 还增加了内存模型加载能力。开发者可以用自定义加密方案保存模型数据,在加载前解密,并从内存中的 Core ML model specification compile 和 load,不要求 compiled model 先落到磁盘。
(22:11)Xcode 14 支持把 Core ML 模型放进 Swift Package。其他人导入 package 后,Xcode 会自动编译并打包模型,并生成开发者熟悉的代码接口。这降低了在 Swift 生态分发可复用模型的成本。
核心启发
-
做一个实时相机滤镜性能面板:把每个滤镜背后的 Core ML 模型加载次数、prediction time 和 Data lane 事件列出来。这样可以快速发现“滤镜切换慢”来自模型加载,还是来自输入输出转换。
-
做一个模型候选评估表:在选模型阶段,用 Xcode Performance Report 记录不同设备、不同 compute units 下的 prediction time、load time 和 layer placement。适合对象检测、姿态识别、实时分割这类有帧率目标的功能。
-
把 GPU 图像管线改成 Float16 直通:如果 app 的前处理和后处理已经在 GPU 上使用
OneComponent16Half,可以重新转换模型,让 Core ML 直接接受 Float16 image 或 Float16 MultiArray,减少 app 侧转换和 Core ML Data lane 的转换事件。 -
为高频预测复用输出 buffer:对视频流、音频流或传感器流模型,预分配输出 backing buffer,预测时复用。这个方向适合每秒调用多次模型的功能,例如实时增强、运动分析和连续分类。
-
把可复用模型封装成 Swift Package:把模型、调用代码和示例输入输出一起放进 package,让团队内多个 app 共享同一套 Core ML 集成方式。Xcode 14 会处理模型编译、打包和代码生成。
关联 Session
- Explore the machine learning development experience — 先讲模型发现、转换、验证和设备端调优,适合作为本 session 的前置流程。
- Get to know Create ML Components — 讲如何用 Create ML Components 训练自定义模型,训练完成后可以用本 session 的工具评估和优化 Core ML 集成。
- Compose advanced models with Create ML Components — 展示更复杂的 Create ML Components 组合方式,适合需要把 temporal data 模型部署到 Core ML 的场景。
- What’s new in Vision — Vision API 常用于图像和视频智能功能,上层 Vision pipeline 的性能也会受到模型选择、数据格式和硬件执行方式影响。
评论
GitHub Issues · utterances