
Highlight
Apple 在 Xcode 13 中把 DocC 扩展到交互式教程写作,开发者可以用 Markdown 指令组织教程目录、章节、步骤、代码和图片,让框架使用者在文档窗口中按步骤构建真实 App。
核心内容
你发布了一个 Swift 框架,API 参考已经写好。用户仍然会卡住。
他们知道某个类型存在,却不知道第一步该写什么。他们能读到单个方法的说明,却看不到几个 API 如何组合成一个功能。最后,他们只能去示例工程里翻代码,或者在 issue 里问你。
DocC 的交互式教程解决这个问题。它把教程当成文档的一部分,直接放在 Xcode 的 Developer Documentation 窗口里。教程用 Markdown 编写,再用 DocC 指令(directive)描述结构。
这场 session 用 SlothCreator 框架做示例。作者先把框架 API 分组:创建树懒、照顾树懒、和其他框架交互。然后把这些分组变成教程章节。每个章节包含多个教程。每个教程再拆成 section 和 step。
用户读到的是一个可逐步推进的学习路径:先创建 Xcode 项目,再加入框架依赖,再写 SwiftUI 视图,再对照预览截图检查结果。
这让文档从“说明 API”推进到“训练用户使用 API”。开发者需要做的事情也很具体:准备一个 Documentation Catalog,写教程目录文件,添加教程文件,放入图片和代码文件,最后用 Product > Build Documentation 预览。
详细内容
教程目录:用 @Tutorials 组织入口
(11:26)
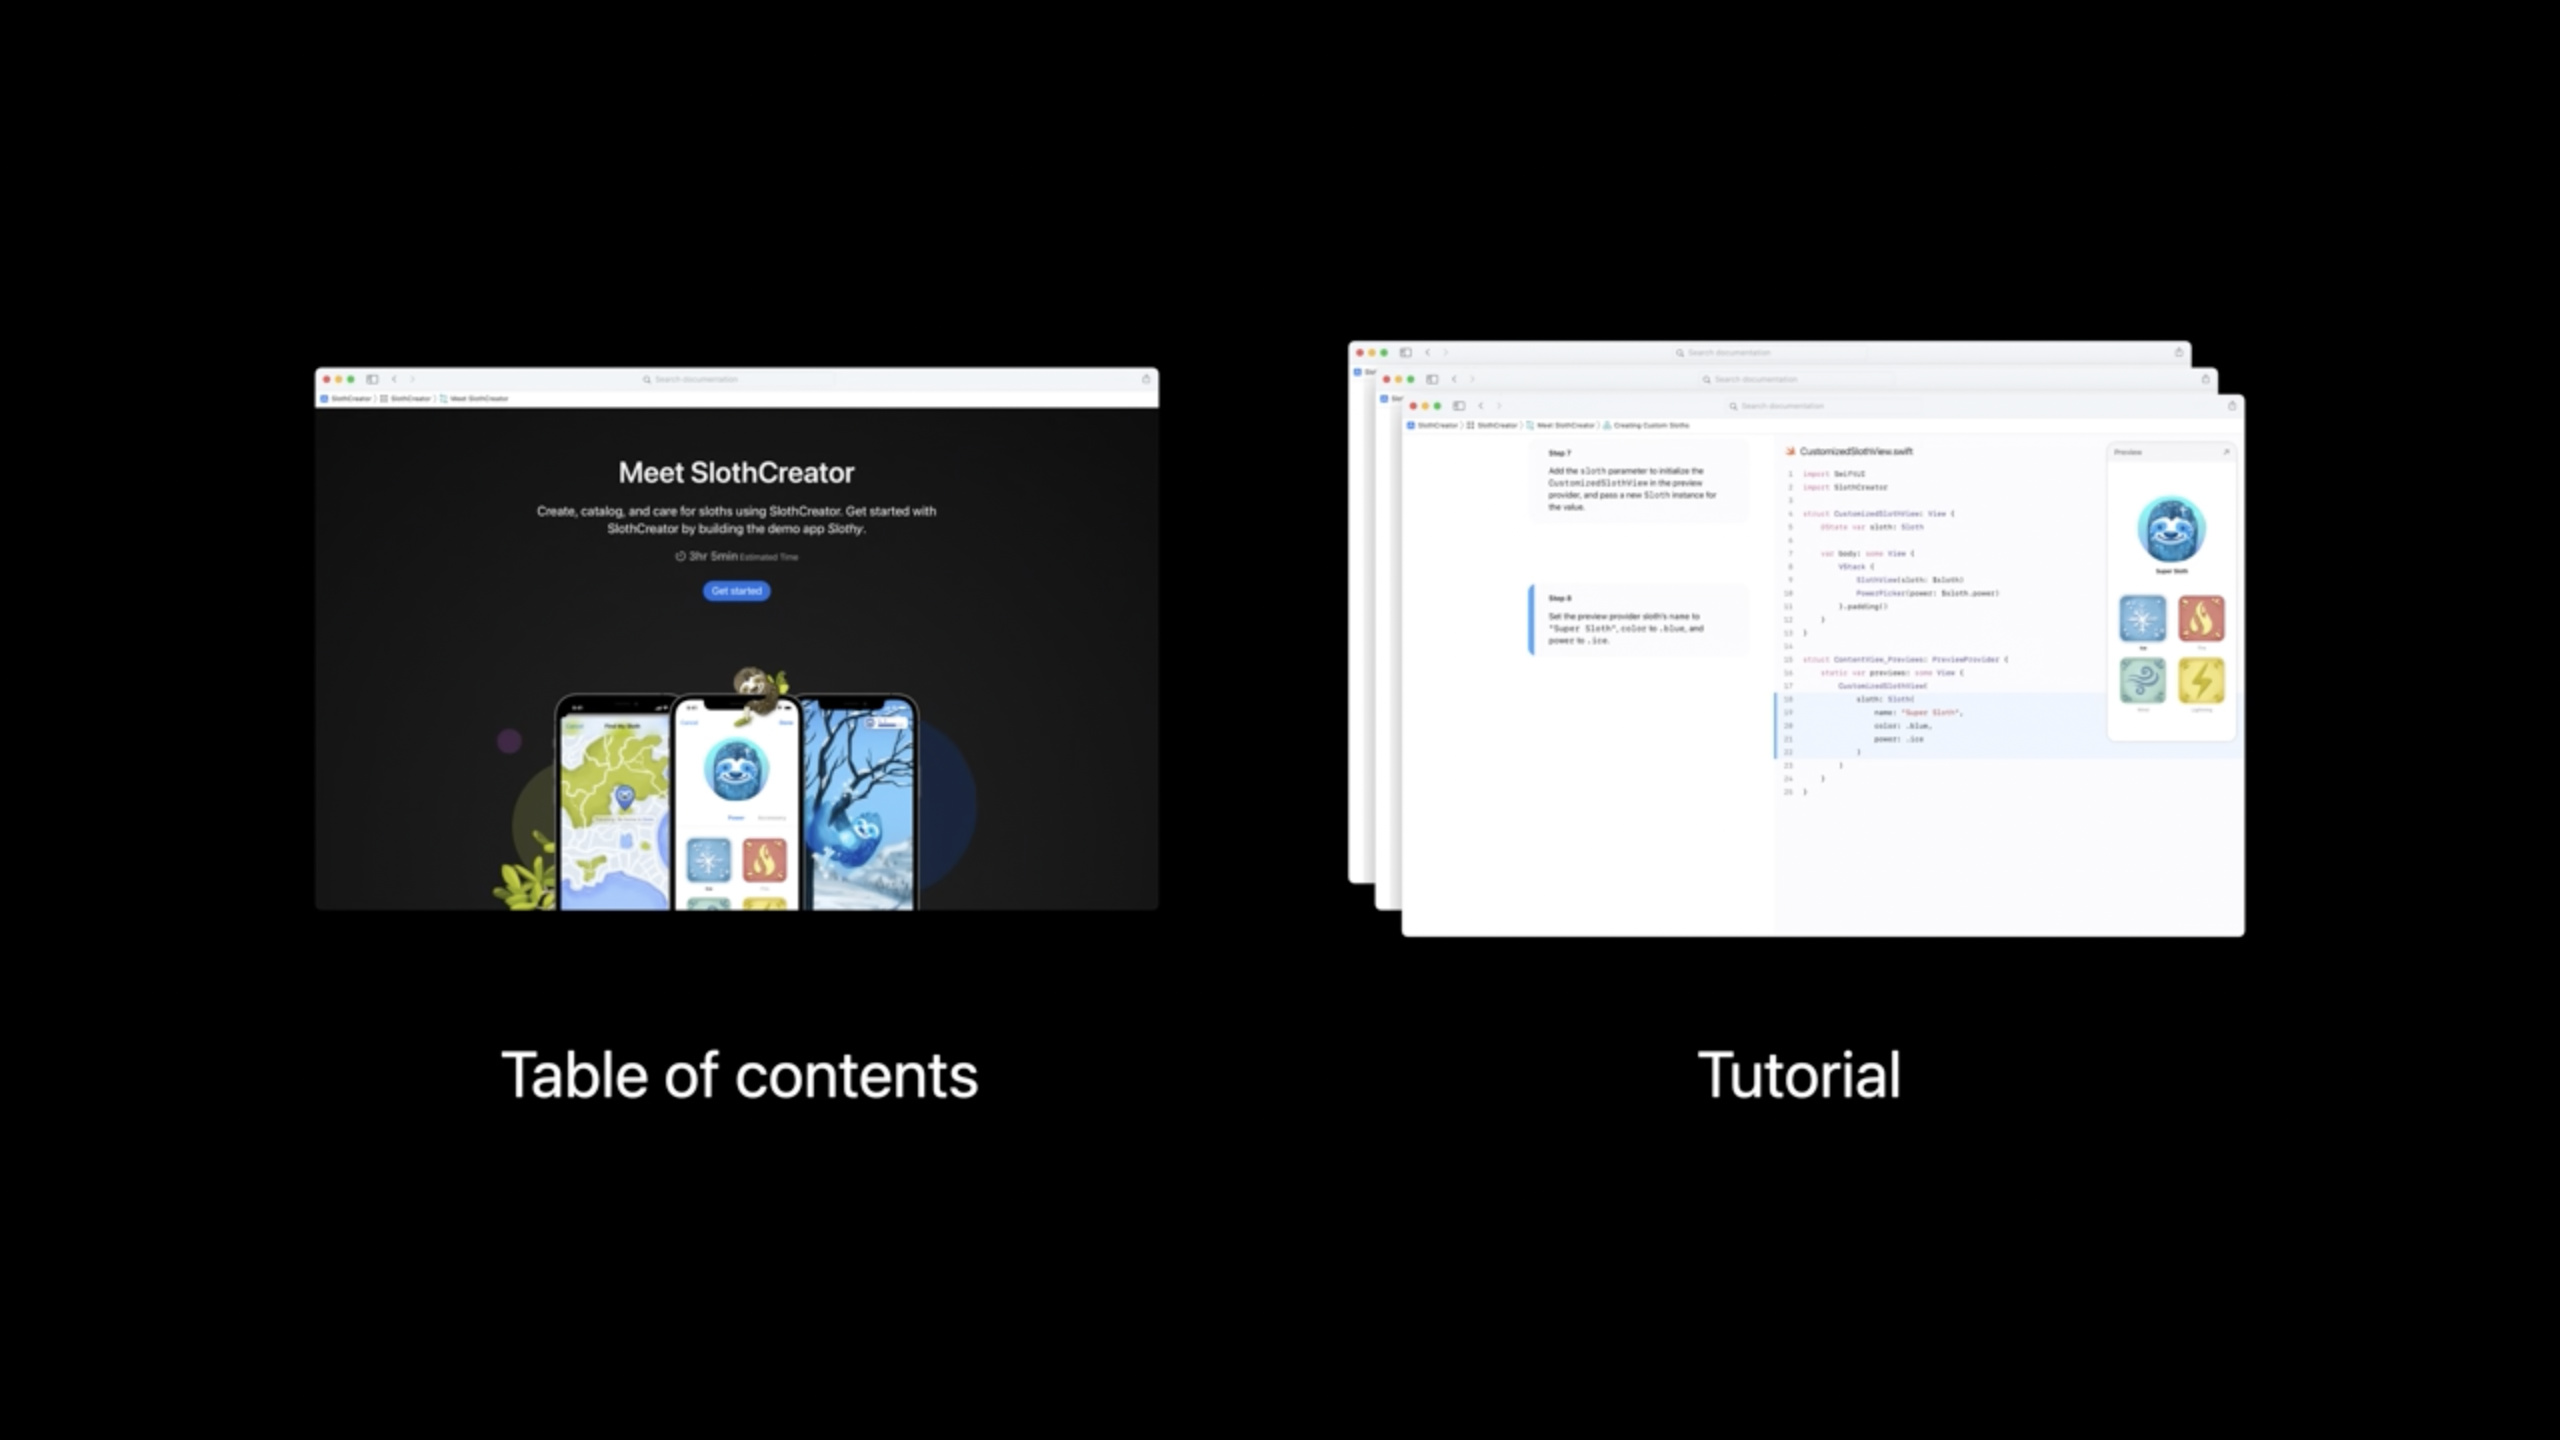
DocC 教程集合需要一个 Table of Contents 文件。这个文件用 @Tutorials 作为根指令。里面包含介绍、章节和指向具体教程的链接。
@Tutorials(name: "SlothCreator") {
    @Intro(title: "Meet SlothCreator") {
        Create, catalog, and care for sloths using SlothCreator. Get started with SlothCreator by building the demo app _Slothy_.

        @Image(source: slothcreator-intro.png, alt: "An illustration of 3 iPhones in portrait mode, displaying the UI of finding, creating, and taking care of a sloth in Slothy — the sample app that you build in this collection of tutorials.")
    }

    @Chapter(name: "SlothCreator Essentials") {
        @Image(source: chapter1-slothcreatorEssentials.png, alt: "A wireframe of an app interface that has an outline of a sloth and four buttons below the sloth. The buttons display the following symbols, from left to right: snowflake, fire, wind, and lightning.")

        Create custom sloths and edit their attributes and powers using SlothCreator.

        @TutorialReference(tutorial: "doc:Creating-Custom-Sloths")
    }
}
关键点:
@Tutorials(name: "SlothCreator")定义教程集合,名称会出现在文档导航中。@Intro(title: "Meet SlothCreator")定义集合入口的标题和介绍文字。@Image(source:alt:)给入口添加图片,并提供无障碍描述。@Chapter(name:)把教程按学习阶段分组。@TutorialReference(tutorial:)链接到单个教程文件,DocC 会用这些链接生成入口和进度信息。
教程文件:从标题、概览和图片开始
(12:21)
Hannah 在 Xcode 13 中新建 Tutorial file,然后把第一个教程命名为 Creating Custom Sloths。教程模板里已经有 intro、section 和 steps,可以在这个基础上补内容。
Creating Custom Sloths关键点:
- 这个标题对应教程页的主标题。
- Xcode 的 Tutorial file 模板会生成基础结构,作者只需要替换标题、介绍和步骤。
- 标题应该对应用户要完成的任务,示例中是创建自定义树懒。
(12:27)
教程概览告诉读者要构建什么。
This tutorial guides you through building _Slothy_ — an app for creating and caring for custom sloths. You'll start by building the sloth creation view.关键点:
- 第一部分说明最终产物是
_Slothy_App。 - 破折号后面说明 App 的用途:创建并照顾自定义树懒。
- 最后一句说明第一段学习任务:构建 sloth creation view。
_Slothy_使用 Markdown 斜体语法,DocC 会保留 Markdown 渲染。
(13:04)
教程可以引用放在 Documentation Catalog Resources 文件夹里的图片。
creating-intro.png关键点:
- 文件名写在
@Image的source参数中。 - 图片资源放在 Documentation Catalog 的 Resources 文件夹里。
- session 中强调要给图片添加 accessible description,让读者通过阅读和听读都能理解教程内容。
Section 和 Step:把大任务拆成可执行步骤
(15:57)
第一节让读者创建 Xcode 项目并添加 SlothCreator 依赖。每个 @Step 只做一件事,并配一张截图。
@Step {
    Enter "Slothy" as the Product Name.

    @Image(source: creating-01-02.png, alt: "A screenshot of the project sheet, which shows the Product Name for the app being built as Slothy. The Interface is set to SwiftUI, and the Life Cycle is set to SwiftUI App.")
}

@Step {
    Select "SwiftUI" from the Interface pop-up menu and "SwiftUI App" from the Life Cycle pop-up menu, then click Next. Choose a location to save the Slothy project on your Mac.

    @Image(source: creating-01-03.png, alt: "A screenshot of the project sheet, which shows the Interface is set to SwiftUI and the Life Cycle is set to SwiftUI App.")
}

@Step {
    Add `SlothCreator` as a dependency to the project.

    @Image(source: creating-01-04.png, alt:"A screenshot shows the SlothCreator package in Xcode's navigator.")
}
关键点:
- 每个
@Step包含一段指令文字。 - 第一个步骤要求输入 Product Name,任务范围很小。
- 第二个步骤要求选择 SwiftUI Interface 和 SwiftUI App Life Cycle。
- 第三个步骤要求把
SlothCreator加入项目依赖。 - 每个步骤都跟随
@Image,图片展示读者应该看到的 Xcode 状态。 alt文本描述截图内容,服务 VoiceOver 和其他辅助技术。
(16:09)
写完后,作者用 Product > Build Documentation 构建文档,也可以按 Control-Shift-Command-D。Xcode 会打开 Developer Documentation 窗口预览教程。
Product > Build Documentation
Control + Shift + Command + D
关键点:
Product > Build Documentation在 Xcode 中构建 DocC 文档。Control + Shift + Command + D是同一个操作的快捷键。- 构建成功后,可以在 Developer Documentation 窗口检查 Table of Contents、章节和教程页。
- session 中的示例在预览里确认了章节链接、教程 intro、步骤图片切换和预计完成时间。
Code Step:把代码文件和预览图放进教程
(17:58)
第二节开始写 SwiftUI 代码。DocC 的 @Code 指令可以显示某一步对应的 Swift 文件。它还会和上一步代码比较,突出新增部分。
@Section(title: "Add a customization view") {
    @ContentAndMedia(layout: horizontal) {
        Add the ability for users to customize sloths and select their powers.

        @Image(source: 01-creating-section2.png, alt: "An outline of a sloth surrounded by four power type icons. The power type icons are arranged in the following order, clockwise from the top: fire, wind, lightning, and ice.")
    }

    @Steps {
        @Step {
            Create a new SwiftUI View file named `CustomizedSlothView.swift`.

            @Code(name: "CustomizedSlothView.swift", file: 01-creating-code-02-01.swift) {
                @Image(source: preview-01-creating-code-02-01.png, alt: "A screenshot from the Xcode preview as it would appear on iPhone, with the text, Hello, World!, centered in the middle of the display.")
            }
        }

        @Step {
            Import the `SlothCreator` package.

            @Code(name: "<#display name#>", file: <#filename.swift#>)
        }
    }
}
关键点:
@Section(title:)定义教程中的一个阶段。@ContentAndMedia(layout: horizontal)让说明文字和图片横向排列。@Steps包住一组步骤。- 第一个
@Step要求创建CustomizedSlothView.swift。 @Code(name:file:)指向要展示的 Swift 文件。- 嵌套在
@Code内的@Image展示 Xcode Preview 结果。 - 第二个
@Step使用模板占位符,随后会替换成真实文件名。
(19:05)
作者把第二个代码步骤的显示名替换成真实文件名。
CustomizedSlothView.swift关键点:
- 这个值用于
@Code的name参数。 - 它显示在代码步骤顶部,告诉读者正在编辑哪个文件。
- 名称和真实 Swift 文件一致,读者能在 Xcode navigator 中直接找到。
(19:08)
代码内容来自单独的 Swift 文件。
01-creating-code-02-02.swift关键点:
- 这个值用于
@Code的file参数。 - DocC 读取该 Swift 文件并显示在教程右侧。
- session 中说明 DocC 会把当前代码文件和上一步代码文件比较,并高亮新代码。
(19:25)
后续步骤继续用 @Code 展示每一步的 Swift 文件,并用预览图让读者核对结果。
@Step {
    Create a ``Sloth`` state variable called `sloth`.

    @Code(name: "CustomizedSlothView.swift", file: 01-creating-code-02-03.swift) {
         @Image(source: preview-01-creating-code-02-01.png, alt: "A screenshot from the Xcode preview as it would appear on iPhone, with the text, Hello, World!, centered in the middle of the display.")
    }
}

@Step {
    Delete the template `Text` view, then add a new `VStack` with trailing padding.

    This adds space around and between any views inside.

    @Code(name: "CustomizedSlothView.swift", file: 01-creating-code-02-04.swift) {
         @Image(source: preview-01-creating-code-02-04.png, alt: "A screenshot of a blank preview canvas.")
    }
}

@Step {
    Add a `SlothView`. Specify the `sloth` state variable for the view's `sloth` binding.

    @Code(name: "CustomizedSlothView.swift", file: 01-creating-code-02-05.swift) {
         @Image(source: preview-01-creating-code-02-04.png, alt: "A screenshot of a blank preview canvas.")
    }
}

@Step {
    Add a `PowerPicker`. Specify the `sloth`'s `power` for the picker view's `power` binding.

    @Code(name: "CustomizedSlothView.swift", file: 01-creating-code-02-06.swift) {
         @Image(source: preview-01-creating-code-02-04.png, alt: "A screenshot of a blank preview canvas.")
    }
}

The following steps display your customized sloth view in the SwiftUI preview.

@Step {
    Add the `sloth` parameter to initialize the `CustomizedSlothView` in the preview provider, and pass a new `Sloth` instance for the value.

    @Code(name: "CustomizedSlothView.swift", file: 01-creating-code-02-07.swift) {
         @Image(source: preview-01-creating-code-02-07.png, alt: "A portrait of a generic sloth displayed in the center of the canvas.")
    }
}

@Step {
    Set the preview provider sloth's `name` to `"Super Sloth"`, `color` to `.blue`, and `power` to `.ice`.

    @Code(name: "CustomizedSlothView.swift", file: 01-creating-code-02-08.swift) {
         @Image(source: preview-01-creating-code-02-08.png, alt: "A portrait of an ice sloth on top, followed by four power icons below. The power icons, clockwise from top left, include: ice, fire, wind, and lightning. The ice icon is selected.")
    }
}
关键点:
- 第一步创建
Sloth状态变量,并用双反引号Sloth链接到 DocC 符号。 - 第二步删除模板
Text,改用带 trailing padding 的VStack。 - 第三步添加
SlothView,并把sloth状态变量传给它的slothbinding。 - 第四步添加
PowerPicker,并绑定sloth.power。 - 后两个步骤调整 SwiftUI preview provider,让预览能展示具体树懒状态。
name、color、power的示例值分别是"Super Sloth"、.blue、.ice。
多章节训练:让教程覆盖一组真实任务
(20:10)
单个教程只能教一个局部任务。SlothCreator 的完整教程集合包含八个教程,分成三个章节。章节对应作者前面整理的 API 分组。
@Chapter(name: "Sloth Health & Happiness") {
    @Image(source: chapter2-healthAndHappiness.png, alt: "A popover window pointing at a button with a leaf symbol on it. To the right of the leaf button, there is a button with a smiley face and a button with a dumbbell.")

    Discover how to track sloth's activity levels, measure their overall happiness, and feed them their favorite foods.

    @TutorialReference(tutorial: "doc:Feeding-Sloths")
    @TutorialReference(tutorial: "doc:Tracking-Sloth-Activity")
    @TutorialReference(tutorial: "doc:Measuring-Sloth-Happiness")
}

@Chapter(name: "Finding Hidden Sloths") {
    @Image(source: chapter3-findingHiddenSloths.png, alt: "An illustration of a radar scanning over a map. The map displays a pin with a smiley sloth face in the upper left quadrant.")

    Find sloths as they move around their neighborhoods and make friends.

    @TutorialReference(tutorial: "doc:Locating-Sloths")
    @TutorialReference(tutorial: "doc:Finding-Sloth-Habitats")
}
关键点:
Sloth Health & Happiness章节覆盖活动、快乐程度和喂食。- 该章节引用三个教程:
Feeding-Sloths、Tracking-Sloth-Activity、Measuring-Sloth-Happiness。 Finding Hidden Sloths章节覆盖定位和栖息地。- 该章节引用两个教程:
Locating-Sloths、Finding-Sloth-Habitats。 - 每个章节都有图片和简短说明,读者在目录页就能理解学习路径。
核心启发
-
做什么:给你的 Swift package 加一个“十分钟上手”教程。 为什么值得做:session 中的教程从真实 App 开始,让用户快速看到框架 API 如何协作。 怎么开始:在 Documentation Catalog 里创建 Tutorials 文件夹,添加
@Tutorials目录,再用@TutorialReference链接第一个教程。 -
做什么:为每个关键 API 分组设计一个章节。 为什么值得做:Will 先把 SlothCreator API 分成创建、照顾和交互三组,再把分组变成教程章节。 怎么开始:列出框架最重要的类型和视图,把它们按任务归类,然后为每组写一个
@Chapter。 -
做什么:把安装、配置和第一段代码拆成独立步骤。 为什么值得做:session 中的第一节只处理创建项目和添加依赖,降低新用户进入成本。 怎么开始:用多个
@Step写清 Product Name、Interface、Life Cycle、package dependency 等动作,每一步配一张@Image。 -
做什么:为代码步骤提供 Swift 文件和 Xcode Preview 截图。 为什么值得做:DocC 能展示代码文件,并和上一步比较,高亮新增代码。预览图让读者检查自己是否跟上。 怎么开始:为每一步准备一个 Swift 文件,用
@Code(name:file:)引用,再在@Code中嵌套 preview@Image。 -
做什么:给教程图片补齐无障碍描述。 为什么值得做:Hannah 明确提到教程要让读者通过阅读和听读都获得体验。 怎么开始:检查每个
@Image,为alt写出画面中对完成任务有帮助的信息。
关联 Session
- Meet DocC documentation in Xcode — 了解 DocC 如何在 Xcode 中生成 Swift 框架和包的文档。
- Elevate your DocC documentation in Xcode — 学习用 DocC 组织文章、目录和扩展内容。
- Host and automate your DocC documentation — 把 DocC 文档构建、托管和发布接入自动化流程。
- Write a DSL in Swift using result builders — 理解声明式语法背后的 Swift result builders 思路。
评论
GitHub Issues · utterances