
Highlight
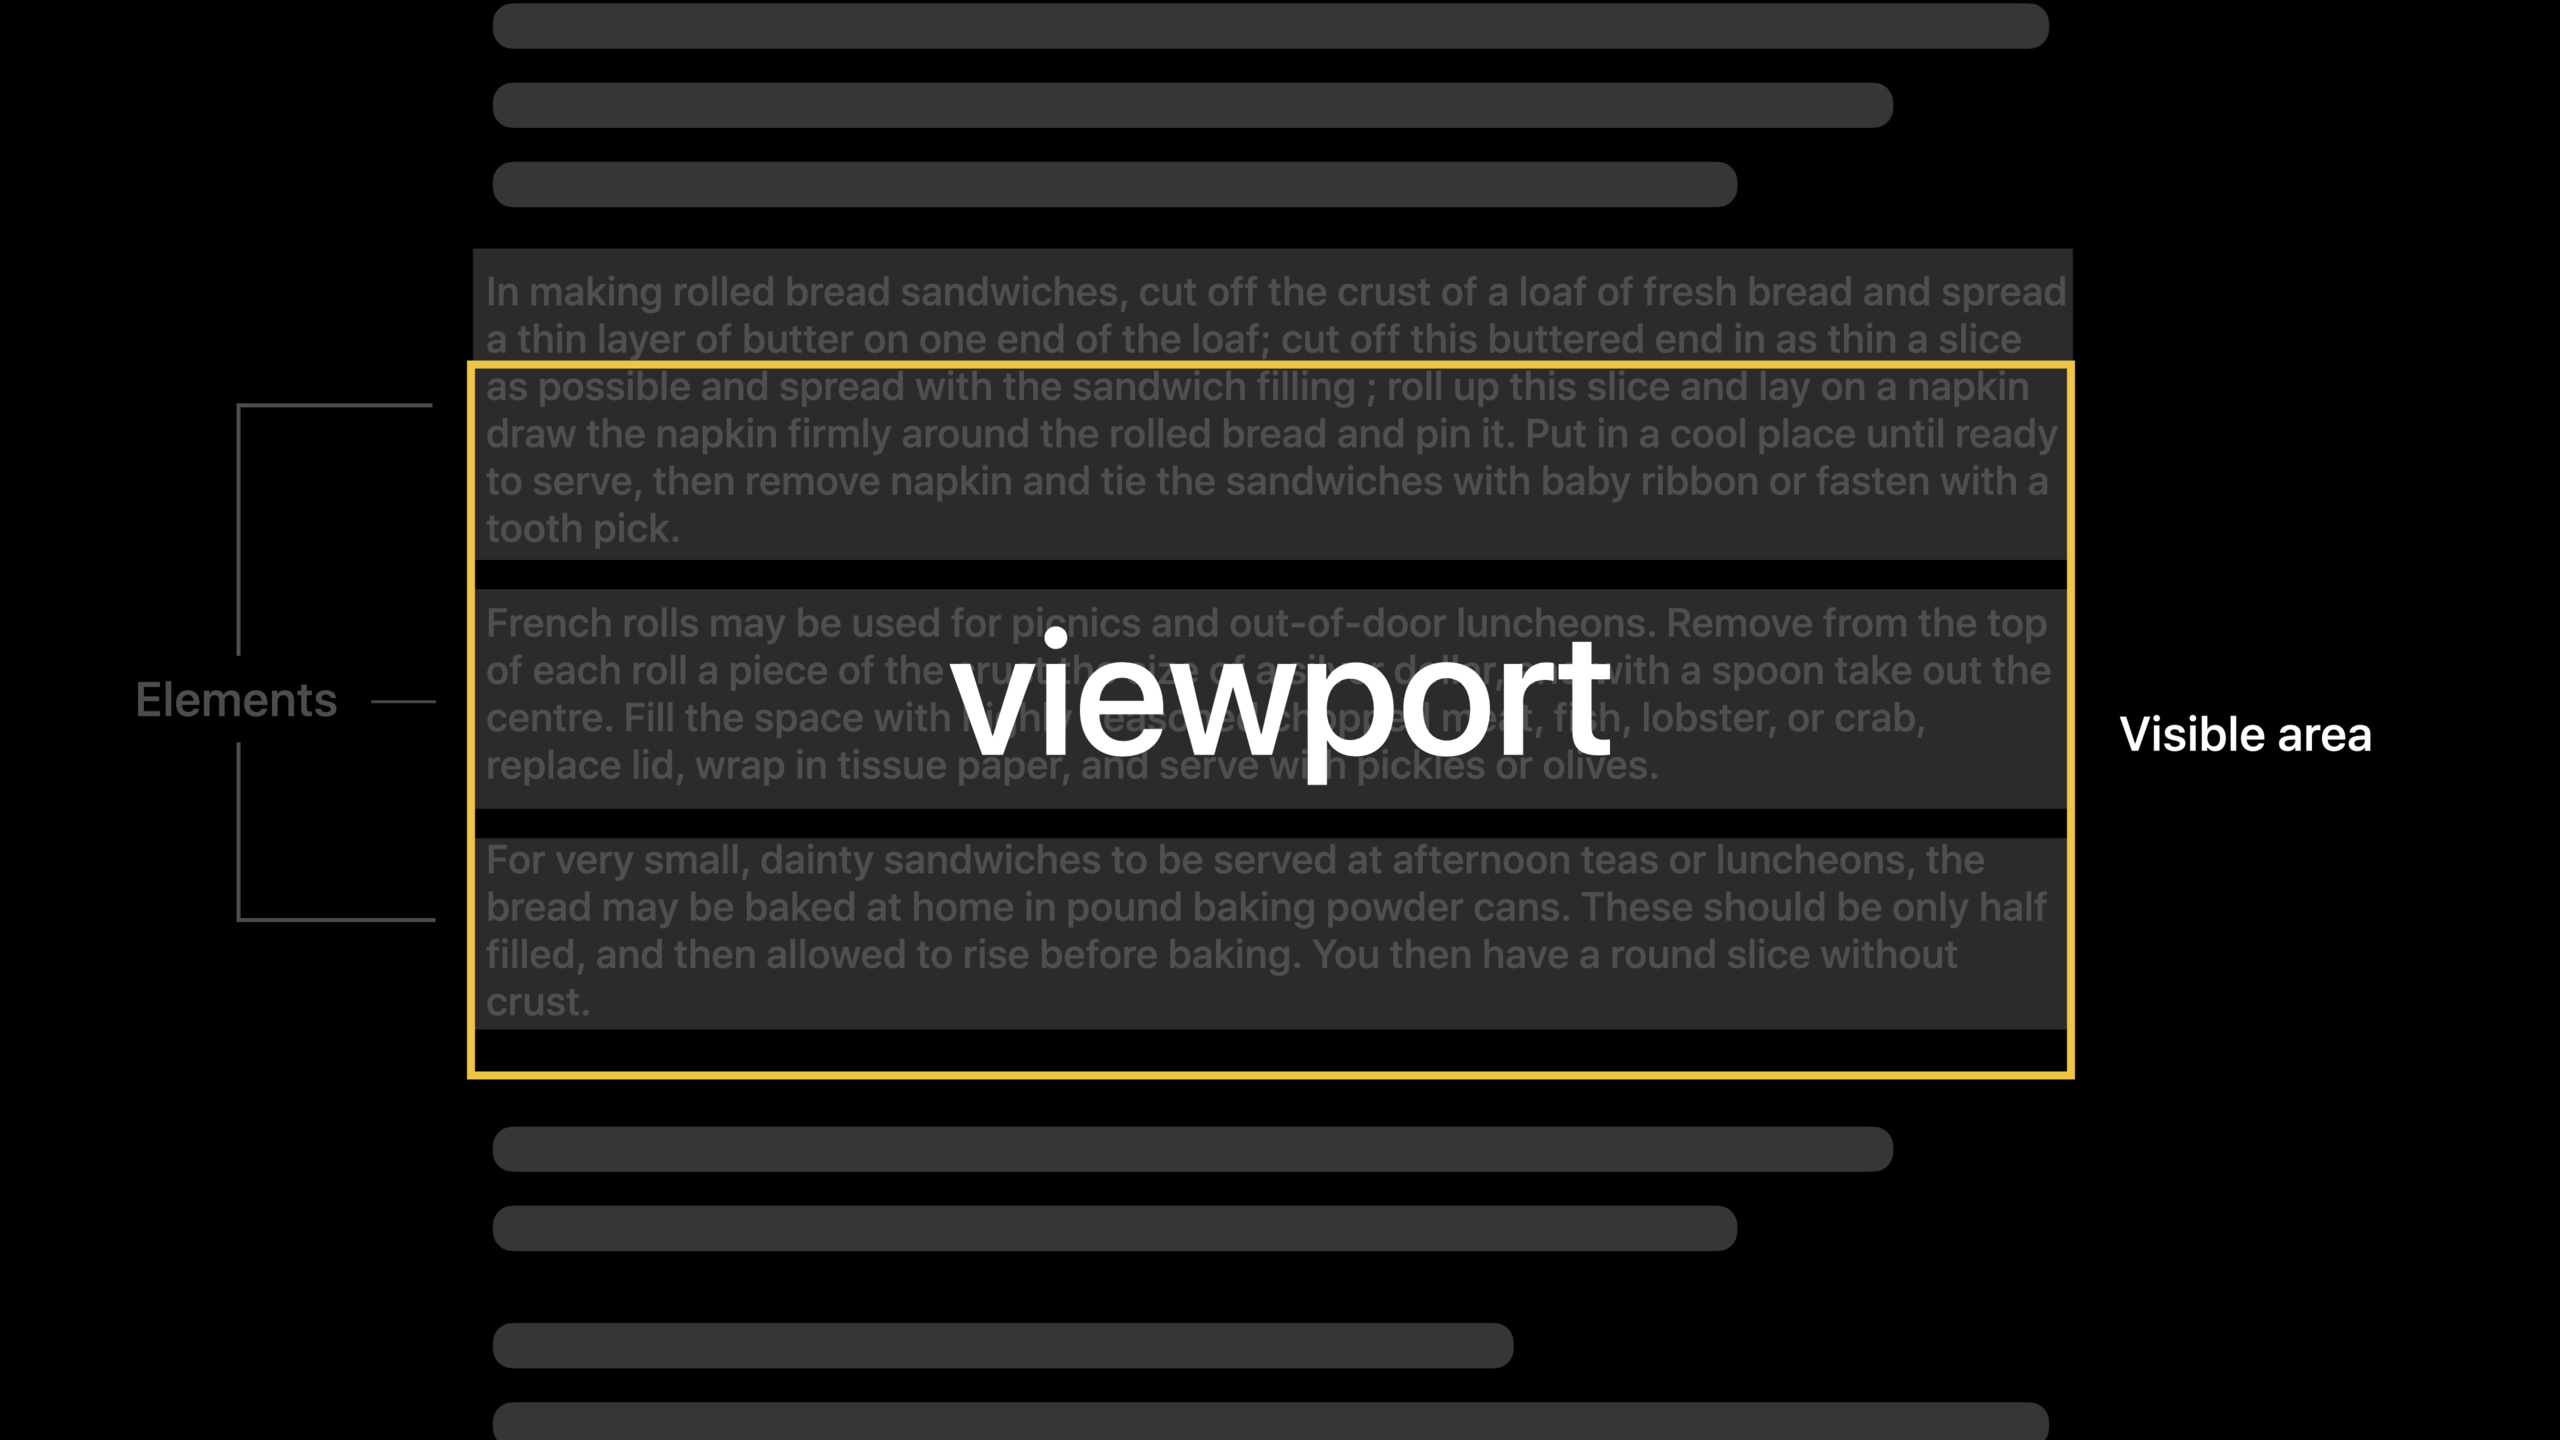
TextKit 2 是 Apple 的下一代文本引擎,基于三个核心设计原则:正确性(抽象化字形处理)、安全性(强调值语义)、性能(基于视口的布局和渲染)。
核心内容
TextKit 1 始于 OpenStep,超过 20 年的历史。它驱动了所有 Apple 平台上的文本显示,但受原始设计约束,难以与现代技术良好集成。TextKit 2 在 Big Sur 中已经悄悄驱动了系统中的许多文本组件。
TextKit 2 和 TextKit 1 共存,都建立在 Foundation、Quartz 和 Core Text 之上。它保留了 MVC 设计:视图在 UIKit/AppKit,模型层和控制器层有了新的版本和更多组件。
三个核心设计原则:正确性抽象化字形处理,安全性强调值语义,性能使用基于视口的布局和渲染。
详细内容
响应布局更新
(32:22)
func textViewportLayoutControllerWillLayout(_ controller: NSTextViewportLayoutController) {
    contentLayer.sublayers = nil
    CATransaction.begin()
}
关键点:
textViewportLayoutControllerWillLayout在布局开始前调用- 清空子图层,开始新的 CATransaction
- 为布局更新做准备
func textViewportLayoutController(_ controller: NSTextViewportLayoutController,
                                  configureRenderingSurfaceFor textLayoutFragment: NSTextLayoutFragment) {
    let (layer, layerIsNew) = findOrCreateLayer(textLayoutFragment)
    if !layerIsNew {
        let oldPosition = layer.position
        layer.updateGeometry()
        if oldPosition != layer.position {
            animate(layer, from: oldPosition, to: layer.position)
        }
    }
    contentLayer.addSublayer(layer)
}
关键点:
configureRenderingSurfaceFor为每个布局片段配置渲染表面- 可以追踪现有图层,只更新位置变化
- 动画位置变化,提供流畅的视觉体验
func textViewportLayoutControllerDidLayout(_ controller: NSTextViewportLayoutController) {
    CATransaction.commit()
    updateSelectionHighlights()
    updateContentSizeIfNeeded()
    adjustViewportOffsetIfNeeded()
}
关键点:
textViewportLayoutControllerDidLayout在布局完成后调用- 提交 CATransaction,更新选择高亮、内容尺寸等
- 完成布局周期
重写文本属性显示
(33:47)
func textContentStorage(_ textContentStorage: NSTextContentStorage, textParagraphWith range: NSRange) -> NSTextParagraph? {
    var paragraphWithDisplayAttributes: NSTextParagraph? = nil

    let originalText = textContentStorage.textStorage!.attributedSubstring(from: range)
    if originalText.attribute(.commentDepth, at: 0, effectiveRange: nil) != nil {
        let displayAttributes: [NSAttributedString.Key: AnyObject] = [
            .font: commentFont,
            .foregroundColor: commentColor
        ]
        let textWithDisplayAttributes = NSMutableAttributedString(attributedString: originalText)
        let rangeForDisplayAttributes = NSRange(location: 0, length: textWithDisplayAttributes.length - 2)
        textWithDisplayAttributes.addAttributes(displayAttributes, range: rangeForDisplayAttributes)

        paragraphWithDisplayAttributes = NSTextParagraph(attributedString: textWithDisplayAttributes)
    }
    return paragraphWithDisplayAttributes
}
关键点:
textParagraphWith方法允许在不修改原始文本存储的情况下重写显示属性- 适用于需要临时改变样式但不想污染原始数据的场景
- 返回
nil时使用原始段落
隐藏特定元素
(34:06)
func textContentManager(_ textContentManager: NSTextContentManager,
                        shouldEnumerate textElement: NSTextElement,
                        with options: NSTextElementProviderEnumerationOptions) -> Bool {
    if !showComments {
        if let paragraph = textElement as? NSTextParagraph {
            let commentDepthValue = paragraph.attributedString.attribute(.commentDepth, at: 0, effectiveRange: nil)
            if commentDepthValue != nil {
                return false
            }
        }
    }
    return true
}
关键点:
shouldEnumerate决定是否枚举特定元素参与布局- 返回
false会跳过该元素的布局和渲染 - 可以实现显示/隐藏注释等功能
生成自定义布局片段
(34:28)
func textLayoutManager(_ textLayoutManager: NSTextLayoutManager,
                       textLayoutFragmentFor location: NSTextLocation,
                       in textElement: NSTextElement) -> NSTextLayoutFragment {
    let index = textLayoutManager.offset(from: textLayoutManager.documentRange.location, to: location)
    let commentDepthValue = textContentStorage!.textStorage!.attribute(.commentDepth, at: index, effectiveRange: nil) as? NSNumber

    if commentDepthValue != nil {
        let layoutFragment = BubbleLayoutFragment(textElement: textElement, range: textElement.elementRange)
        layoutFragment.commentDepth = commentDepthValue!.uintValue
        return layoutFragment
    } else {
        return NSTextLayoutFragment(textElement: textElement, range: textElement.elementRange)
    }
}
关键点:
textLayoutFragmentFor允许为特定位置返回自定义布局片段- 可以根据文本属性返回不同的片段类型
- 自定义片段可以实现特殊的渲染效果(如气泡)
绘制气泡背景
(34:58)
override func draw(at renderingOrigin: CGPoint, in ctx: CGContext) {
    ctx.saveGState()
    let bubblePath = createBubblePath(with: ctx)
    ctx.addPath(bubblePath)
    ctx.setFillColor(bubbleColor.cgColor)
    ctx.fillPath()
    ctx.restoreGState()

    super.draw(at: renderingOrigin, in: ctx)
}
关键点:
- 在自定义
NSTextLayoutFragment子类中重写draw方法 - 先绘制自定义背景(如气泡),再调用
super.draw绘制文本 - 使用
CGPath(roundedRect:cornerWidth:cornerHeight:)创建圆角矩形路径
将 NSTextView 切换到 TextKit 2
(37:26)
var scrollView: NSScrollView!
var containerSize = CGSize.zero
var textContainer = NSTextContainer()
var textContentStorage = NSTextContentStorage()

override func viewDidLoad() {
    super.viewDidLoad()

    scrollView = NSScrollView(frame: view.bounds)
    view.addSubview(scrollView)

    setUpScrollView(scrollsHorizontally: false)
}

func setUpTextContainer(scrollsHorizontally: Bool) {
    let contentSize = scrollView.contentSize
    if scrollsHorizontally {
        containerSize = NSSize(width: CGFloat.greatestFiniteMagnitude, height: CGFloat.greatestFiniteMagnitude)
        textContainer.containerSize = containerSize
        textContainer.widthTracksTextView = false
    } else {
        containerSize = NSSize(width: contentSize.width, height: CGFloat.greatestFiniteMagnitude)
        textContainer.containerSize = containerSize
        textContainer.widthTracksTextView = true
    }
}

func setUpTextView(scrollsHorizontally: Bool) {
    let textLayoutManager = NSTextLayoutManager()
    textLayoutManager.textContainer = textContainer

    textContentStorage.addTextLayoutManager(textLayoutManager)

    let textView = NSTextView(frame: scrollView.contentView.bounds, textContainer: textLayoutManager.textContainer)

    textView.isEditable = true
    textView.isSelectable = true
    textView.textStorage?.append(NSAttributedString(string: "Text content..."))
    scrollView.documentView = textView
}
关键点:
- 创建
NSTextLayoutManager并关联到NSTextContainer - 将 layout manager 添加到
NSTextContentStorage - 用 layout manager 的
textContainer初始化NSTextView - 这会让 text view 使用 TextKit 2 进行布局和渲染
核心启发
1. 为文本编辑器添加气泡评论功能
如果你的 App 有文本编辑功能(如代码编辑器、文档协作),添加类似代码审查的气泡评论功能。
实现思路:为评论创建自定义 NSTextLayoutFragment 子类(如 BubbleLayoutFragment),在 textLayoutFragmentFor 中检测评论属性并返回自定义片段。重写 draw 方法绘制气泡背景。
2. 实现语法高亮的增量渲染
代码编辑器的语法高亮需要频繁更新。TextKit 2 的基于视口的布局可以只重绘可见区域。
实现思路:使用 NSTextViewportLayoutController 监听可见区域变化,只为可见范围内的文本片段应用高亮样式。配合 configureRenderingSurfaceFor 缓存渲染结果。
3. 为聊天消息实现特殊布局
聊天 App 的消息通常需要不同的布局(自己的消息靠右,对方的消息靠右,可能带气泡和头像)。
实现思路:为每条消息创建 NSUserActivity,在 textLayoutFragmentFor 中根据发送者返回不同的自定义片段。自定义片段可以控制背景、圆角、头像位置等。
4. 优化大文档的滚动性能
显示几十万行的大文档时,TextKit 1 可能出现卡顿。TextKit 2 的视口布局只处理可见内容。
实现思路:确保使用 NSTextLayoutManager 而不是旧的 NSLayoutManager。为 NSTextContainer 设置合理的 containerSize,避免无限宽度导致的性能问题。
5. 实现可折叠的文本区域
Markdown 编辑器、代码编辑器常需要折叠代码块或章节。TextKit 2 可以通过隐藏元素实现。
实现思路:在 shouldEnumerate 中检查折叠状态,对折叠的元素返回 false。更新折叠状态时调用 textLayoutManager.textViewportLayoutController.layoutViewport 重新布局。
关联 Session
- What’s new in UIKit — iOS 15 中 UIKit 的全面更新
- Bring your UIKit app to the Mac — 将 UIKit App 适配到 Mac
- What’s new in AppKit — macOS 12 中 AppKit 的更新
- Advances in UIKit Buttons and Menus — UIKit 按钮和菜单系统的改进
评论
GitHub Issues · utterances