
Highlight
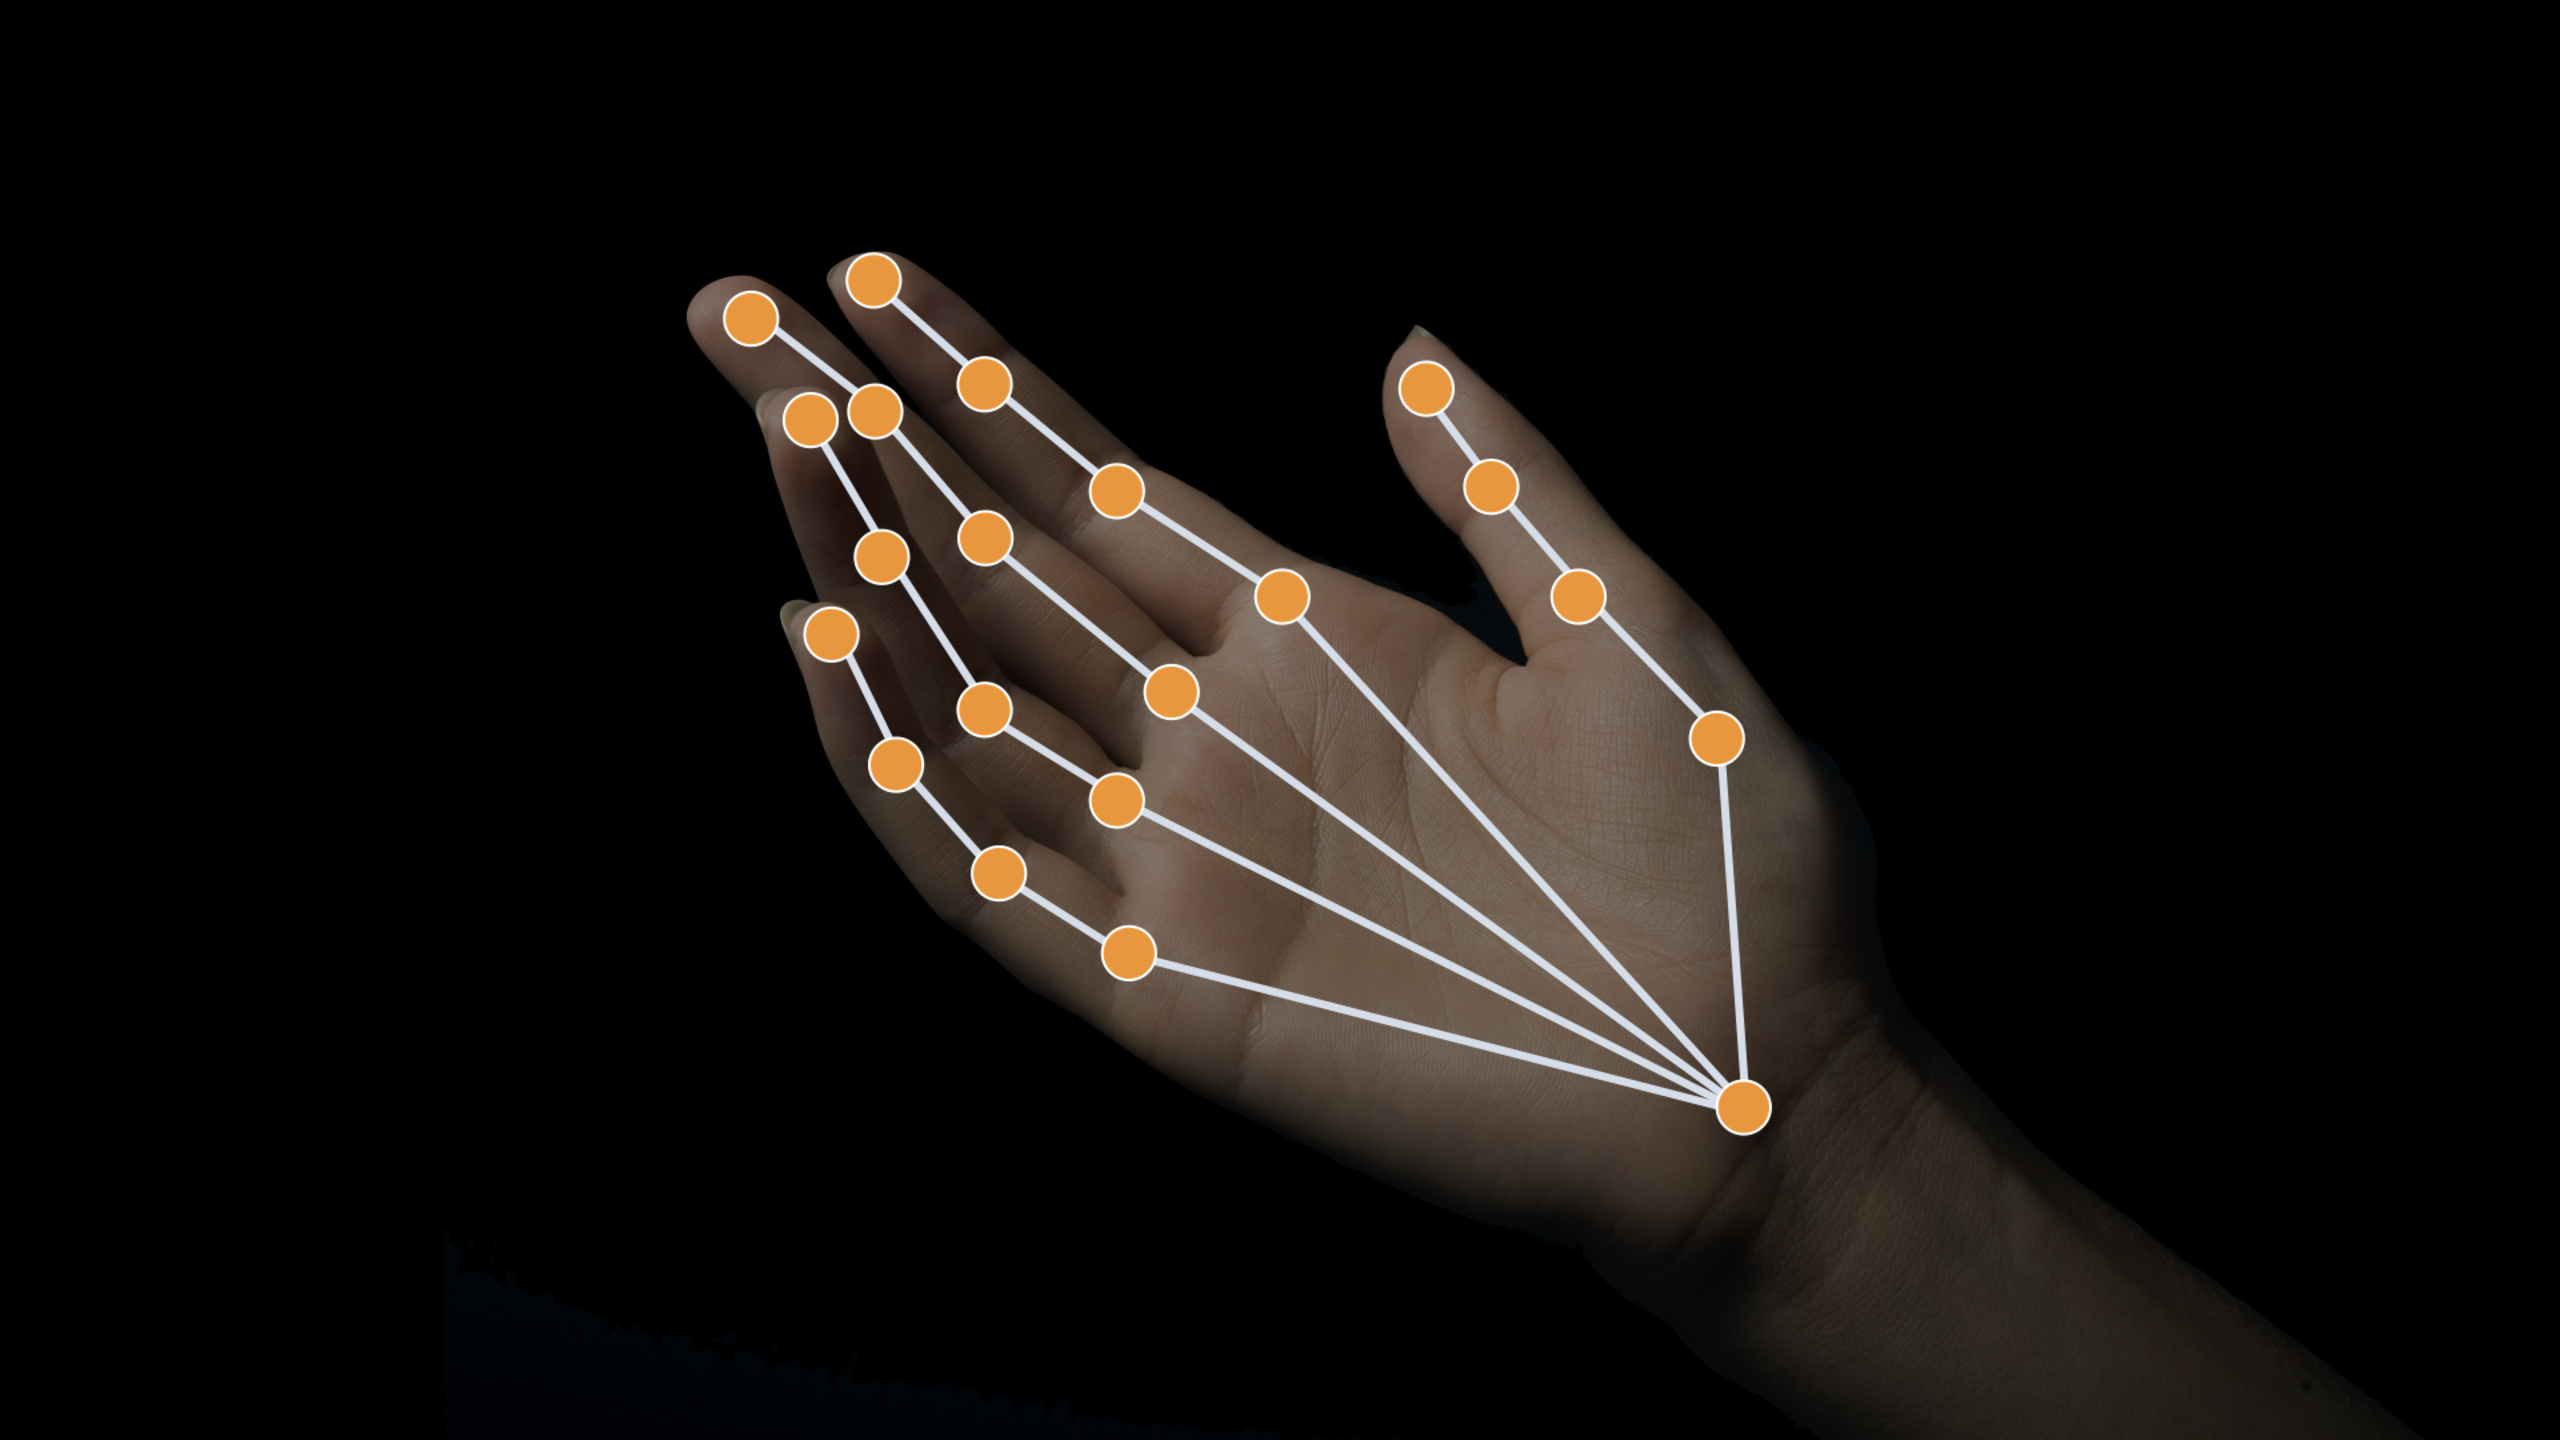
Vision 在 2020 年新增手部姿态和人体姿态检测,请求会返回带置信度的关键点,让 App 能用相机帧识别捏合手势、绘制手部轨迹,并把连续身体姿态交给 Create ML 动作分类器。
核心内容
过去,App 想理解画面里的人,最常见的入口是人脸。Vision 已经有 Face Detection(人脸检测)、Face Landmarks(人脸关键点)和 Human Torso Detection(人体躯干检测)。这些能力能回答「画面里有没有人脸」,却很难回答「手指有没有捏合」「人是不是在投掷」「跳跃最高点是哪一帧」。
WWDC 2020 这场 session 把 Vision 的 People 主题往前推进了一步:新增 VNDetectHumanHandPoseRequest 和 VNDetectHumanBodyPoseRequest。前者返回单手 21 个 landmarks(关键点),后者返回人体的脸、手臂、躯干和腿部关键点。两类结果都通过 VNRecognizedPointsObservation 取出,每个点都有归一化坐标和 confidence(置信度)。
这让交互方式从「点按钮」变成「看动作」。手部姿态示例里,App 每帧读取拇指尖和食指尖,距离足够近并连续稳定三帧后开始画线。身体姿态示例里,App 把投掷前后的姿态窗口保存下来,转成 MLMultiArray,再交给 Core ML 模型判断投掷类型。
Session 也给出了边界。手靠近画面边缘、手掌朝向与相机方向平行、戴手套、脚被误识别成手,都会影响手部姿态。身体姿态遇到倒立、弯腰、宽松遮挡衣物、多人互相遮挡、靠近画面边缘时也会下降。实时推理时还要注意旧设备延迟,身体姿态最好每帧采样,但分类推理可以降低频率,避免占住相机 buffer。
详细内容
手部姿态:从相机帧取出拇指和食指
(07:07)手部姿态的实时路径很直接。相机回调拿到 CMSampleBuffer 后,代码创建 VNImageRequestHandler,执行 VNDetectHumanHandPoseRequest,再从第一个 VNRecognizedPointsObservation 里取 thumb 和 index finger 两组点。
extension CameraViewController: AVCaptureVideoDataOutputSampleBufferDelegate {
    public func captureOutput(_ output: AVCaptureOutput, didOutput sampleBuffer: CMSampleBuffer, from connection: AVCaptureConnection) {
        var thumbTip: CGPoint?
        var indexTip: CGPoint?

        defer {
            DispatchQueue.main.sync {
                self.processPoints(thumbTip: thumbTip, indexTip: indexTip)
            }
        }

        let handler = VNImageRequestHandler(cmSampleBuffer: sampleBuffer, orientation: .up, options: [:])
        do {
            // Perform VNDetectHumanHandPoseRequest
            try handler.perform([handPoseRequest])
            // Continue only when a hand was detected in the frame.
            // Since we set the maximumHandCount property of the request to 1, there will be at most one observation.
            guard let observation = handPoseRequest.results?.first as? VNRecognizedPointsObservation else {
                return
            }
            // Get points for thumb and index finger.
            let thumbPoints = try observation.recognizedPoints(forGroupKey: .handLandmarkRegionKeyThumb)
            let indexFingerPoints = try observation.recognizedPoints(forGroupKey: .handLandmarkRegionKeyIndexFinger)
            // Look for tip points.
            guard let thumbTipPoint = thumbPoints[.handLandmarkKeyThumbTIP], let indexTipPoint = indexFingerPoints[.handLandmarkKeyIndexTIP] else {
                return
            }
            // Ignore low confidence points.
            guard thumbTipPoint.confidence > 0.3 && indexTipPoint.confidence > 0.3 else {
                return
            }
            // Convert points from Vision coordinates to AVFoundation coordinates.
            thumbTip = CGPoint(x: thumbTipPoint.location.x, y: 1 - thumbTipPoint.location.y)
            indexTip = CGPoint(x: indexTipPoint.location.x, y: 1 - indexTipPoint.location.y)
        } catch {
            cameraFeedSession?.stopRunning()
            let error = AppError.visionError(error: error)
            DispatchQueue.main.async {
                error.displayInViewController(self)
            }
        }
    }
}
关键点:
VNImageRequestHandler(cmSampleBuffer:orientation:options:)直接处理相机帧,不需要先转成图片对象。handler.perform([handPoseRequest])执行手部姿态请求;示例把maximumHandCount设成 1,所以最多处理一个 observation。recognizedPoints(forGroupKey:)可以按手指分组取点;这里取 thumb 和 index finger。- 示例只使用
.handLandmarkKeyThumbTIP和.handLandmarkKeyIndexTIP两个 fingertip。 confidence > 0.3过滤低可信点。- Vision 坐标原点在左下角,示例把 y 转成 AVFoundation 坐标里的
1 - y。
(10:39)如果画面里可能有多只手,maximumHandCount 会影响结果数量和延迟。默认值是 2。数值越大,Vision 要为更多手计算姿态;如果只需要最近或最大的手,调低这个参数更合适。
捏合手势:用连续帧证据消除抖动
(08:29)示例没有只看单帧距离。它把拇指尖和食指尖的距离与阈值比较,并用连续帧计数来决定状态。阈值是 40,状态触发需要 3 帧证据。
init(pinchMaxDistance: CGFloat = 40, evidenceCounterStateTrigger: Int = 3) {
        self.pinchMaxDistance = pinchMaxDistance
        self.evidenceCounterStateTrigger = evidenceCounterStateTrigger
    }

    func reset() {
        state = .unknown
        pinchEvidenceCounter = 0
        apartEvidenceCounter = 0
    }

    func processPointsPair(_ pointsPair: PointsPair) {
        lastProcessedPointsPair = pointsPair
        let distance = pointsPair.indexTip.distance(from: pointsPair.thumbTip)
        if distance < pinchMaxDistance {
            // Keep accumulating evidence for pinch state.
            pinchEvidenceCounter += 1
            apartEvidenceCounter = 0
            // Set new state based on evidence amount.
            state = (pinchEvidenceCounter >= evidenceCounterStateTrigger) ? .pinched : .possiblePinch
        } else {
            // Keep accumulating evidence for apart state.
            apartEvidenceCounter += 1
            pinchEvidenceCounter = 0
            // Set new state based on evidence amount.
            state = (apartEvidenceCounter >= evidenceCounterStateTrigger) ? .apart : .possibleApart
        }
    }
关键点:
pinchMaxDistance是捏合阈值,示例默认 40。pointsPair.indexTip.distance(from: pointsPair.thumbTip)是手势判断的唯一几何输入。- 距离小于阈值时累积
pinchEvidenceCounter,同时清空apartEvidenceCounter。 - 距离达到或超过阈值时反向累积
apartEvidenceCounter。 evidenceCounterStateTrigger要求连续 3 帧,避免单帧误检让画线状态跳变。
(09:25)状态进入 pinched 后,示例才把缓存点写进绘制路径。进入 apart 或 unknown 时,缓存会被丢弃,并画出最后一段路径。
private func handleGestureStateChange(state: HandGestureProcessor.State) {
        let pointsPair = gestureProcessor.lastProcessedPointsPair
        var tipsColor: UIColor
        switch state {
        case .possiblePinch, .possibleApart:
            // We are in one of the "possible": states, meaning there is not enough evidence yet to determine
            // if we want to draw or not. For now, collect points in the evidence buffer, so we can add them
            // to a drawing path when required.
            evidenceBuffer.append(pointsPair)
            tipsColor = .orange
        case .pinched:
            // We have enough evidence to draw. Draw the points collected in the evidence buffer, if any.
            for bufferedPoints in evidenceBuffer {
                updatePath(with: bufferedPoints, isLastPointsPair: false)
            }
            // Clear the evidence buffer.
            evidenceBuffer.removeAll()
            // Finally, draw current point
            updatePath(with: pointsPair, isLastPointsPair: false)
            tipsColor = .green
        case .apart, .unknown:
            // We have enough evidence to not draw. Discard any evidence buffer points.
            evidenceBuffer.removeAll()
            // And draw the last segment of our draw path.
            updatePath(with: pointsPair, isLastPointsPair: true)
            tipsColor = .red
        }
        cameraView.showPoints([pointsPair.thumbTip, pointsPair.indexTip], color: tipsColor)
    }
关键点:
.possiblePinch和.possibleApart只是过渡状态,点先进evidenceBuffer。.pinched会把缓存点和当前点一起写入路径,手指已经稳定靠近。.apart和.unknown会清空缓存,避免把误判轨迹画到屏幕上。tipsColor把状态反馈给 UI:橙色等待、绿色绘制、红色停止。
身体姿态:用同一套 Vision 模式分析多个人
(14:26)身体姿态请求的模式和手部姿态一致:创建 request handler,创建 VNDetectHumanBodyPoseRequest,执行请求,然后从 VNRecognizedPointsObservation 读取关键点。区别在于人体姿态能分析画面中的多人,并按 face、left arm、right arm、torso、left leg、right leg 等 group key 组织 landmarks。
(17:08)Session 特意比较了 Vision 和 ARKit。两者返回同一组人体 landmarks。Vision 每个点有 confidence,能处理静态图片、相机 feed 和离线图库分析,并且不需要 AR session。ARKit 更适合 live motion capture(实时动作捕捉),依赖后置相机和支持设备。
(20:48)Action and Vision 示例把身体姿态和轨迹检测放在同一个相机回调中。投掷追踪状态下,代码会执行 trajectory request;同时继续运行 detectPlayerRequest,用身体姿态结果更新玩家框和关节覆盖层。
extension GameViewController: CameraViewControllerOutputDelegate {
    func cameraViewController(_ controller: CameraViewController, didReceiveBuffer buffer: CMSampleBuffer, orientation: CGImagePropertyOrientation) {
        let visionHandler = VNImageRequestHandler(cmSampleBuffer: buffer, orientation: orientation, options: [:])
        if self.gameManager.stateMachine.currentState is GameManager.TrackThrowsState {
            DispatchQueue.main.async {
                // Get the frame of rendered view
                let normalizedFrame = CGRect(x: 0, y: 0, width: 1, height: 1)
                self.jointSegmentView.frame = controller.viewRectForVisionRect(normalizedFrame)
                self.trajectoryView.frame = controller.viewRectForVisionRect(normalizedFrame)
            }
            // Perform the trajectory request in a separate dispatch queue
            trajectoryQueue.async {
                self.setUpDetectTrajectoriesRequest()
                do {
                    if let trajectoryRequest = self.detectTrajectoryRequest {
                        try visionHandler.perform([trajectoryRequest])
                    }
                } catch {
                    AppError.display(error, inViewController: self)
                }
            }
        }
        // Run bodypose request for additional GameConstants.maxPostReleasePoseObservations frames after the first trajectory observation is detected
        if !(self.trajectoryView.inFlight && self.trajectoryInFlightPoseObservations >= GameConstants.maxTrajectoryInFlightPoseObservations) {
            do {
                try visionHandler.perform([detectPlayerRequest])
                if let result = detectPlayerRequest.results?.first as? VNRecognizedPointsObservation {
                    let box = humanBoundingBox(for: result)
                    let boxView = playerBoundingBox
                    DispatchQueue.main.async {
                        let horizontalInset = CGFloat(-20.0)
                        let verticalInset = CGFloat(-20.0)
                        let viewRect = controller.viewRectForVisionRect(box).insetBy(dx: horizontalInset, dy: verticalInset)
                        self.updateBoundingBox(boxView, withRect: viewRect)
                        if !self.playerDetected && !boxView.isHidden {
                            self.gameStatusLabel.alpha = 0
                            self.resetTrajectoryRegions()
                            self.gameManager.stateMachine.enter(GameManager.DetectedPlayerState.self)
                        }
                    }
                }
            } catch {
                AppError.display(error, inViewController: self)
            }
        } else {
            // Hide player bounding box
            DispatchQueue.main.async {
                if !self.playerBoundingBox.isHidden {
                    self.playerBoundingBox.isHidden = true
                    self.jointSegmentView.resetView()
                }
            }
        }
    }
}
关键点:
VNImageRequestHandler(cmSampleBuffer:orientation:options:)复用相机 buffer 做 Vision 分析。trajectoryQueue.async把轨迹请求放到单独队列,避免和 UI 更新挤在一起。detectPlayerRequest是身体姿态请求,返回VNRecognizedPointsObservation。humanBoundingBox(for:)根据姿态关键点算玩家位置,再转成视图坐标。- 轨迹进入
inFlight后,示例只继续保存有限数量的 post-release 姿态帧,控制动作分类窗口。
(21:19)人体框不是单独检测出来的。示例从 observation 取出 .all 组关键点,过滤低置信度点,再把这些点的位置 union 成 normalized bounding box。
func humanBoundingBox(for observation: VNRecognizedPointsObservation) -> CGRect {
        var box = CGRect.zero
        // Process body points only if the confidence is high
        guard observation.confidence > 0.6 else {
            return box
        }
        var normalizedBoundingBox = CGRect.null
        guard let points = try? observation.recognizedPoints(forGroupKey: .all) else {
            return box
        }
        for (_, point) in points {
            // Only use point if human pose joint was detected reliably
            guard point.confidence > 0.1 else { continue }
            normalizedBoundingBox = normalizedBoundingBox.union(CGRect(origin: point.location, size: .zero))
        }
        if !normalizedBoundingBox.isNull {
            box = normalizedBoundingBox
        }
        // Fetch body joints from the observation and overlay them on the player
        DispatchQueue.main.async {
            let joints = getBodyJointsFor(observation: observation)
            self.jointSegmentView.joints = joints
        }
        // Store the body pose observation in playerStats when the game is in TrackThrowsState
        // We will use these observations for action classification once the throw is complete
        if gameManager.stateMachine.currentState is GameManager.TrackThrowsState {
            playerStats.storeObservation(observation)
            if trajectoryView.inFlight {
                trajectoryInFlightPoseObservations += 1
            }
        }
        return box
    }
关键点:
observation.confidence > 0.6先过滤整个人体 observation。recognizedPoints(forGroupKey: .all)取出全部身体关键点。- 单点 confidence 小于等于 0.1 时跳过。
normalizedBoundingBox.union(...)用剩余关键点构造人体框。- 游戏进入
TrackThrowsState后,示例把 observation 存入playerStats,后续动作分类会用到这些姿态。
动作分类:把姿态窗口转成 Core ML 输入
(18:23)身体姿态可以和 Create ML 的动作分类配合。Session 给了几条训练和推理建议:训练视频里最好只有一个目标人物;也可以不用视频,直接用 Vision 的 keypointsMultiArray 取得 ML MultiArray buffer;训练用 Vision 姿态,推理也要用 Vision 姿态,不能把 ARKit 姿态喂给用 Vision 姿态训练出的模型。
(21:58)示例用 ring buffer 保存最近的身体姿态 observation。满了就移除最旧一帧,再追加新 observation。
mutating func storeObservation(_ observation: VNRecognizedPointsObservation) {
        if poseObservations.count >= GameConstants.maxPoseObservations {
            poseObservations.removeFirst()
        }
        poseObservations.append(observation)
    }
关键点:
poseObservations保存连续身体姿态。GameConstants.maxPoseObservations限制窗口大小。removeFirst()丢弃最旧 observation。- 新 observation 始终追加到窗口末尾。
(22:42)分类前,代码需要把最多 60 帧 observation 转成 MLMultiArray。如果帧数不够 60,就补零。
func prepareInputWithObservations(_ observations: [VNRecognizedPointsObservation]) -> MLMultiArray? {
    let numAvailableFrames = observations.count
    let observationsNeeded = 60
    var multiArrayBuffer = [MLMultiArray]()

    // swiftlint:disable identifier_name
    for f in 0 ..< min(numAvailableFrames, observationsNeeded) {
        let pose = observations[f]
        do {
            let oneFrameMultiArray = try pose.keypointsMultiArray()
            multiArrayBuffer.append(oneFrameMultiArray)
        } catch {
            continue
        }
    }

    // If poseWindow does not have enough frames (60) yet, we need to pad 0s
    if numAvailableFrames < observationsNeeded {
        for _ in 0 ..< (observationsNeeded - numAvailableFrames) {
            do {
                let oneFrameMultiArray = try MLMultiArray(shape: [1, 3, 18], dataType: .double)
                try resetMultiArray(oneFrameMultiArray)
                multiArrayBuffer.append(oneFrameMultiArray)
            } catch {
                continue
            }
        }
    }
    return MLMultiArray(concatenating: [MLMultiArray](multiArrayBuffer), axis: 0, dataType: MLMultiArrayDataType.double)
}
关键点:
observationsNeeded是 60,模型期望固定长度姿态窗口。pose.keypointsMultiArray()把单帧身体姿态转成 Core ML 可接收的数组。- 帧数不足时,示例创建 shape 为
[1, 3, 18]的MLMultiArray补齐。 - 最后一行把所有帧沿 axis 0 拼接成一个输入。
(22:21)窗口准备好后,示例创建 PlayerActionClassifierInput,调用 Core ML 模型预测,再从概率数组里取最高置信度对应的 throw type。
mutating func getLastThrowType() -> ThrowType {
        let actionClassifier = PlayerActionClassifier().model
        guard let poseMultiArray = prepareInputWithObservations(poseObservations) else {
            return ThrowType.none
        }
        let input = PlayerActionClassifierInput(input: poseMultiArray)
        guard let predictions = try? actionClassifier.prediction(from: input),
            let output = predictions.featureValue(for: "output")?.multiArrayValue,
                let outputBuffer = try? UnsafeBufferPointer<Float32>(output) else {
            return ThrowType.none
        }
        let probabilities = Array(outputBuffer)
        guard let maxConfidence = probabilities.prefix(3).max(), let maxIndex = probabilities.firstIndex(of: maxConfidence) else {
            return ThrowType.none
        }
        let throwTypes = ThrowType.allCases
        return throwTypes[maxIndex]
    }
关键点:
PlayerActionClassifier().model是 Create ML 训练后进入 App 的分类模型。prepareInputWithObservations(poseObservations)把姿态窗口变成模型输入。prediction(from:)运行分类。- 输出通过
"output"取回MLMultiArray,再转成Float32概率数组。 probabilities.prefix(3).max()只在前三个投掷类别里找最高置信度。
核心启发
-
做什么:做一个隔空绘图或白板批注 App。为什么值得做:手部姿态能稳定取出拇指尖和食指尖,捏合三帧后开始画线,松开后停止。怎么开始:用
VNDetectHumanHandPoseRequest取 thumb tip 和 index tip,再复用示例里的距离阈值和 evidence counter。 -
做什么:做一个无按钮相机快门。为什么值得做:Session 开头提到用特定手势触发拍照,手部姿态能让用户离开屏幕也能操作。怎么开始:先设置较低的
maximumHandCount控制延迟,再把目标手势分类逻辑绑定到拍照动作。 -
做什么:做一个运动动作分类器。为什么值得做:身体姿态 observation 可以通过
keypointsMultiArray()转成MLMultiArray,再输入 Create ML 训练出的动作分类模型。怎么开始:先参考 10043 训练动作分类器,在 App 中保存 60 帧姿态窗口并按本场示例补零。 -
做什么:做一个照片或视频里的最佳动作帧选择器。为什么值得做:身体姿态可以分析静态图片、相机 feed 和离线图库,Session 举了跳跃最高点、stromotion 合成和运动姿态挑选的例子。怎么开始:离线遍历视频帧,执行
VNDetectHumanBodyPoseRequest,按关节位置和 confidence 选择候选帧。 -
做什么:做一个简单的人体姿态质量提示层。为什么值得做:Session 明确列出边缘遮挡、多人互相遮挡、倒立、弯腰和宽松衣物会降低效果。怎么开始:检查 observation confidence 和单点 confidence,低于阈值时在取景器里提示用户后退、调整站位或露出完整身体。
关联 Session
- Build an Action Classifier with Create ML — 训练基于 Vision 身体姿态序列的动作分类模型。
- Explore the Action & Vision app — 把身体姿态、轨迹检测和 Core ML 分类器组合成完整运动分析 App。
- Explore Computer Vision APIs — 补充 Vision、Core Image 和 Core ML 在计算机视觉工作流里的组合方式。
- Get models on device using Core ML Converters — 了解训练模型转换到 Core ML 并在设备端运行的部署路径。
评论
GitHub Issues · utterances