
Highlight
这是一个面向推送通知初学者的完整教程。Session 从最基础的概念开始讲解:什么是远程推送、为什么需要 Device Token、APNs 的工作原理、以及如何在客户端和服务端分别实现推送功能。
核心内容
很多 App 都会在上线后遇到同一个问题:用户没有打开应用,服务器却有一条和他有关的新信息。餐厅有今日特价,电商有订单状态,内容应用有最新数据。靠用户主动刷新会错过时机,靠应用长时间在后台运行又不符合系统的电量模型。
这场 session 把推送通知拆成两类。Alert notification 用来显示可交互的提醒,系统会在应用未运行时展示它。Background notification 给应用一段后台运行时间,让它在用户打开前先把内容更新好。两者都从同一个入口开始:应用向 APNs 注册,拿到 device token,再把 token 发给自己的 provider server。
真正容易出错的是边界。Alert push 要在有上下文的用户动作之后请求权限,payload 的 aps 字典负责系统展示,自定义数据放在 aps 外。Background push 只需要 content-available,但系统会限制后台运行次数,低电量等条件下也可能不启动应用。每个回调最后都要调用 completion handler,让系统知道这次处理结果。
详细内容
注册 APNs 并拿到 device token
(02:02)推送链路的第一步是注册远程通知。registerForRemoteNotifications() 会让设备向 APNs 注册,并把 device token 返回给应用。对于 alert notification,AppDelegate 还要成为 UNUserNotificationCenterDelegate,这样用户点开通知时应用能收到回调。
class AppDelegate: UIResponder, UIApplicationDelegate, UNUserNotificationCenterDelegate {

    func application(_ application: UIApplication,
                     didFinishLaunchingWithOptions launchOptions: [UIApplication.LaunchOptionsKey: Any]?) -> Bool {
        UIApplication.shared.registerForRemoteNotifications()
        UNUserNotificationCenter.current().delegate = self
        return true
    }
}
关键点:
UIApplicationDelegate负责接收远程通知注册结果。UNUserNotificationCenterDelegate只和 alert notification 的交互处理有关。registerForRemoteNotifications()触发 APNs 注册流程。UNUserNotificationCenter.current().delegate = self让通知被打开时回到应用代码。
(02:36)注册完成后,系统只会走两个回调之一。失败时拿到错误;成功时拿到 Data 形式的 device token。session 明确要求把这个 token 发到自己的后端推送服务器,因为 APNs 需要它来定位目标设备。
func application(_ application: UIApplication,
                   didFailToRegisterForRemoteNotificationsWithError error: Error) {
    // The token is not currently available.
    print("Remote notification is unavailable: \(error.localizedDescription)")
}

func application(_ application: UIApplication,
                   didRegisterForRemoteNotificationsWithDeviceToken deviceToken: Data) {
     // Forward the token to your provider, using a custom method.
     self.forwardTokenToServer(token: deviceToken)
}
关键点:
didFailToRegisterForRemoteNotificationsWithError是注册失败路径。didRegisterForRemoteNotificationsWithDeviceToken是注册成功路径。deviceToken不是给本地存着看的,它要进入 provider server 的设备表。- session 的示例把转发动作封装为
forwardTokenToServer(token:)。
(03:05)device token 是 Data。示例先把每个字节转成十六进制字符串,再拼成一个字符串,通过 URLSession 发给服务器。
func forwardTokenToServer(token: Data) {
    let tokenComponents = token.map { data in String(format: "%02.2hhx", data) }
    let deviceTokenString = tokenComponents.joined()
    let queryItems = [URLQueryItem(name: "deviceToken", value: deviceTokenString)]
    var urlComps = URLComponents(string: "www.example.com/register")!
    urlComps.queryItems = queryItems
    guard let url = urlComps.url else {
        return
    }

    let task = URLSession.shared.dataTask(with: url) { data, response, error in
        // Handle data
    }

    task.resume()
}
关键点:
token.map遍历每个字节。String(format: "%02.2hhx", data)把字节转成两位十六进制文本。joined()得到 provider server 常用的 device token 字符串。URLQueryItem把 token 放进注册请求。URLSession.shared.dataTask发起网络请求。task.resume()真正启动请求。
请求通知权限
(03:47)alert notification 还需要用户授权。session 特别强调,请求授权应该发生在有上下文的动作之后。示例把它放在订阅按钮里,因为用户刚表达了接收通知的意图。
@IBAction func subscribeToNotifications(_ sender: Any) {
    let userNotificationCenter = UNUserNotificationCenter.current()
    userNotificationCenter.requestAuthorization(options: [.alert, .sound, .badge]) { (granted, error) in
        print("Permission granted: \(granted)")
    }
}
关键点:
UNUserNotificationCenter.current()取得通知中心。requestAuthorization会触发系统权限弹窗。.alert、.sound、.badge分别对应提醒、声音和角标。granted表示用户的选择。- 后续再次调用会返回设置里的状态,不会反复弹窗。
组织 alert payload 并处理点击
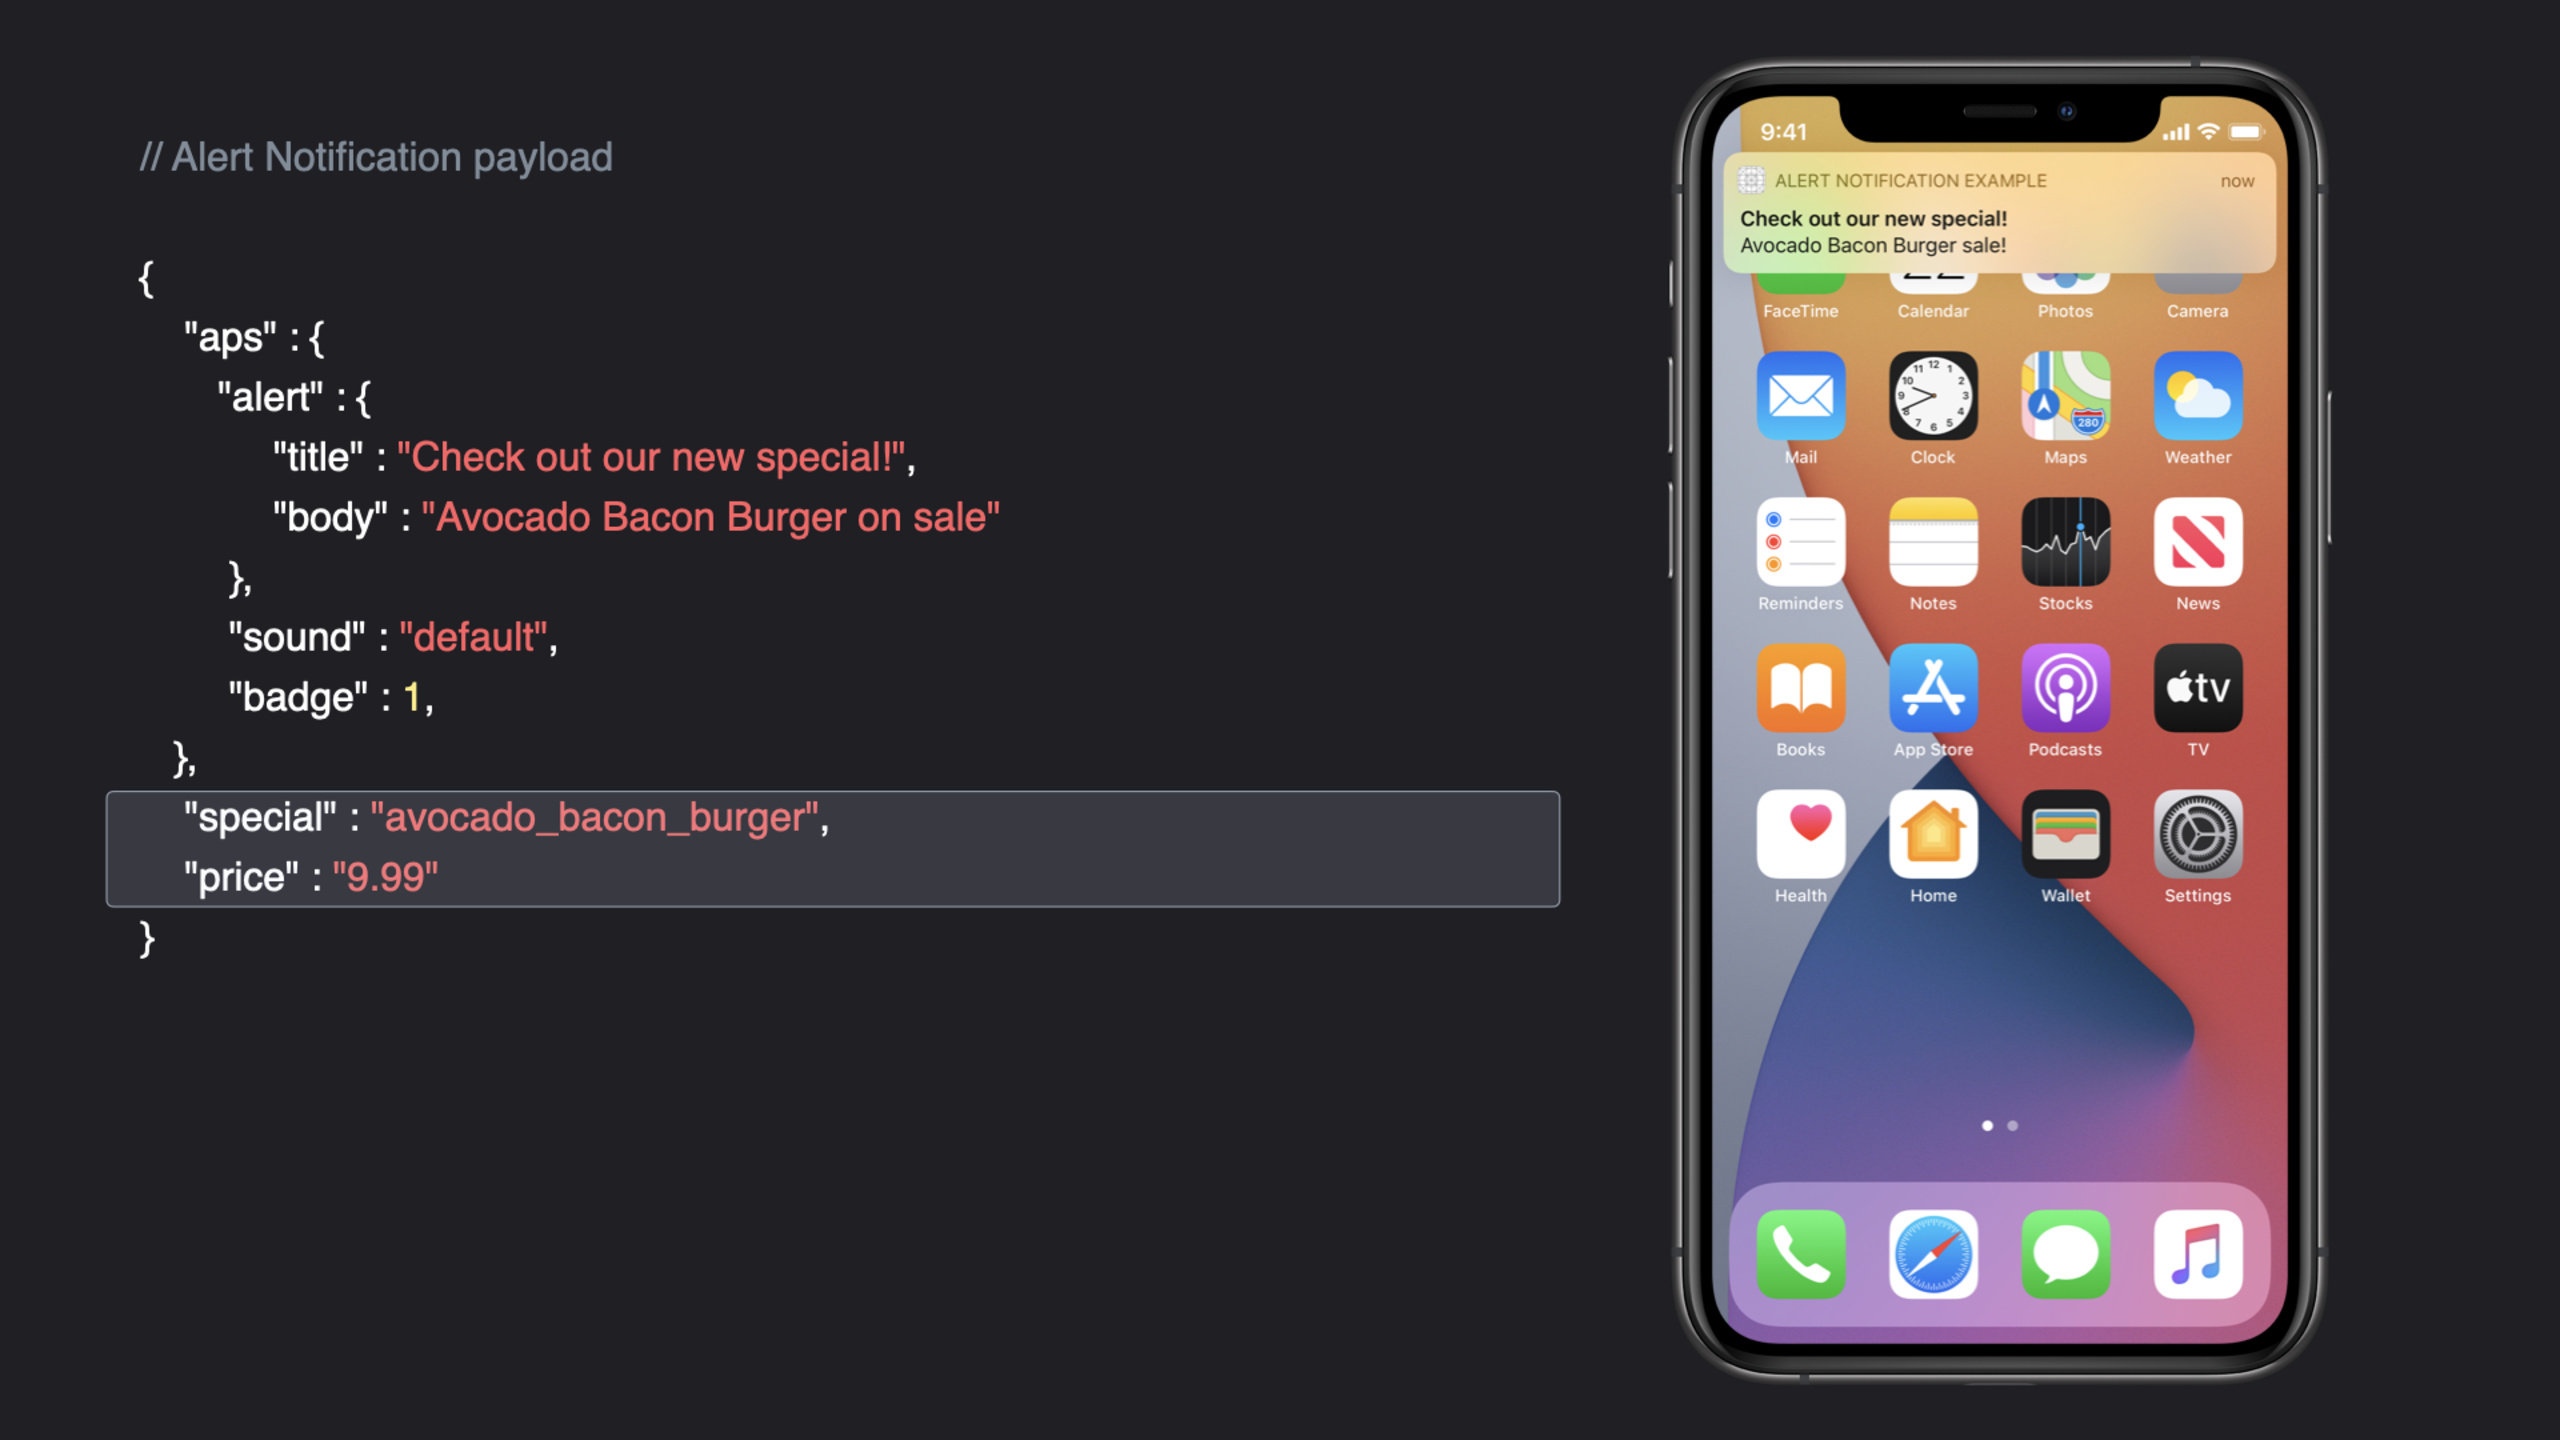
(04:43)provider server 发给 APNs 的 payload 分两层。aps 字典告诉系统如何展示通知;业务字段放在 aps 外,应用在用户点开通知后读取。
{
    "aps" : {
       "alert" : {
            "title" : "Check out our new special!",
            "body" : "Avocado Bacon Burger on sale"
        },
        "sound" : "default",
        "badge" : 1,
   },
    "special" : "avocado_bacon_burger",
    "price" : "9.99"
}
关键点:
aps是系统识别的通知字典。alert.title是短标题。alert.body是完整提示文本。sound使用"default"时播放默认声音。badge是应用图标角标的绝对值。special和price是应用自己的业务数据。
(06:11)当用户打开 alert notification,UNUserNotificationCenterDelegate 的 didReceive response 会被调用。示例从 userInfo 里取出业务字段,把餐厅特价商品加入购物车,再打开购物车界面。
func userNotificationCenter(_ center: UNUserNotificationCenter,
                            didReceive response: UNNotificationResponse,
                            withCompletionHandler completionHandler: @escaping () -> Void) {
    let userInfo = response.notification.request.content.userInfo
    guard let specialName = userInfo["special"] as? String,
          let specialPriceString = userInfo["price"] as? String,
          let specialPrice = Float(specialPriceString) else {
        // Always call the completion handler when done.
        completionHandler()
        return
    }

    let item = Item(name: specialName, price: specialPrice)
    addItemToCart(item)
    showCartViewController()
    completionHandler()
}
关键点:
response.notification.request.content.userInfo取出完整 payload。guard校验自定义字段是否存在、格式是否正确。- 数据不符合预期时也要调用
completionHandler()。 Item(name:price:)把 payload 转成应用内模型。showCartViewController()打开和通知相关的界面。- 成功路径最后也要调用
completionHandler()。
用 background push 预更新数据
(08:16)background notification 也要注册远程通知并拿到 device token,但不需要设置 UNUserNotificationCenterDelegate。session 给出的原因很直接:这个 delegate 只处理 alert notification 的交互。
class AppDelegate: UIResponder, UIApplicationDelegate {

    func application(_ application: UIApplication,
                     didFinishLaunchingWithOptions launchOptions: [UIApplication.LaunchOptionsKey: Any]?) -> Bool {
       UIApplication.shared.registerForRemoteNotifications()
       return true
    }
}
关键点:
- background push 仍然使用 APNs 的 device token。
registerForRemoteNotifications()仍然是入口。- 没有 alert 交互时,不需要把 AppDelegate 设为通知中心 delegate。
(09:05)background notification 的 payload 更小。aps.content-available 是关键字段,它告诉系统这条通知用于后台更新。
{
    "aps" : {
       "content-available" : 1
    },
    "myCustomKey" : "myCustomData"
}
关键点:
content-available放在aps字典里。- 值为
1时,系统会把它当作后台通知。 myCustomKey代表应用自己的数据。- background payload 不需要
alert字典。
(09:33)设备收到远程通知后,应用可以在 didReceiveRemoteNotification 里执行后台更新。示例为餐厅应用下载当天菜单,并用 UIBackgroundFetchResult 告诉系统结果。
func application(_ application: UIApplication,
                     didReceiveRemoteNotification userInfo: [AnyHashable : Any],
                     fetchCompletionHandler completionHandler:
                     @escaping (UIBackgroundFetchResult) -> Void) {
    guard let url = URL(string: "www.example.com/todays-menu") else {
        completionHandler(.failed)
        return
    }

    let task = URLSession.shared.dataTask(with: url) { data, response, error in
        guard let data = data else {
            completionHandler(.noData)
            return
        }

        updateMenu(withData: data)
        completionHandler(.newData)
    }
}
关键点:
userInfo包含后台通知 payload。fetchCompletionHandler的参数是UIBackgroundFetchResult。- URL 创建失败时返回
.failed。 - 没有拿到数据时返回
.noData。 - 更新菜单成功后返回
.newData。 - 系统会用这些结果决定以后什么时候再给应用后台运行时间。
核心启发
限时优惠直达购买页
做什么:给餐厅、电商或票务应用做一条 alert push,用户点开后直接进入对应商品或订单页面。
为什么值得做:session 的餐厅示例展示了 aps.alert 负责通知展示,special 和 price 负责业务跳转所需的数据。
怎么开始:注册远程通知,拿到 device token 后发给 provider server;服务端发送包含业务字段的 payload;客户端在 userNotificationCenter(_:didReceive:withCompletionHandler:) 里解析 userInfo 并打开目标页面。
打开 App 前预取最新内容
做什么:新闻、菜单、库存或行程应用收到后台推送后先拉取最新数据,让用户打开时看到新内容。
为什么值得做:background notification 会在应用不在前台时给一段运行时间,适合处理需要保持新鲜的数据。
怎么开始:服务端发送包含 aps.content-available = 1 的 payload;客户端实现 application(_:didReceiveRemoteNotification:fetchCompletionHandler:),用 URLSession 拉取数据,完成后返回 .newData、.noData 或 .failed。
设备 token 健康检查
做什么:做一个后台诊断面板,记录每台设备最近一次注册 APNs 的时间、token 上传结果和失败原因。
为什么值得做:session 把 device token 作为推送链路的关键标识。注册失败或 token 没有同步到 provider server,后续 payload 再正确也无法送达目标设备。
怎么开始:在 didRegisterForRemoteNotificationsWithDeviceToken 上传 token;在 didFailToRegisterForRemoteNotificationsWithError 记录错误;服务端保存 token、用户、设备和更新时间,方便排查投递问题。
按场景拆分 alert push 与 background push
做什么:为同一类业务事件建立两套推送策略:需要用户马上处理的事件用 alert push,只需更新本地数据的事件用 background push。
为什么值得做:session 明确区分了两种通知。Alert notification 会显示可交互提醒;background notification 用来刷新内容,并受系统后台运行策略约束。
怎么开始:为 provider server 增加事件类型字段;生成 payload 时决定写入 aps.alert 还是 aps.content-available;客户端分别实现 alert 点击处理和 background fetch 处理。
关联 Session
- Build local push connectivity for restricted networks — 把推送通知扩展到没有互联网连接的受限网络,适合继续理解本地服务器到设备的通知链路。
- Streamline your App Clip — 讲解 App Clip notification、位置确认和轻量交易流程,展示通知在即时体验里的使用方式。
- Keep your complications up to date — 介绍 watchOS complication 的后台刷新、URLSession 和 well-timed push notifications。
- Boost performance and security with modern networking — 补充推送服务端和客户端网络请求相关的现代协议、安全性和能耗基础。
评论
GitHub Issues · utterances