
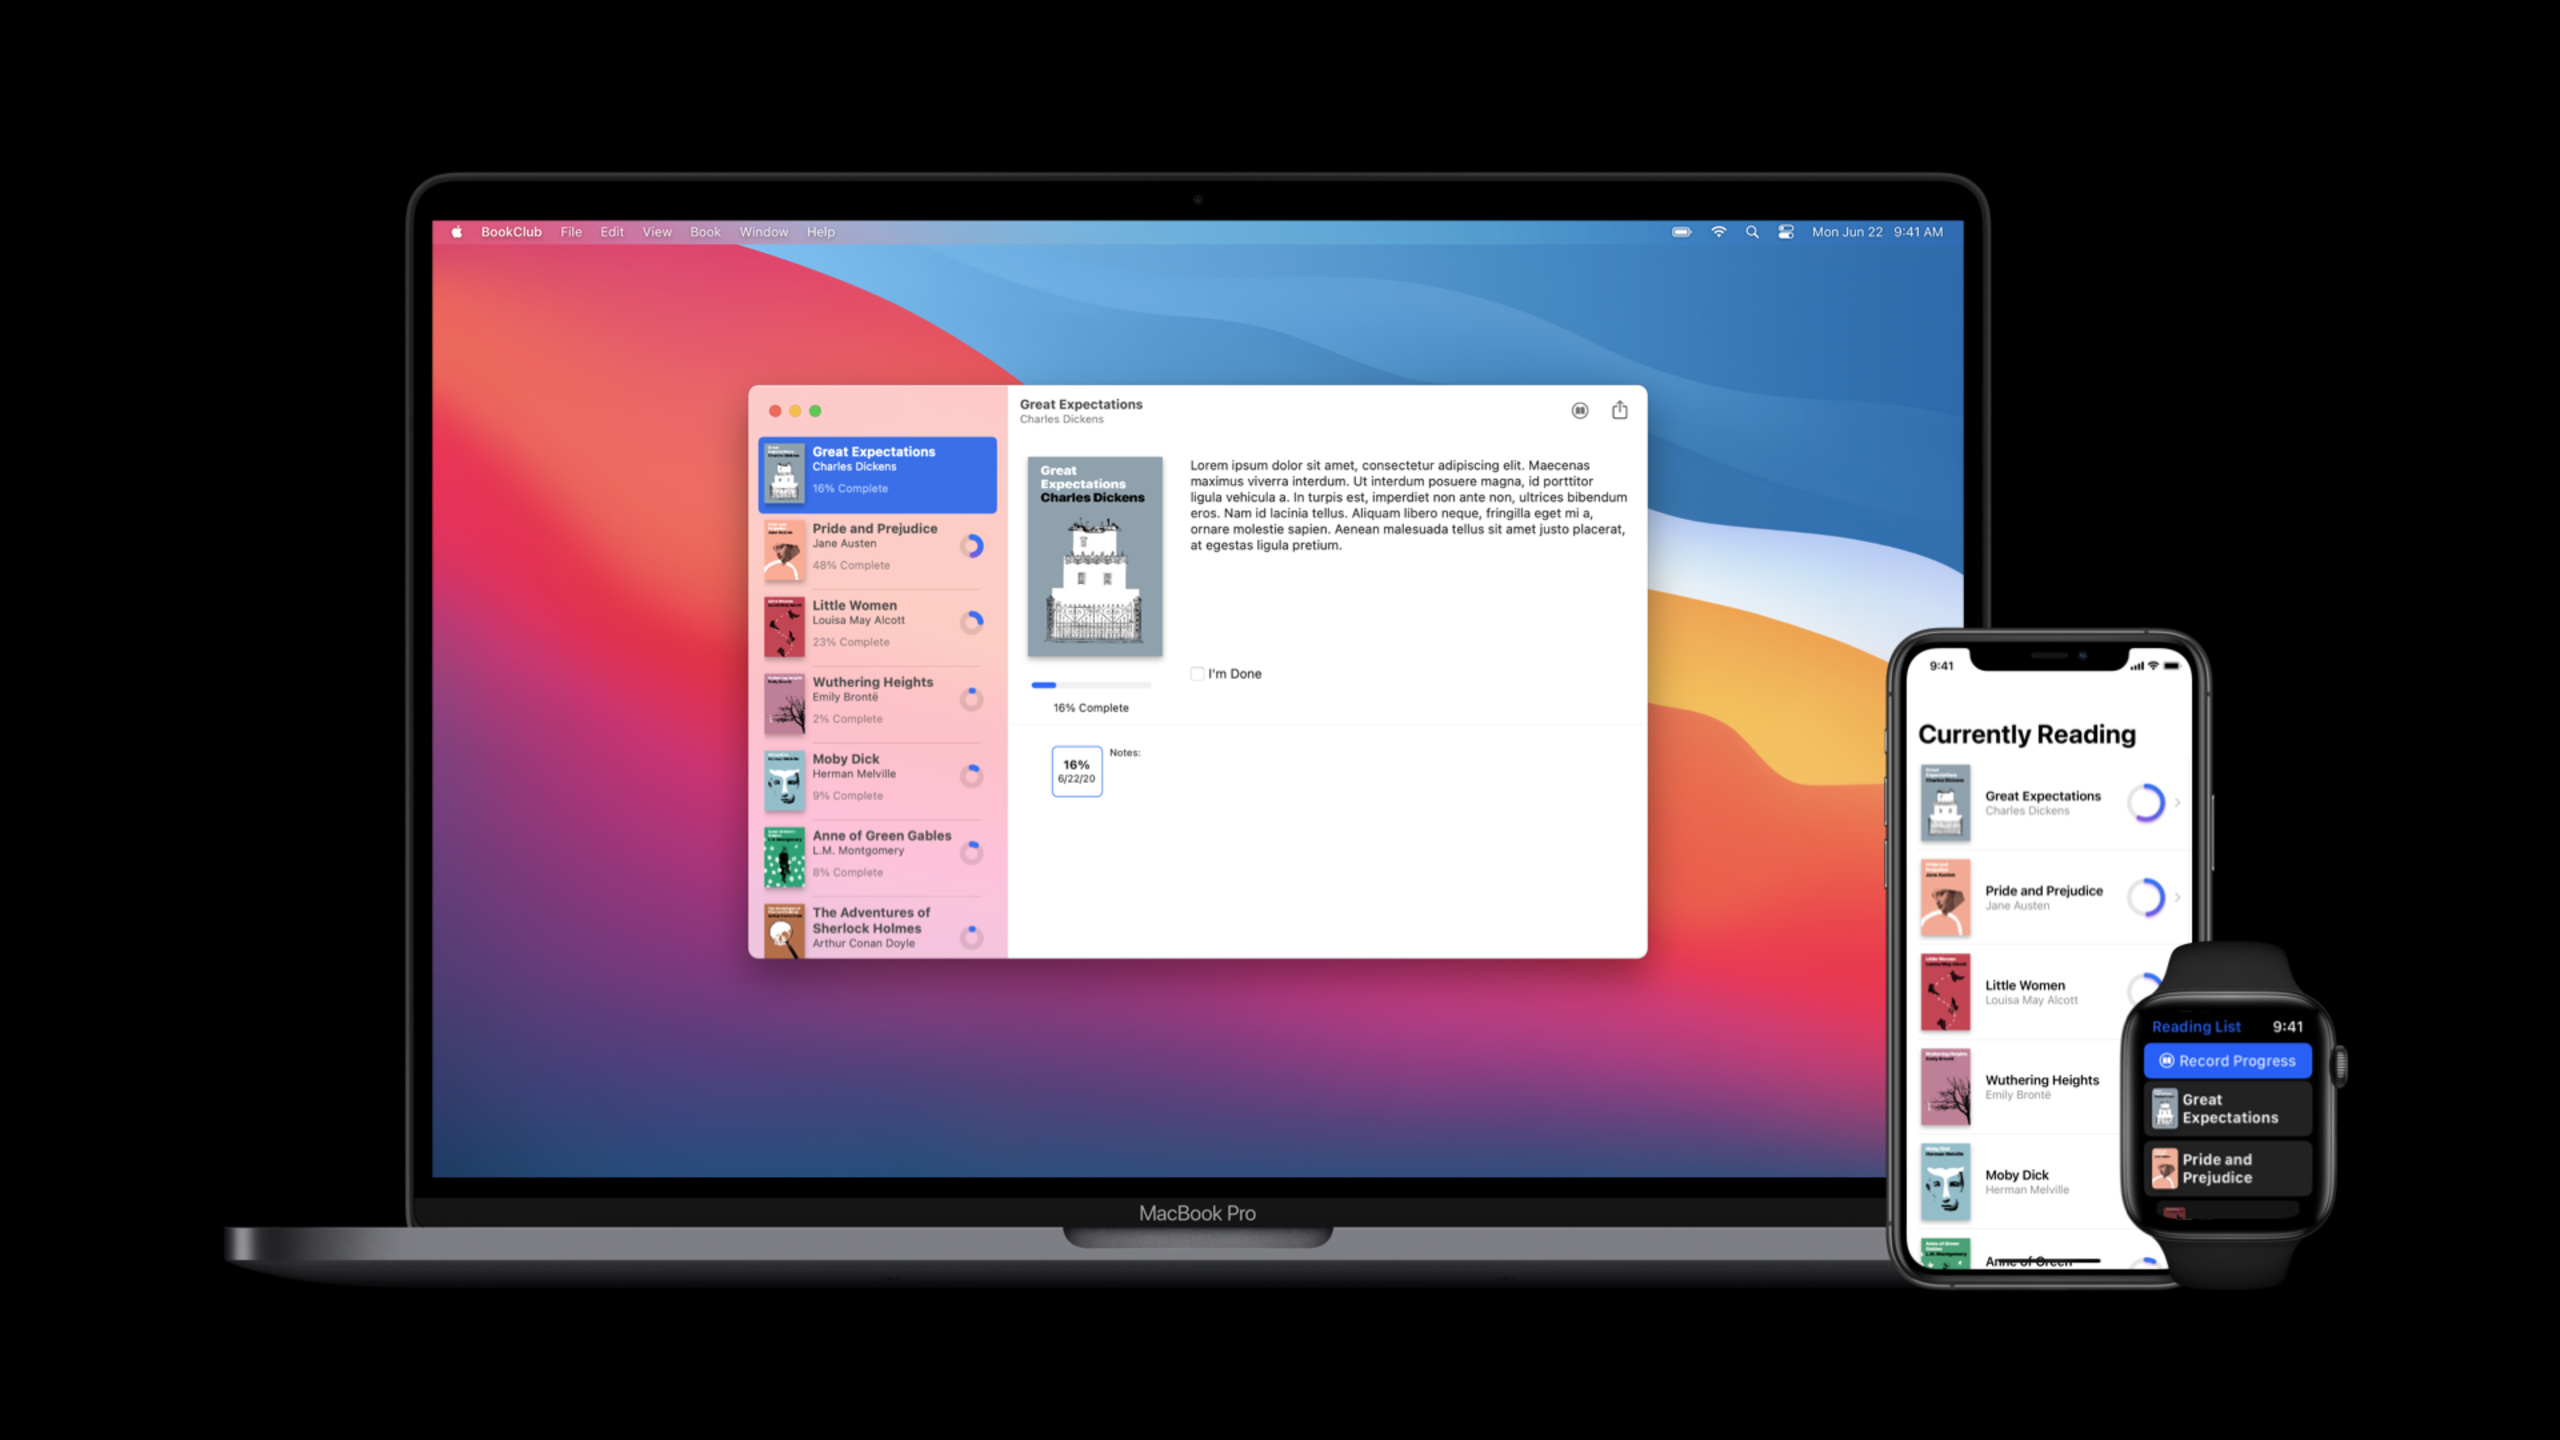
Highlight
SwiftUI 2020 新增
App、Scene、WindowGroup、SceneStorage、DocumentGroup、Settings和Commands,让应用入口、多窗口、状态恢复、文档窗口、偏好设置和菜单命令都能用声明式代码组织。
核心内容
(00:35)SwiftUI 第一年的重点是 View。开发者可以用声明式语法组合文本、图片、列表和导航,但一个完整 App 还要面对入口、窗口、平台生命周期、菜单、偏好设置和文档管理。这个 session 的切入点就是补上 View 外面的层级:App 拥有 Scene,Scene 承载 View,平台决定 Scene 如何显示。
(03:57)App 协议把入口写成一个带 @main 的类型。这个入口的 body 返回 Scene,Scene 再承载 View。最常见的 Scene 是 WindowGroup,它把同一份界面定义交给系统,让 iPadOS 和 macOS 可以按平台规则创建窗口、标签页和新实例。
(07:48)多窗口带来的第一个实际问题是状态边界。BookClub 示例里,每个窗口选择的书都不同;修改一个窗口的选择,不会影响其他窗口。共享数据模型放在 App 层,窗口里的 View 状态保持独立,这就是 SwiftUI Scene 架构要表达的核心。
(12:08)当平台负责创建和销毁 Scene 时,开发者还需要恢复每个窗口的局部状态。SceneStorage 用一个唯一 key 保存 View 状态,SwiftUI 会在合适的时机自动保存和恢复。后半段还给出三个扩展方向:DocumentGroup 管文档窗口,Settings 管 macOS 偏好设置,commands modifier 管菜单命令。
详细内容
App、Scene 和 View 的层级
(03:57)示例 App 只有一个入口类型。BookClubApp 符合 App 协议,body 返回 WindowGroup,WindowGroup 再创建 ReadingListViewer。
@main
struct BookClubApp: App {
    @StateObject private var store = ReadingListStore()

    var body: some Scene {
        WindowGroup {
            ReadingListViewer(store: store)
        }
    }
}

struct ReadingListViewer: View {
    @ObservedObject var store: ReadingListStore

    var body: some View {
        NavigationView {
            List(store.books) { book in
                Text(book.title)
            }
            .navigationTitle("Currently Reading")
        }
    }
}

class ReadingListStore: ObservableObject {
    init() {}

    var books = [
        Book(title: "Book #1", author: "Author #1"),
        Book(title: "Book #2", author: "Author #2"),
        Book(title: "Book #3", author: "Author #3")
    ]
}

struct Book: Identifiable {
    let id = UUID()
    let title: String
    let author: String
}
关键点:
@main让BookClubApp成为程序入口,session 明确提到这是 Swift 5.3 的新属性。BookClubApp的body返回some Scene,因为 App 的内容由 Scene 组成。WindowGroup是主界面的 Scene 定义,系统会按平台能力创建窗口或标签页。@StateObject在 App 层拥有ReadingListStore,ReadingListViewer通过@ObservedObject使用这份模型。.navigationTitle("Currently Reading")不只显示导航栏标题;session 演示它还会影响 App Switcher 和 macOS 窗口标题。
WindowGroup 的多窗口状态
(10:21)WindowGroup 的视图定义可以被平台实例化多次。macOS 和 iPadOS 上,用户通过菜单项、快捷键或多任务手势创建新窗口时,每个 Scene 都有自己的 View 状态。
@main
struct BookClubApp: App {
    @StateObject private var store = ReadingListStore()

    var body: some Scene {
        WindowGroup {
            ReadingListViewer(store: store)
        }
    }
}

struct ReadingListViewer: View {
    @ObservedObject var store: ReadingListStore

    var body: some View {
        NavigationView {
            List(store.books) { book in
                Text(book.title)
            }
            .navigationTitle("Currently Reading")
        }
    }
}

class ReadingListStore: ObservableObject {
    init() {}

    var books = [
        Book(title: "Book #1", author: "Author #1"),
        Book(title: "Book #2", author: "Author #2"),
        Book(title: "Book #3", author: "Author #3")
    ]
}

struct Book: Identifiable {
    let id = UUID()
    let title: String
    let author: String
}
关键点:
store是共享模型,每个窗口都能读取同一份书单。ReadingListViewer是窗口内容的模板,平台需要新窗口时会创建新的 Scene 实例。- View 状态属于各自的 Scene,session 用“不同窗口选中不同书”演示了这个边界。
WindowGroup在 macOS 上会提供 File 菜单里的新建窗口入口,并支持标准 Command-N 快捷键。
SceneStorage 恢复每个窗口的选择
(12:07)平台管理 Scene 生命周期后,本地 View 状态需要恢复机制。示例把选中的书保存为字符串,再转换成 Binding<UUID?> 交给 NavigationLink。
@main
struct BookClubApp: App {
    @StateObject private var store = ReadingListStore()

    var body: some Scene {
        WindowGroup {
            ReadingListViewer(store: store)
        }
    }
}

struct ReadingListViewer: View {
    @ObservedObject var store: ReadingListStore
    @SceneStorage("selectedItem") private var selectedItem: String?

    var selectedID: Binding<UUID?> {
        Binding<UUID?>(
            get: { selectedItem.flatMap { UUID(uuidString: $0) } },
            set: { selectedItem = $0?.uuidString }
        )
    }

    var body: some View {
        NavigationView {
            List(store.books) { book in
                NavigationLink(
                    destination: Text(book.title),
                    tag: book.id,
                    selection: selectedID
                ) {
                    Text(book.title)
                }
            }
            .navigationTitle("Currently Reading")
        }
    }
}

class ReadingListStore: ObservableObject {
    init() {}

    var books = [
        Book(title: "Book #1", author: "Author #1"),
        Book(title: "Book #2", author: "Author #2"),
        Book(title: "Book #3", author: "Author #3")
    ]
}

struct Book: Identifiable {
    let id = UUID()
    let title: String
    let author: String
}
关键点:
@SceneStorage("selectedItem")用唯一 key 标识要保存的状态。selectedItem存字符串,因为 SceneStorage 保存的是可恢复的简单值。selectedID把字符串转换为UUID,再包装成Binding。NavigationLink使用tag和selection绑定选中项,恢复后能回到对应书籍。- SwiftUI 负责在合适时机保存和恢复这个状态,开发者不用手写窗口生命周期逻辑。
DocumentGroup 处理文档窗口
(12:59)文档类 App 可以把根 Scene 换成 DocumentGroup。它负责打开、编辑和保存文档 Scene,示例用 ShapeDocument 展示 FileDocument 的读写入口。
import SwiftUI
import UniformTypeIdentifiers

@main
struct ShapeEditApp: App {
    var body: some Scene {
        DocumentGroup(newDocument: ShapeDocument()) { file in
            DocumentView(document: file.$document)
        }
    }
}

struct DocumentView: View {
    @Binding var document: ShapeDocument

    var body: some View {
        Text(document.title)
            .frame(width: 300, height: 200)
    }
}

struct ShapeDocument: Codable {
    var title: String = "Untitled"
}

extension UTType {
    static let shapeEditDocument =
        UTType(exportedAs: "com.example.ShapeEdit.shapes")
}

extension ShapeDocument: FileDocument {
    static var readableContentTypes: [UTType] { [.shapeEditDocument] }

    init(fileWrapper: FileWrapper, contentType: UTType) throws {
        let data = fileWrapper.regularFileContents!
        self = try JSONDecoder().decode(Self.self, from: data)
    }

    func write(to fileWrapper: inout FileWrapper, contentType: UTType) throws {
        let data = try JSONEncoder().encode(self)
        fileWrapper = FileWrapper(regularFileWithContents: data)
    }
}
关键点:
DocumentGroup(newDocument:)定义新文档的默认值。file.$document给DocumentView一个文档绑定,界面可以直接编辑文档内容。ShapeDocument符合Codable,示例用JSONDecoder和JSONEncoder完成读写。UTType(exportedAs:)声明自定义文档类型。FileDocument的readableContentTypes、初始化方法和write方法构成文档读写边界。
Settings 和 Commands 补齐桌面 App 体验
(13:27)macOS 常见的偏好设置窗口可以写成 Settings Scene。session 说明它会自动设置 Preferences 命令,并给窗口正确的样式。
@main
struct BookClubApp: App {
    @StateObject private var store = ReadingListStore()

    @SceneBuilder var body: some Scene {
        WindowGroup {
            ReadingListViewer(store: store)
        }

    #if os(macOS)
        Settings {
            BookClubSettingsView()
        }
    #endif
    }
}

struct BookClubSettingsView: View {
    var body: some View {
        Text("Add your settings UI here.")
            .padding()
    }
}
关键点:
@SceneBuilder让 App 的body同时声明多个 Scene。WindowGroup仍然是主界面。Settings只在 macOS 分支下出现。BookClubSettingsView是偏好设置窗口的内容。
(14:07)菜单命令使用 Commands 类型封装,再通过 commands modifier 加到 Scene 上。示例里的命令会根据当前焦点启用或禁用。
struct BookCommands: Commands {
    @FocusedBinding(\.selectedBook) private var selectedBook: Book?

    var body: some Commands {
        CommandMenu("Book") {
            Section {
                Button("Update Progress...", action: updateProgress)
                    .keyboardShortcut("u")
                Button("Mark Completed", action: markCompleted)
                    .keyboardShortcut("C")
            }
            .disabled(selectedBook == nil)
        }
    }

    private func updateProgress() {
        selectedBook?.updateProgress()
    }
    private func markCompleted() {
        selectedBook?.markCompleted()
    }
}
关键点:
BookCommands符合Commands,菜单逻辑可以独立成类型。CommandMenu("Book")创建一个自定义菜单。Button可以绑定 action 和键盘快捷键。.disabled(selectedBook == nil)根据焦点状态禁用整组命令。@FocusedBinding(\.selectedBook)让命令面向当前用户焦点,session 将它类比为 AppKit 或 UIKit 的 responder chain。
核心启发
-
做什么:把 SwiftUI App 的入口改成
@main+App协议。 为什么值得做:session 展示的BookClubApp用一个类型同时声明入口、共享模型和主 Scene,启动代码更贴近界面结构。 怎么开始:先创建struct YourApp: App,在body里放WindowGroup,把原来第一屏 View 作为WindowGroup的内容。 -
做什么:给 iPadOS 和 macOS 用户增加多窗口能力。 为什么值得做:
WindowGroup会按平台规则创建多个窗口或标签页,BookClub 示例证明每个窗口可以保留独立选择状态。 怎么开始:把主界面放进WindowGroup,共享数据放在 App 层的@StateObject,窗口内选择、滚动或导航状态留在 View 层。 -
做什么:用
SceneStorage恢复每个窗口的局部状态。 为什么值得做:session 明确说 Scene 生命周期由平台管理,SceneStorage用 key 自动保存和恢复 View 状态。 怎么开始:为需要恢复的简单值加@SceneStorage("key"),必要时像示例一样在字符串和业务 ID 之间做绑定转换。 -
做什么:为文档类工具改用
DocumentGroup。 为什么值得做:ShapeEdit 示例把文档创建、打开、编辑和保存放进 Scene 定义,文档读写集中到FileDocument。 怎么开始:定义一个符合FileDocument的文档类型,声明UTType,再用DocumentGroup(newDocument:)创建根 Scene。 -
做什么:给 macOS 版本补上偏好设置窗口和菜单命令。 为什么值得做:session 里的
Settings和Commands让偏好设置、菜单项、快捷键和焦点状态都沿用 SwiftUI 的声明式模型。 怎么开始:在@SceneBuilder里加SettingsScene,再创建符合Commands的类型,用CommandMenu和@FocusedBinding组织命令。
关联 Session
- Introduction to SwiftUI — 先理解 SwiftUI 的声明式 View 模型,再阅读本 session 的 App、Scene 和 WindowGroup 层级。
- Build document-based apps in SwiftUI — 深入
DocumentGroup、FileDocument和文档管理,衔接本 session 的 ShapeEdit 示例。 - Data Essentials in SwiftUI — 继续学习
@State、@Binding和ObservableObject,补齐 App、Scene、View 之间的数据传递。 - What’s new in SwiftUI — 从 2020 年 SwiftUI 全局更新看 app、scene、widget、complication 等新增能力。
评论
GitHub Issues · utterances